
.svg)
Exciting New Feature: Notion Integration for Blameless Retrospectives!
Blameless is excited to introduce a powerful new integration with Notion, designed to enhance your incident management retrospectives and collaboration. This update brings seamless connectivity between Blameless and Notion, enabling teams to leverage Notion's organizational and documentation capabilities directly within the Blameless platform.
Key Features:
- Automated Documentation: Automatically create and manage incident reports in Notion, reducing manual work and ensuring consistent, thorough documentation.
- Enhanced Collaboration: Link your Blameless incidents with Notion pages to centralize information and improve collaboration across teams.
- Custom Templates: Use customizable Blameless Analysis templates and Retrospective Tab templates tailored to your incident management needs, ensuring that all critical information is captured and exported to your newly created Notion document.
Why This Matters:
This integration allows teams to streamline their incident response processes by leveraging Notion's powerful documentation tools directly within Blameless. By automating the creation and management of incident reports, teams can focus more on resolving issues and less on administrative tasks. The ability to customize templates ensures that your incident documentation is both comprehensive and aligned with your organization's standards.
Solving Common Challenges:
Managing incident documentation and collaboration can be time-consuming and prone to errors. The Notion integration automates these tasks, ensuring consistency and accuracy while also improving cross-team collaboration by centralizing all relevant information in one place.
What Our Customers Are Saying:
"The Notion integration with Blameless has been a game-changer for our incident management process. We can now focus on resolving incidents faster, knowing that the documentation is being handled automatically and efficiently in a familiar location to the entire organization." - Engineering Manager
"Being able to customize our incident templates in Blameless, and export them directly into Notion has allowed us to ensure that our incident reports meet our organizational standards every time." - SRE Team Lead
Use Case:
For teams dealing with complex incidents that require thorough documentation and collaboration across multiple stakeholders, this integration is invaluable. It helps streamline the process by automating documentation, reducing errors, and centralizing information, making it easier to track, review, and improve incident management practices.
If you would like a more detailed look at how to get started with the Blameless-Notion integration, refer to our technical documentation.
Explore this new feature today and see how the Blameless-Notion integration can elevate your incident management practices!
Getting Started:
We're excited to announce the latest updates to Blameless, designed to enhance your incident management experience and improve team efficiency. Here’s what’s new:

📝 Feature 1: Multiple Retrospective Templates in the Retrospective Tab Editor
- ❓What it is: You can now create multiple retrospective templates in the Blameless Retrospective Tabs section, allowing different templates for different teams and incident types.
- 👐 Value Proposition: Tailor your retrospectives to fit the unique needs of each team or incident type, ensuring more relevant and insightful post-incident reviews.
- ⚙️ Problem Solved: One-size-fits-all retrospectives often miss critical nuances. This feature ensures each team gets a customized approach, avoiding excessive noise and irrelevant questions.
- 🤝 Use Case: A large enterprise with multiple development teams can create specific retrospective templates for each team. For example, the database team can focus on schema changes and query optimization issues, while the front-end team can concentrate on UI/UX challenges and browser compatibility issues.
- 💬 Customer Quote:
"Having the flexibility to create different retrospective templates has transformed our post-incident analysis, making it more focused and actionable. Our template in security is completely different from the rest of the company. The addition of multiple tabs in the Retrospective have allowed us to expand our usage of Blameless." - Security Incidents Manager
- 👟 How to Get Started: Head over to your Settings section in Blameless. Under Retrospective Preferences, you will see the Retrospective Tabs section. Here, you are now free to create your first new template!
🎉 Feature 2: Microsoft Teams Creation Process Upgrade
- ❓What it is: The incident creation process in Microsoft Teams has been upgraded from using an Adaptive Card to a Dialog (pop open modal), significantly reducing noise in the channel.
- 👐 Value Proposition: Streamline incident creation while keeping channels clean and focused, reducing distractions for your team not involved in Blameless directly.
- ⚙️ Problem Solved: Adaptive Cards can clutter the channel and distract team members. Dialogs keep the interface clean and efficient, unlocking other cool features customers have asked about.
- 🤝 Use Case: During a high-severity incident, the incident response team can quickly create incidents without cluttering the main communication channel. This ensures important updates and communications remain visible, and the incident creation process does not become a distraction.
- 💬 Customer Quote:
"Switching to a Dialog for incident creation has decluttered our channels to avoid confusion amongst users that are not directly interacting with Blameless at that time." - Site Reliability Engineer, Payments Product
- 👟 How to Get Started: This new update is automatically available for you and your team to use now!
🏷️ Feature 3: Tags (Custom Fields) & Service Dropdown Control in Microsoft Teams
- ❓What it is: You can now add tags (custom fields) on the incident creation dialog, and Microsoft Teams users can remove the Services dropdown for PagerDuty, OpsGenie, or Servicenow if desired.
- 👐 Value Proposition: Enhance the specificity of incident reporting with custom fields and simplify the incident creation process by removing unnecessary options.
- ⚙️ Problem Solved: Standard fields often don’t capture all the necessary details. Custom fields allow for more precise and useful data collection.
- 🤝 Use Case 1: A support team handling various types of incidents can add tags (custom fields) such as “Customer Impact Level” or “Affected Components” to better categorize and prioritize incidents.
- 🤝 Use Case 2: Removing the Services dropdown can simplify the form for teams that do not use that field, making the process faster and more efficient.
- 💬 Customer Quote:
"The ability to add custom fields and customize the incident ingestion form has made our reporting much more effective, as well as enhancing our ability to route to the right teams as soon as the problem is reported.." - Incident Manager, Major Incident Management
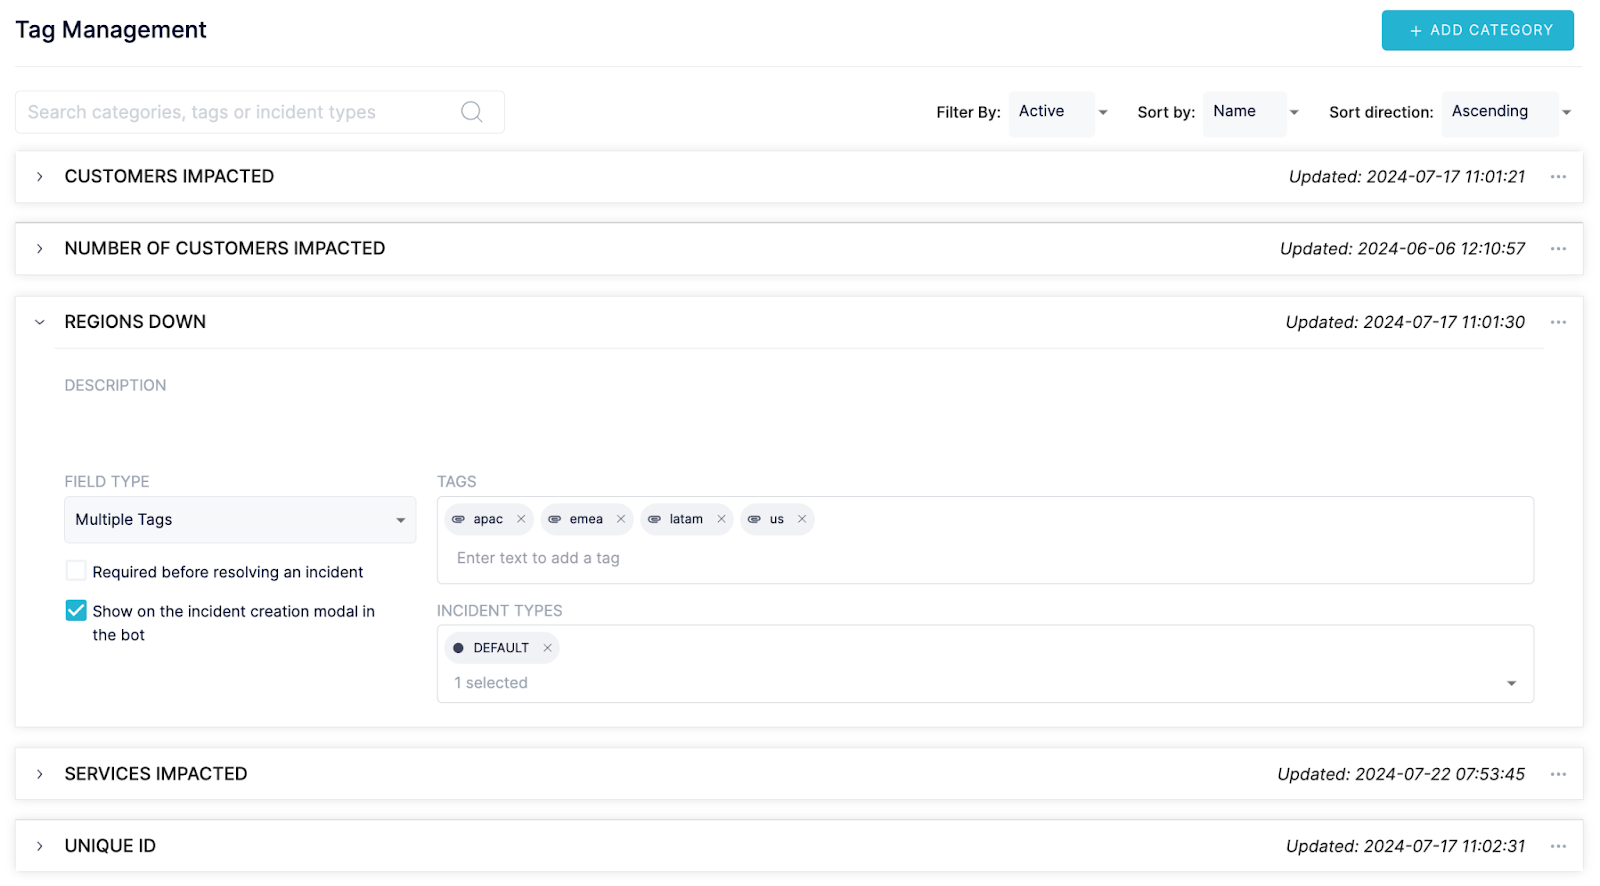
- 👟 How to Get Started: Head over to your Settings section in Blameless. You will see the section called Tag Management. Under a Tag Category, you will see the option to Show on the incident creation modal in the bot. This will add this Tag Category on your incident creation dialog in Microsoft Teams (also available in Slack). If you would like to remove the Services dropdown, please reach out to your Customer Success Manager for assistance.
📅 Feature 4: WorkFlows Reminders
- ❓What it is: Trigger automated Blameless WorkFlows based on a schedule or lack of activity in an incident.
- 👐 Value Proposition: Ensure critical workflows are executed timely and no incidents fall through the cracks, improving overall incident management efficiency.
- ⚙️ Problem Solved: Teams need to follow up with incident responders to make sure tasks are being completed, follow-up actions are taken care of, and incident progress continues towards resolution. WorkFlow reminders allow you to set up automated workflows that can follow up with the team on your behalf and escalate or route accordingly.
- 🤝 Use Case: In a scenario where an incident is ongoing and there has been no activity for a defined period, WorkFlows Reminders can automatically trigger a follow-up workflow to ensure that the incident does not stall. This could include reassigning tasks, escalating the incident, or prompting for status updates to keep the resolution process on track.
- 💬 Customer Quote:
"WorkFlows Reminders have been a game-changer, ensuring we never miss a crucial step during incident management." - DevOps Engineer
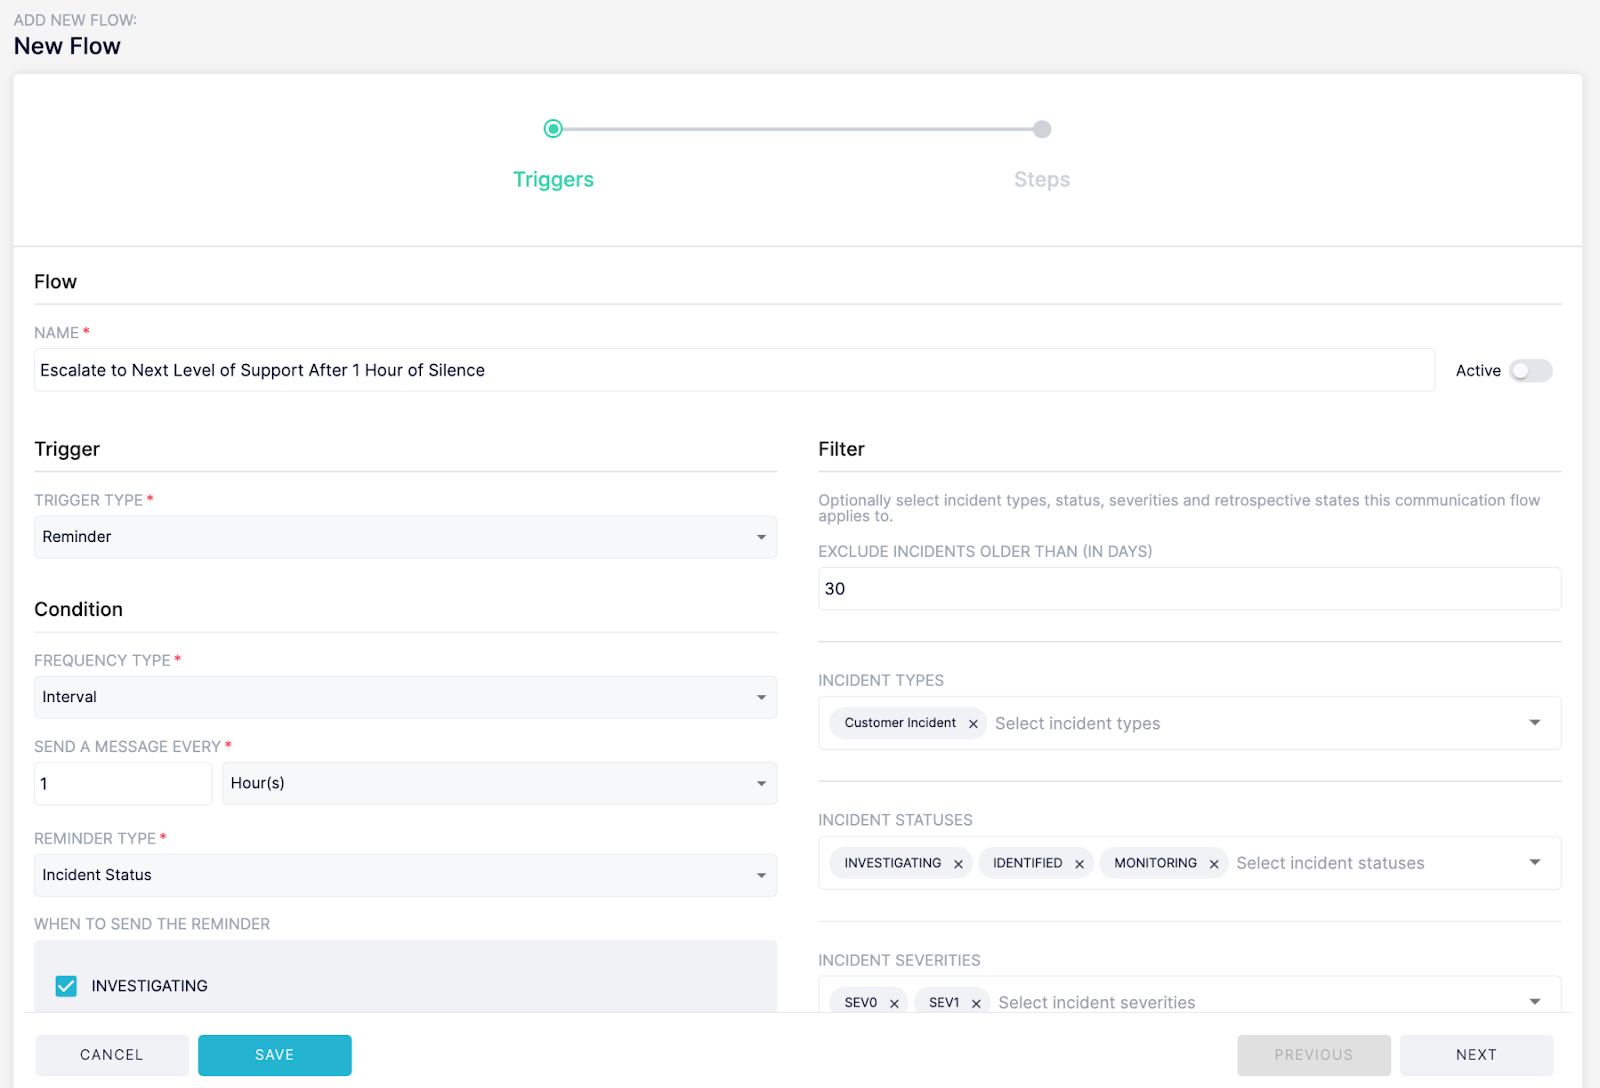
- 👟 How to Get Started: Head over to WorkFlows in Blameless. As you are creating a new WorkFlow, you will see the option to add a TRIGGER TYPE. A Blameless Event is a trigger based on something changing in an incident or retrospective and a Reminder is a trigger based on lack of activity in an incident or retrospective.
These new features are designed to help you manage incidents more effectively, with a focus on customization, efficiency, and automation. Upgrade now and experience a more streamlined and powerful incident management process with Blameless!
Getting Started:
📝 Feature 1: Multiple Retrospective Templates in the Retrospective Tab Editor
🎉 Feature 2: Microsoft Teams Creation Process Upgrade & 🏷️ Feature 3: Tags (Custom Fields) & Service Dropdown Control in Microsoft Teams
📅 Feature 4: WorkFlows Reminders
In this update, Blameless introduces rich text paragraphs in custom retrospective configurations, enabling enhanced formatting, tables, and links for more effective retrospectives. Additionally, the collaborative text editor in the Analysis section now supports inline commenting, version history, advanced formatting, image insertion, and real-time editing. These features enhance clarity, collaboration, and efficiency in incident management retrospectives, helping teams document, analyze, and learn from incidents more effectively. Customers are already leveraging these improvements to streamline their processes and drive better outcomes.
New Features
Custom Retrospective Configuration - Rich Text Paragraphs
Description: You can now utilize rich text paragraphs in your custom retrospective configuration. This feature allows you to incorporate formatting options, tables, links to external sources, and more. You can find this feature available in the Custom Tab settings under Retrospective Preferences.
Value Proposition: Enhance the clarity and effectiveness of your retrospectives by organizing information in a more readable and engaging way.
Customer Quote:
"The rich text paragraphs have transformed our retrospectives. We can now include detailed tables and links, making it easier to track change events and reference key documents."
Analysis Section of Blameless Retrospective
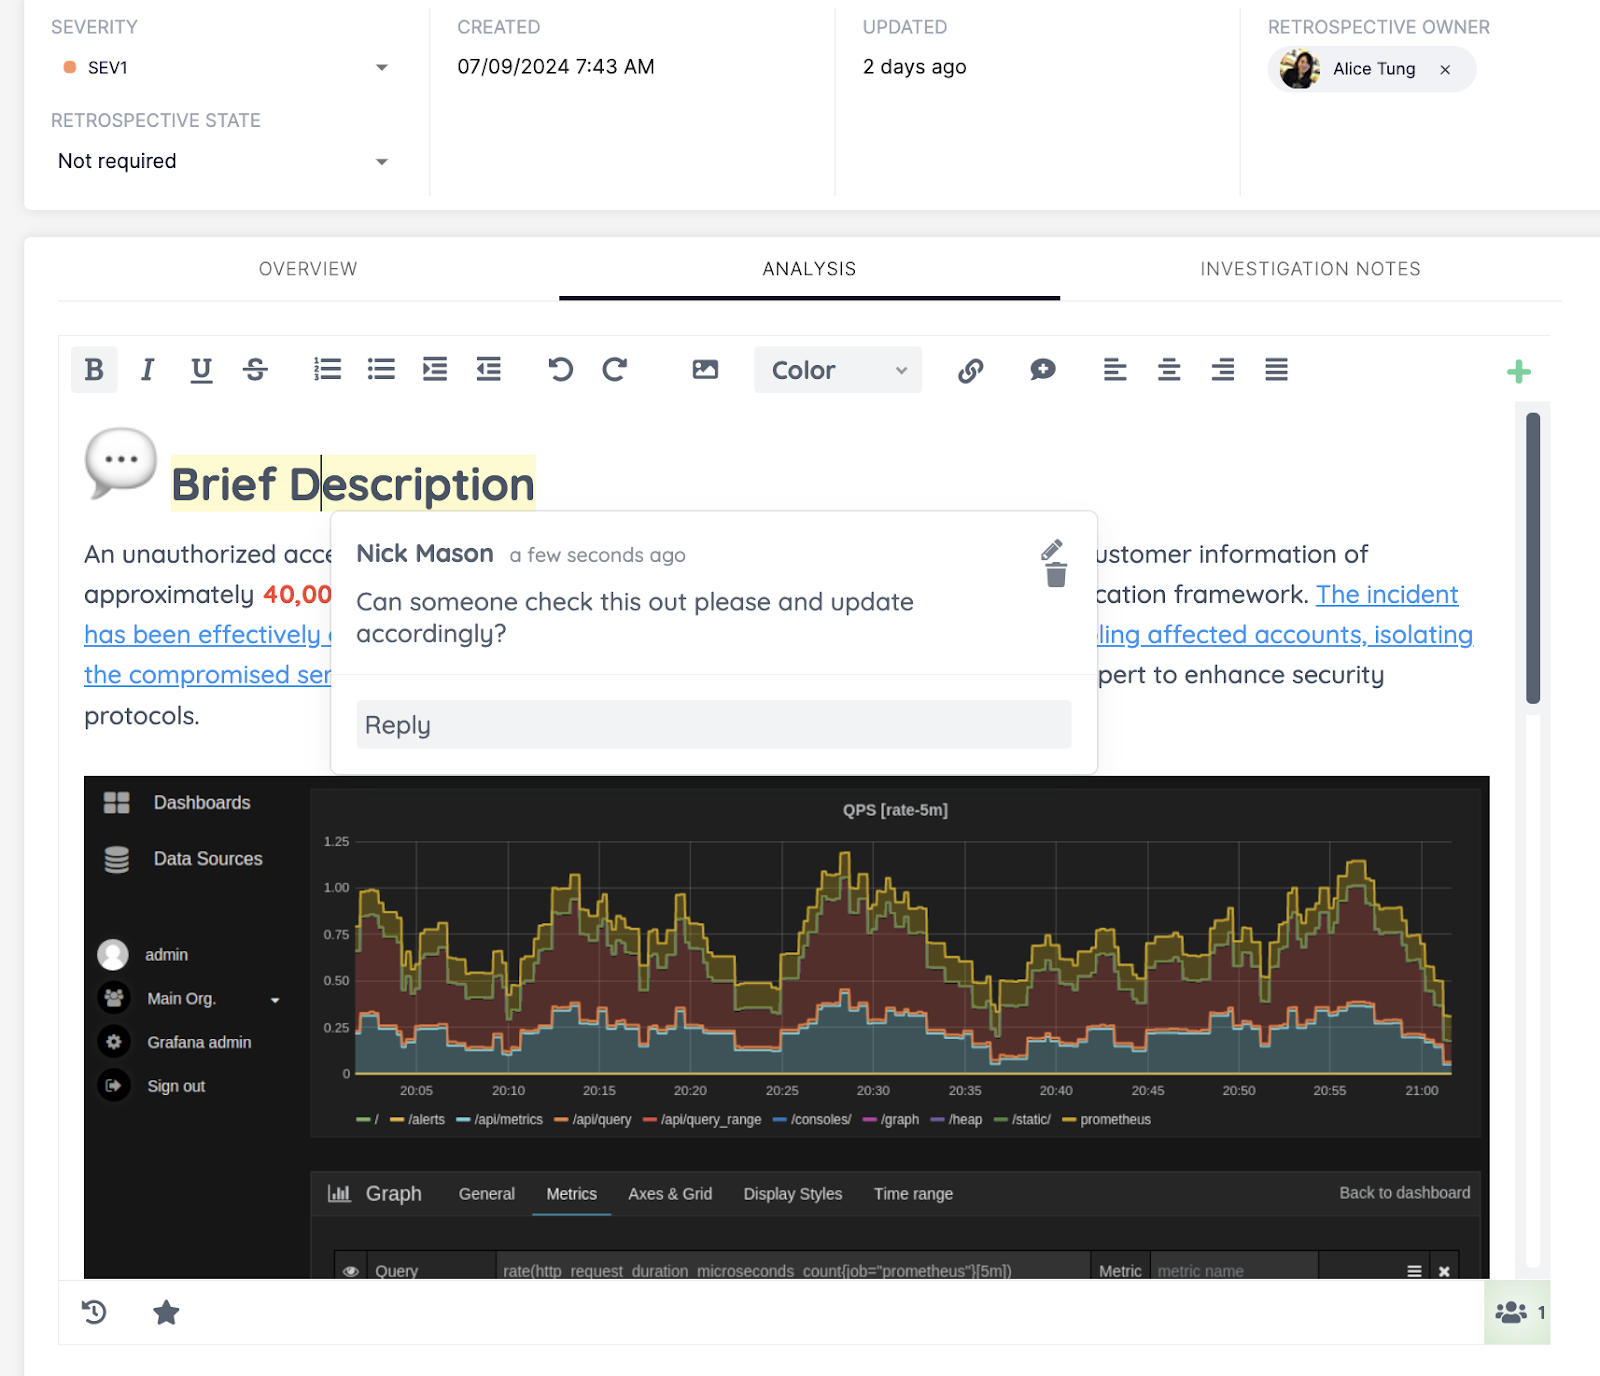
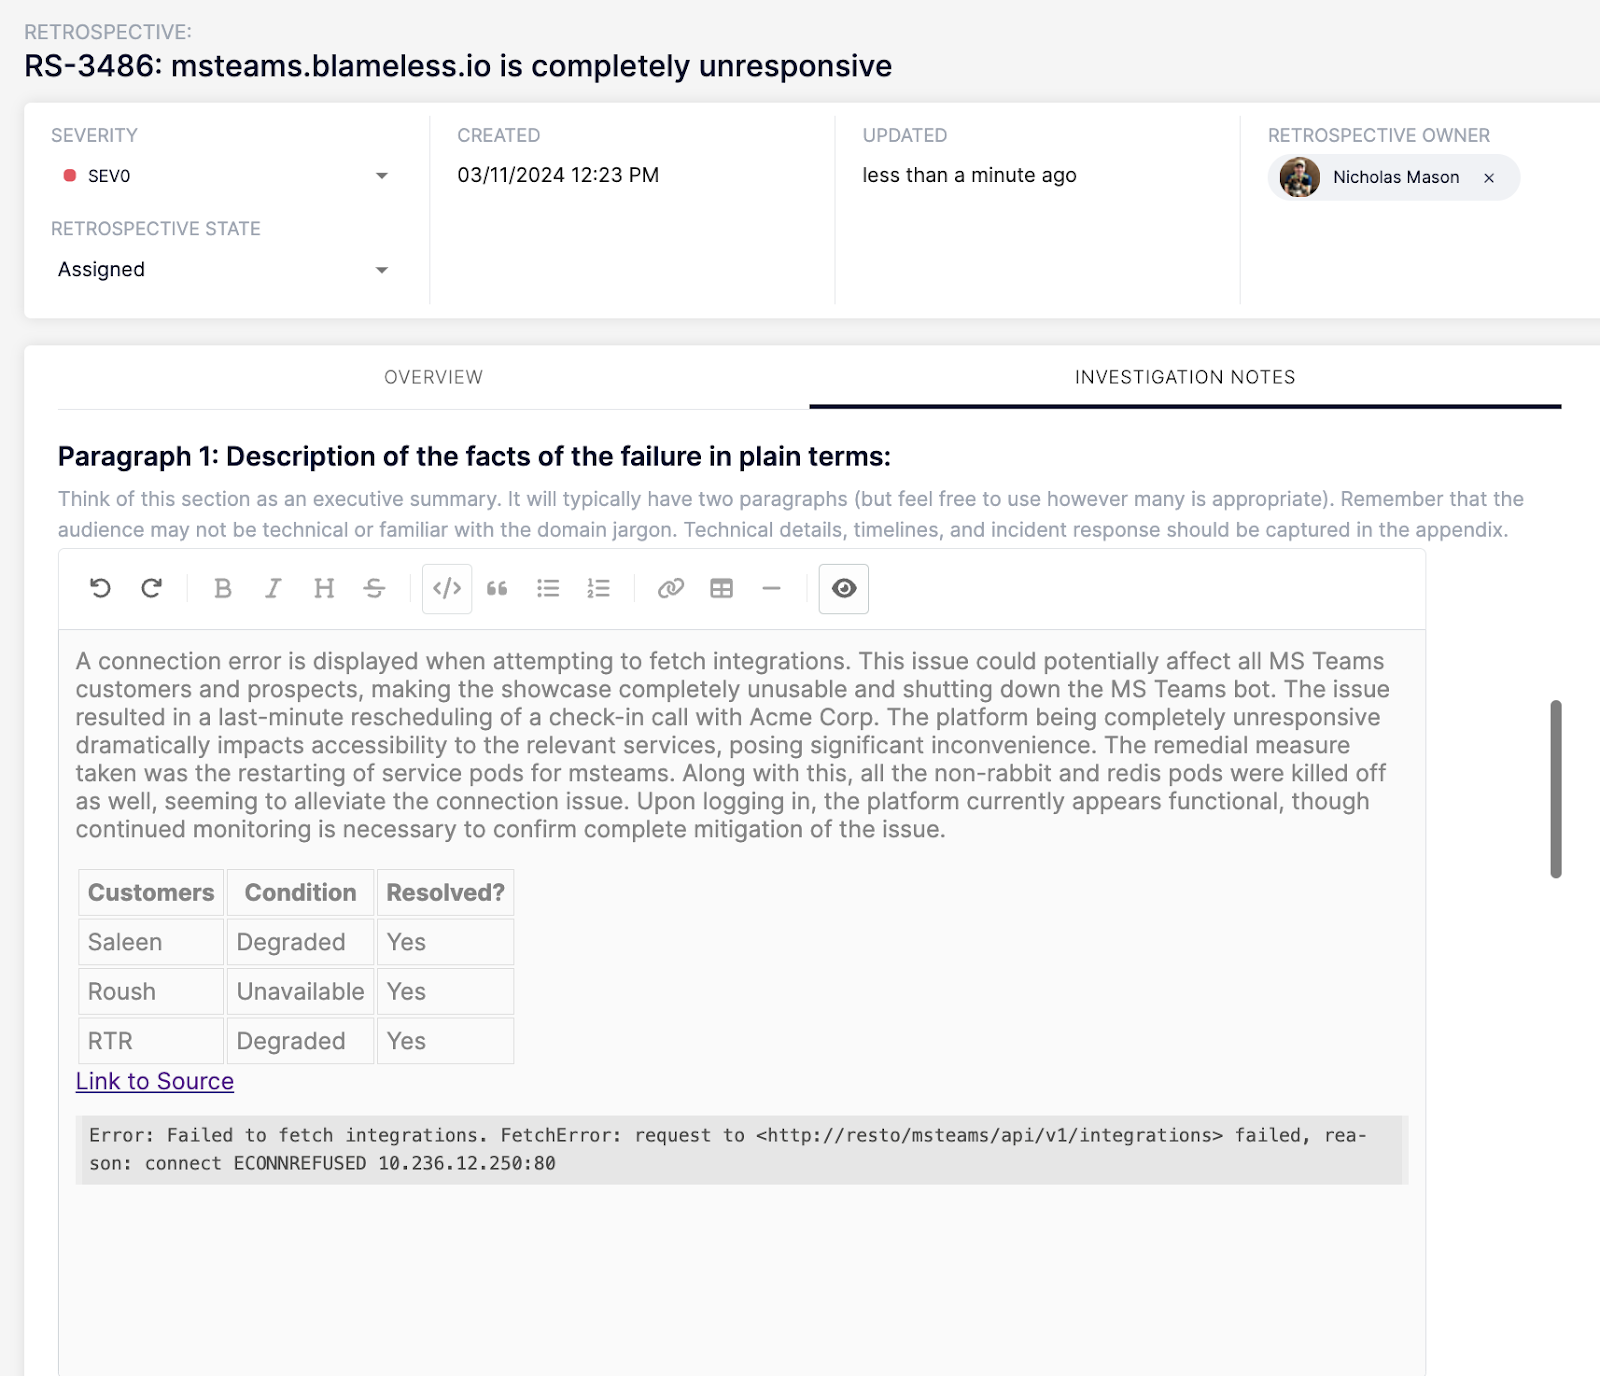
Description: The collaborative text editor in the Analysis section now features inline commenting, version history, enhanced formatting options, image insertion, and real-time editing. These enhancements improve the quality and efficiency of collaborative incident analysis, ensuring all team members are aligned and engaged.
- Inline Commenting: Add comments directly within the text, facilitating focused discussions and feedback.
- Version History: Track changes over time to understand the evolution of your analysis and make informed decisions based on past versions.
- Formatting Updates: Update text formatting, including links and headers, to maintain consistency and improve readability.
- Image Insertion: Add images to visually represent data, incidents, or solutions.
- Real-Time Editing: See who is editing what in real time, fostering better collaboration and reducing the chances of conflicting changes.
Value Proposition: Improve the quality and efficiency of collaborative incident analysis, ensuring that all team members are aligned and engaged.
Customer Quote:
"The new collaborative text editor has been a game-changer for us. Inline commenting and real-time editing have significantly improved our team's ability to analyze incidents and propose solutions efficiently."
These new features aim to provide a more robust and collaborative experience for your incident management retrospectives, ensuring that your team can document, analyze, and learn from incidents with greater ease and efficiency.
Getting Started:
We're excited to announce the release of Incident Briefs, a powerful new feature designed to enhance your incident communication and reporting processes. Incident Briefs allow you to create targeted, custom AI-generated summaries for different audiences within your organization, ensuring that everyone gets the information they need in the format they prefer.
Key Features:

Custom AI-Generated Summaries:
- Targeted Audiences: Tailor your incident summaries to specific audiences such as C-level executives, engineering teams, and incident responders.
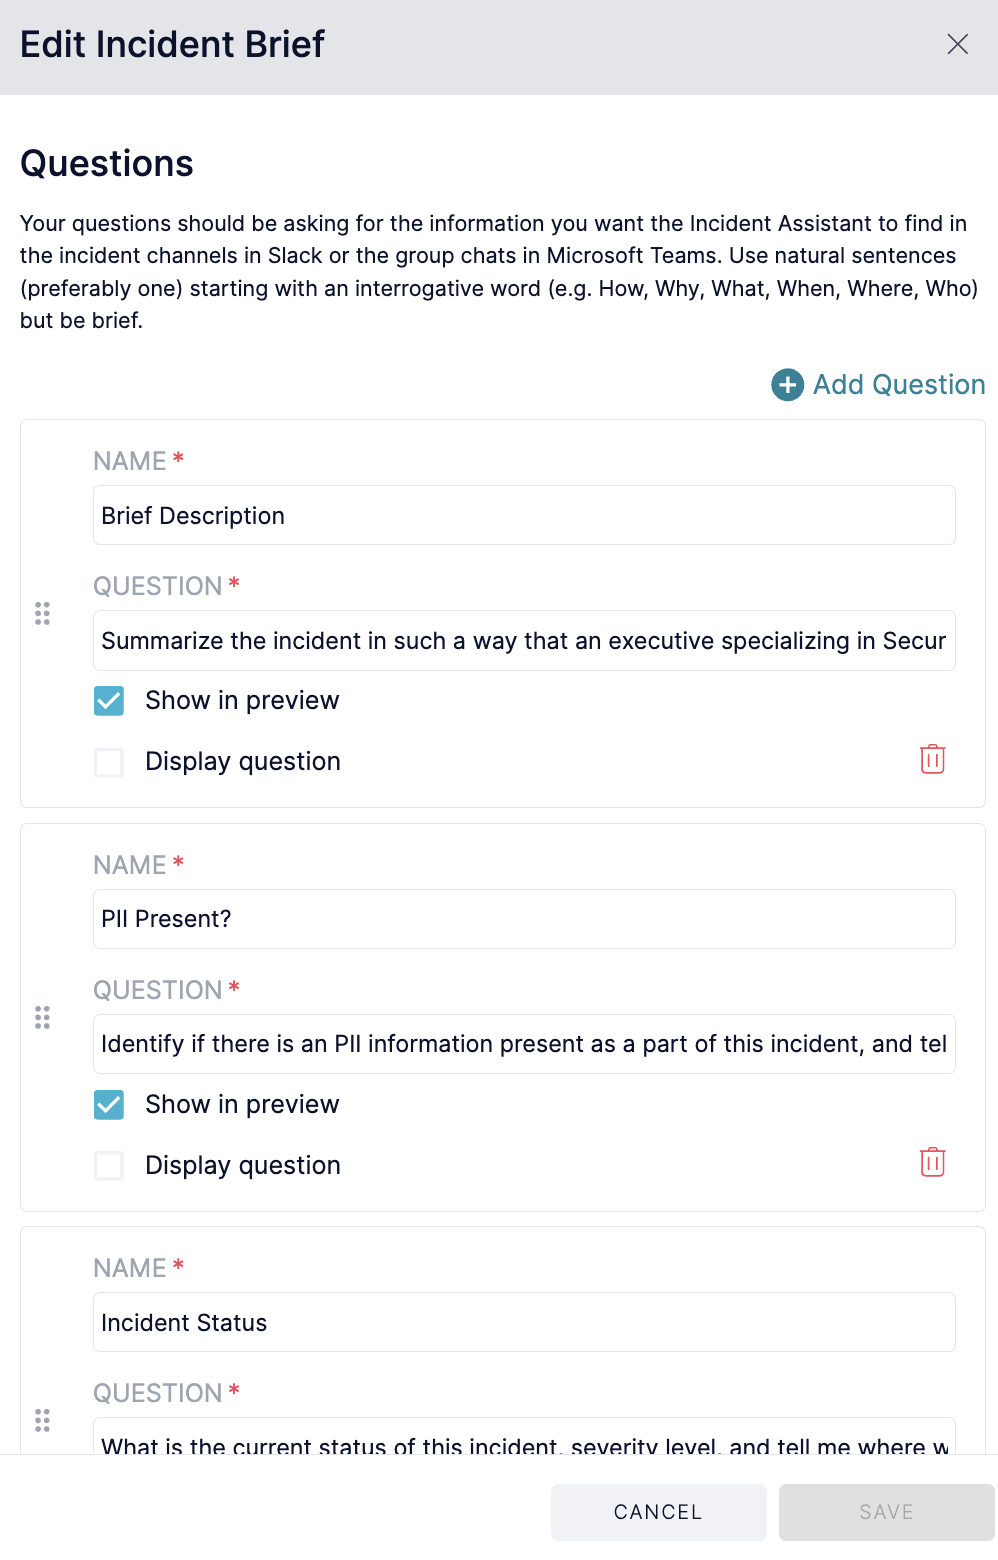
- Customizable Questions: Fully customize the questions sent to ChatGPT to generate precise and relevant summaries.
Flexible Display Options:
- Question Naming: Customize the name that appears for each question to align with your organization's terminology and preferences.
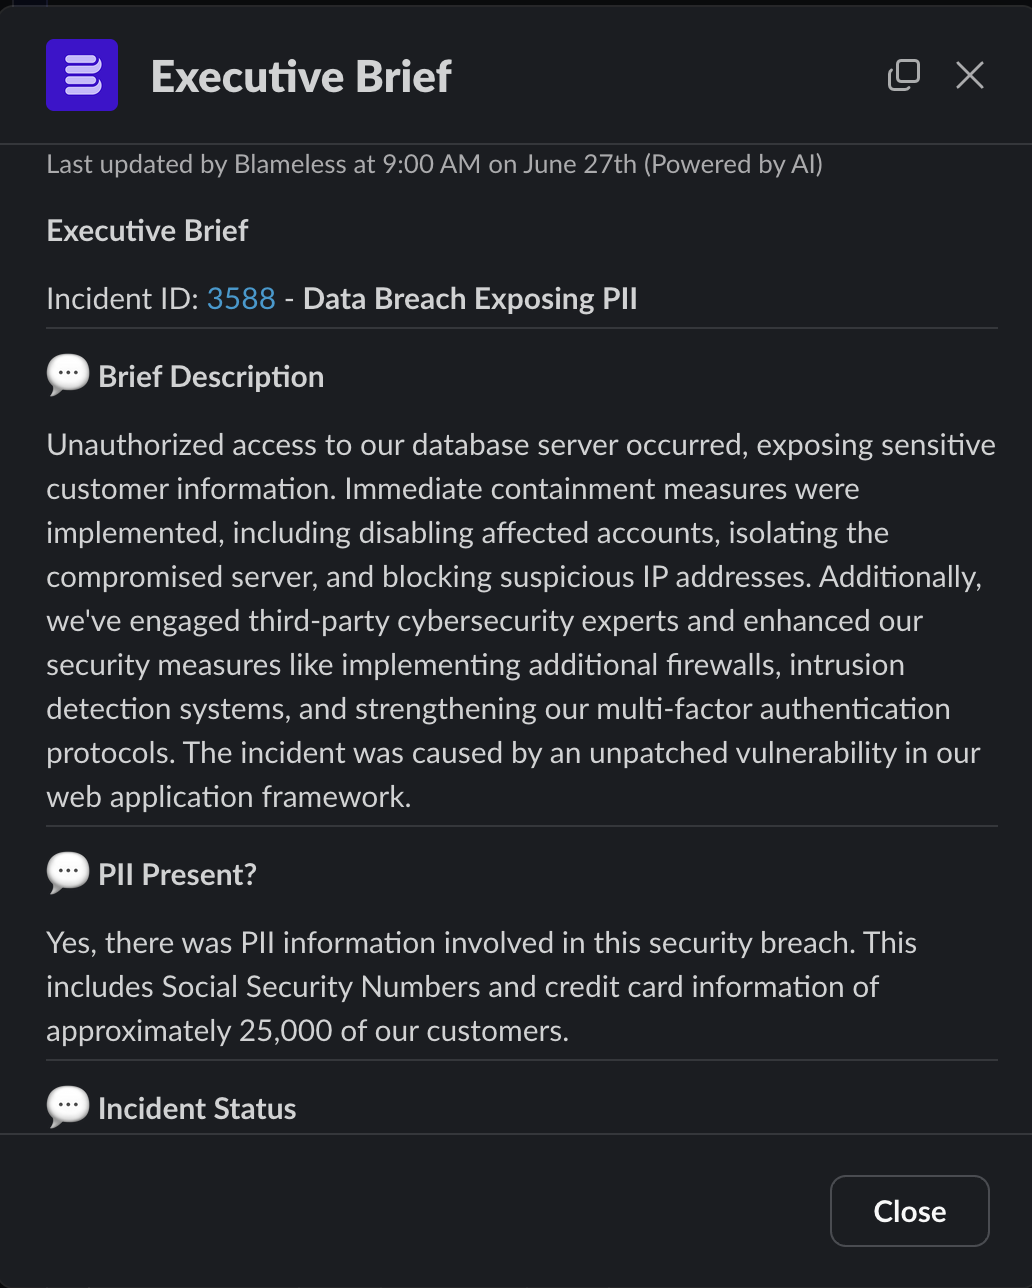
- Preview vs. Full Brief: Choose whether to display a preview of the answered question directly in the Slack card or the full brief in a Slack modal for more detailed information at a click of a button.
Value Proposition:
- Enhanced Communication: Deliver the right level of detail to the right audience, improving clarity and efficiency in incident management.
- Time Savings: Quickly generate comprehensive incident summaries without manual effort, allowing your team to focus on resolution and prevention.
- Customization and Flexibility: Adapt Incident Briefs to meet the unique needs of your organization, ensuring that every stakeholder receives the most relevant information.
Customer Quotes Across Different Levels in an Organization:
C-Level Executive:
"Incident Briefs have revolutionized our incident reporting process. The ability to tailor summaries for different stakeholders ensures that everyone is informed and aligned, from the executive team to the on-the-ground responders. It's a game-changer for our organization."
Engineering Manager:
"The customizable questions and flexible display options in Incident Briefs have significantly improved our incident review meetings. We can now present the most relevant details concisely, allowing us to focus on actionable insights and next steps. My boss never needs to ask me for specific information that matters to them because we designed a custom brief to answer those exact questions!"
SRE Incident Responder:
"With Incident Briefs, summaries that highlight the key points of an incident without sifting through logs and reports are automatically sent to where my leadership and co-works receive information best. It saves me time and helps me communicate more effectively with the rest of the team."
How to Get Started:
To start using Incident Briefs, complete the following steps:
- Go to your Blameless account. Under Settings, make sure you enable the OpenAI integration under Integrations → GenerativeAI.
- Use the Blameless API key, which does not share your data or use it to train any models, or use your own if you have an OpenAI ChatGPT enterprise account.
- Ensure you are using GTP 4.
- Head over to the Incident Assistant section under Incident WorkFlows in settings.
- Configure your first brief!
When you are running an incident, it is important to note that an Incident Brief will be updated every 5 minutes. In addition, the same Slack card where the Incident Brief was published will be updated to avoid unwanted noise in your Slack channels.
If you have any questions or need assistance, our customer success team is here to help.
Thank you for choosing the Blameless Platform to manage your incidents. We are committed to continuously improving our product to meet your needs and enhance your operational efficiency.
Getting Started:
We are thrilled to announce the release of three powerful new features designed to enhance your incident management and retrospective experience:
- 📓 Date Picker & Numeric Fields in Retrospective Templates (Custom Tab)
- 📨 Automated Communications Integration (Email, SMS, Slack, Microsoft Teams, and Webhooks)
- 👁️ WorkFlow Execution Details Visibility
New Features:
📓 Date Picker & Numeric Fields in Retrospective Templates:
- 📅 Date Picker Fields: Effortlessly select and input precise dates within your retrospective templates. This feature ensures accurate scheduling, enhances historical analysis, and simplifies the tracking of incident timelines and action items.
- 🔢 Numeric Fields: Seamlessly input and analyze quantitative data, making it easier to track metrics, assign values, and gain actionable insights from your retrospectives. This feature supports better data-driven decision-making.
⭐ Benefits:
- Enhanced Precision: Accurate date selection and quantitative data input for more detailed retrospectives.
- Improved Data Tracking: Simplifies the tracking of key metrics and timelines, enabling better analysis and continuous improvement.
💬 Customer Quote:
“The new Date Picker and Numeric Fields have transformed our retrospective process. We can now easily track important dates and metrics specific to our organization, leading to more insightful post-incident analyses that leadership has been asking about for years."
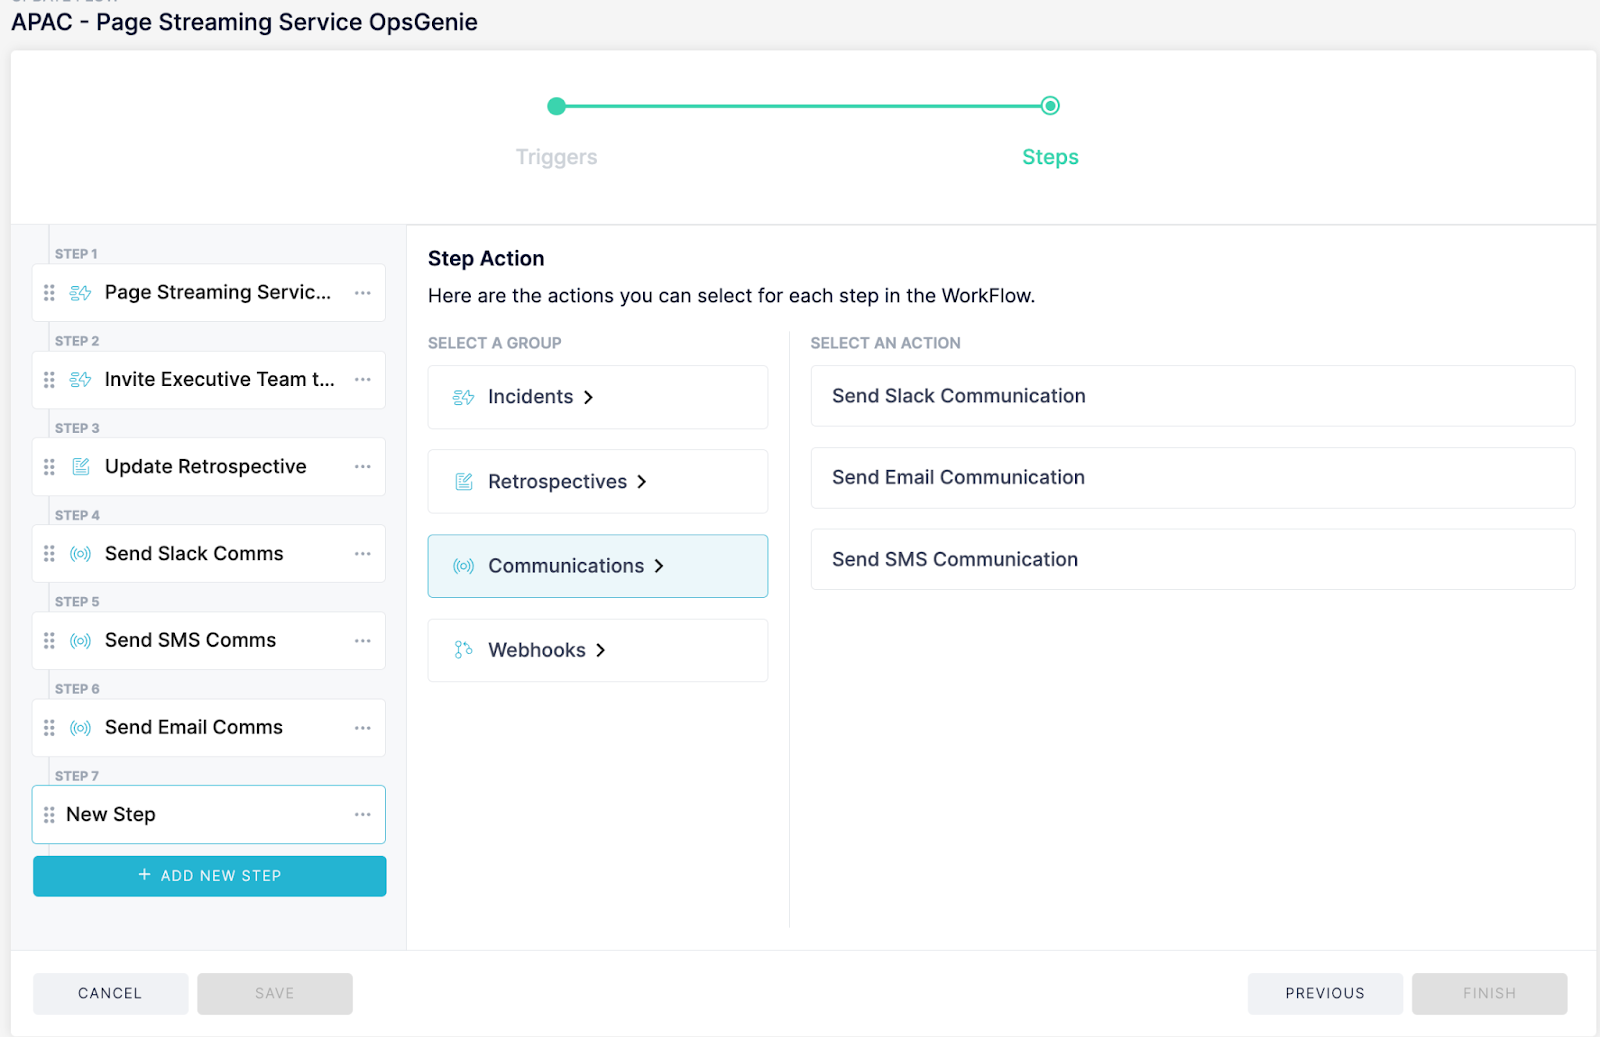
📨 Automated Communications Integration:
- SMS, Email, Slack, and Microsoft Teams Communications: Our WorkFlow Engine now supports automated communications across multiple channels. Instantly notify your teams and stakeholders via SMS, email, Slack, or Microsoft Teams, ensuring timely updates and coordinated responses.
⭐ Benefits:
- Real-Time Notifications: Keep your teams and stakeholders informed with instant updates across their preferred communication channels.
- Enhanced Coordination: Streamline communication WorkFlows, reducing response times and improving incident resolution efficiency.
- Scalability: Automated communication can easily scale with your organization. Whether handling a single incident or multiple simultaneous events, automated WorkFlows ensure that communication remains efficient and effective.
💬 Customer Quote:
"Automated communications via SMS, email, and Slack have been a game-changer for our incident management. We can now keep everyone in the loop in real-time, which has significantly improved our response times."
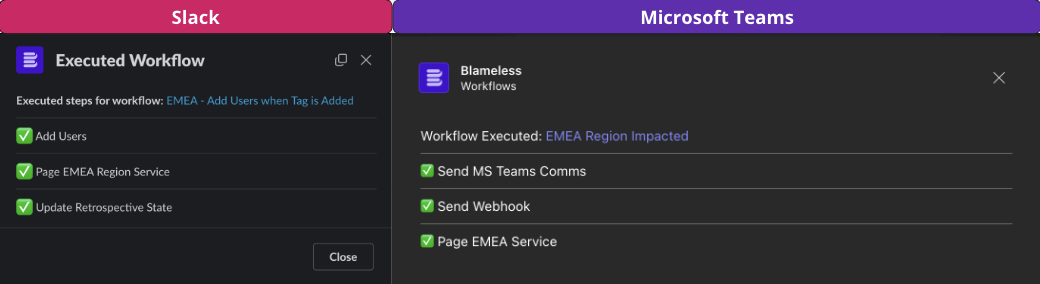
👁️ WorkFlow Execution Details Visibility:
- Step-by-Step Breakdown: View a detailed breakdown of each step executed in your automated WorkFlow, right within your Slack or Microsoft Teams channels.
- Success Indicators: Easily identify whether each step was successful or encountered an issue, helping you quickly diagnose and address problems.
- Direct Access: Get a direct link to the configuration of the WorkFlow, allowing you to make adjustments and improvements on the fly without leaving your communication platform.
⭐ Benefits:
- Enhanced Transparency: Gain full visibility into your WorkFlow executions, providing you with clear insights into what actions were taken and their outcomes.
- Improved Incident Management: Quickly identify and rectify any issues within your automated processes, ensuring smoother and more reliable incident resolution.
- Streamlined Workflow Adjustments: Direct access to WorkFlow configurations means you can efficiently update and optimize your processes as needed, reducing downtime and improving responsiveness.
💬 Customer Quotes:
“Being able to see the execution details of our WorkFlows in Slack has been a game-changer. We can immediately identify any steps that fail and address them without delay."
"The new feature that shows detailed WorkFlow steps in Microsoft Teams has significantly improved our incident management efficiency. It’s incredibly helpful to have all this information readily accessible."
These enhancements are designed to improve the accuracy, efficiency, and effectiveness of your incident management processes. We look forward to seeing how these new features help you streamline operations and achieve better outcomes.
Getting Started:
📓Date Picker & Numeric Fields in Retrospective Templates
📨Automated Communications Integration & 👁️WorkFlow Execution Details Visibility
We are excited to announce the release of our new Incident Management Workflow Engine, designed to enhance and automate your incident management processes. This powerful engine ensures your workflows adapt dynamically as incidents evolve, streamlining operations and improving response times.
New Features:
1. Adaptive WorkFlows:
- Our workflow engine dynamically adapts your incident management processes in real-time based on incident changes, ensuring a responsive and flexible approach to incident handling.
2. Event-Triggered WorkFlows:
- Incident Creation: Automatically initiate workflows when a new incident is created.
- Incident Status Update: Trigger workflows based on changes in incident status.
- Incident Severity Update: Adapt workflows when incident severity is updated.
- Retrospective State Change: Modify workflows based on changes in the retrospective state.
- Tasks Assigned: Automatically trigger workflows when tasks are assigned.
- Runbooks Attached: Initiate specific workflows when runbooks are attached to incidents.
- Follow-Up Actions Created: Trigger follow-up actions workflows to track post-incident activities.
- Tags Added: Automatically adjust Incident workflows when tags are added.

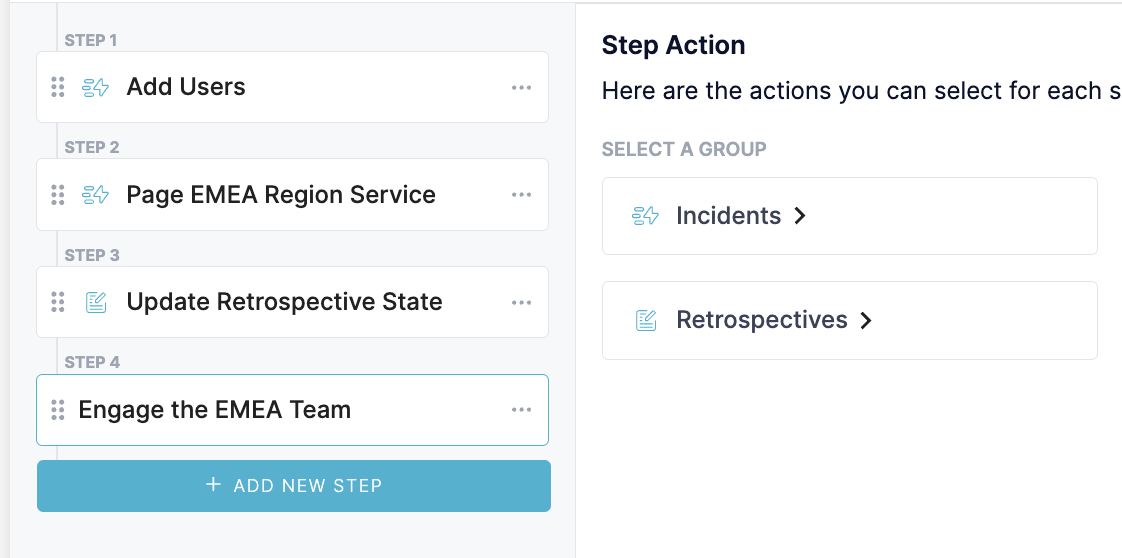
3. Multi-Step WorkFlow Capabilities:
- Combine multiple actions into a cohesive, multi-step workflow to ensure comprehensive incident management.
- Add users to Slack or Microsoft Teams incident channels to enhance team communication and collaboration.
- Automatically update the state of a retrospective, ensuring accurate and timely post-incident reviews.
- Seamlessly page on-call team members in PagerDuty or OpsGenie, ensuring immediate response to critical incidents.
Benefits:
- Improved Efficiency: Automate repetitive tasks, ensuring consistent and streamlined incident management processes.
- Enhanced Responsiveness: Dynamic adaptation of workflows to incident changes ensures timely and appropriate responses.
- Streamlined Communication: Integrated actions with Slack, Microsoft Teams, PagerDuty, and OpsGenie improve team coordination and incident resolution times.
- Comprehensive Post-Incident Management: Automate and track follow-up actions, retrospective updates, and ensure thorough incident analysis.
- Standardized Procedures: Initiate specific workflows when runbooks are attached to incidents, ensuring standardized response procedures.
- Accurate and Timely Post-Incident Reviews: Automatically update retrospective states for thorough and timely post-incident analysis.
- Optimized Task Management: Automatically trigger workflows when tasks are assigned, enhancing task management and execution.
- Better Categorization: Adapt workflows based on tags added to incidents, improving categorization and handling.
Examples based on Customer Use Cases:
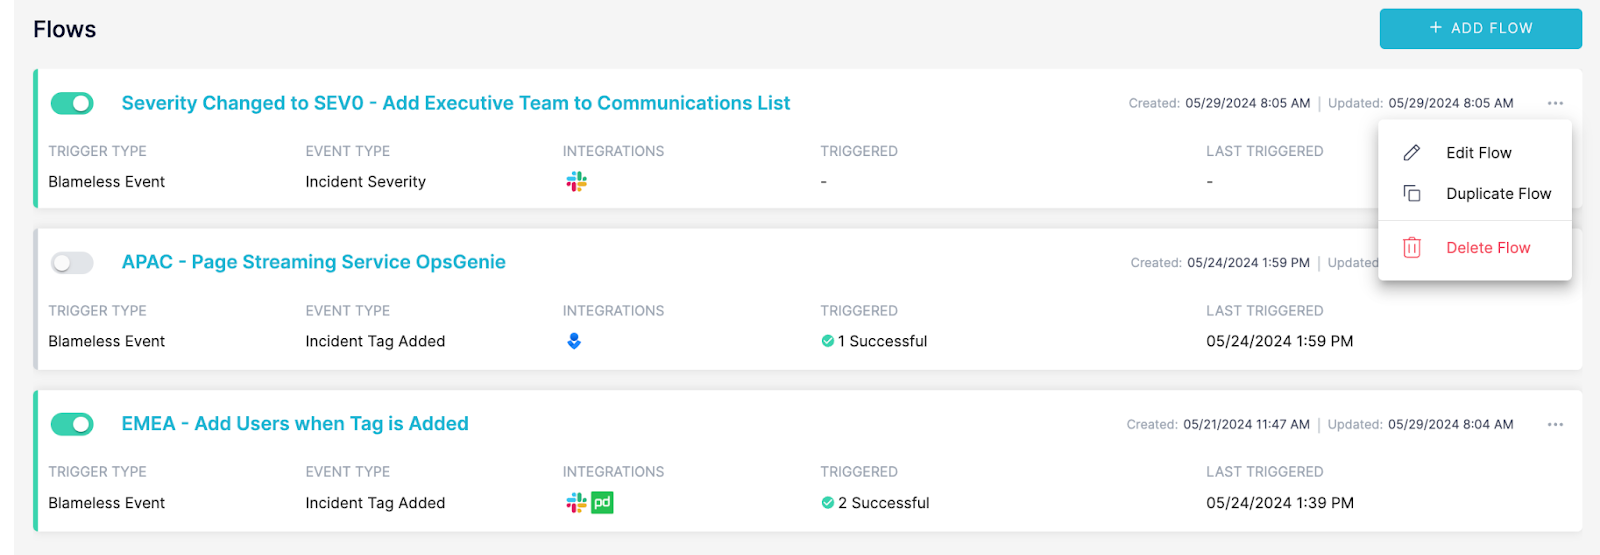
- “I have a worldwide Incident Management program. Blameless helps me automate Incidents depending on different types of problems. With WorkFlows, I am able to utilize the Tag Category, Region, just like we do today as a part of our Incident Management workflow, but the team doesn’t need to figure out what happens after they say a certain region around the world is impacted. Today, when we select EMEA for example, we have to send out a different communication template, ensure that we page a specific on-call engineer for a service based on EMEA ownership, and invite the extended EMEA team into the incident channel. With WorkFlows, the team just needs to add the Tag, and WorkFlows takes care of all the rest for us.”
- “When incidents are started in our organization, we often have very little context on what is actually the problem. As we investigate, we learn more about the source of the issue, who is impacted, and what is needed to resolve the issue. With WorkFlows, the team now just needs to answer a series of questions, and Blameless will automatically adjust the direction of the incident based on the answers by adding new users into the channel, letting us know if we need to do a post-incident review or not, and escalating to the appropriate parties if the issue gets more complicated.”
- "Implementing the Incident Management Workflow Engine has been a game-changer for our operations. We've set up WorkFlows that trigger when follow up actions are created, notifying team members immediately with what they need to do, ensuring no time is lost. By integrating with Slack and PagerDuty, our team stays in sync and can respond quickly, even during off-hours. The adaptive nature of the WorkFlows means that as incidents evolve, our response evolves with them, significantly reducing downtime and improving our overall incident resolution process.
This release marks a significant enhancement to our incident management capabilities, equipping you with the tools to manage and resolve incidents more effectively. We look forward to your feedback and are committed to continually improving your incident management experience.
Getting Started
While anyone at your organization should be able to start Blameless incidents, not everyone should have access to all current and past incidents (nor retrospectives), particularly when those incidents are handling sensitive and confidential information related to security issues. With Blameless you can already restrict the creation of incidents and access to incidents (and retrospectives) on a per incident type basis. Now, you can also allow Blameless users only to access the incidents (and their corresponding retrospectives) that they create, while preventing access to all other incidents of the same incident type. Additionally, at any time during or after the incident, if deemed necessary for security or confidentiality reasons, users who created the incident or joined the incident, can have their permissions to access the incident easily revoked. Meanwhile, users joining incidents without any pre-assigned Blameless identity roles, can be granted more permissions (Reader, Writer) to access and interact with the Blameless incident (and retrospective).
Assign the new IncidentCreator role to users
Restricting incident creators to create and access only incidents they created in Blameless is pretty easy. Under Identity Management in Blameless, a Blameless administrator with the IdentityAdmin permission, just needs to assign the new IncidentRole to users via a group, which is automatically created by default per incident type, along with the IncidentReader, IncidentWriter and IncidentAdmin roles (see incident roles).
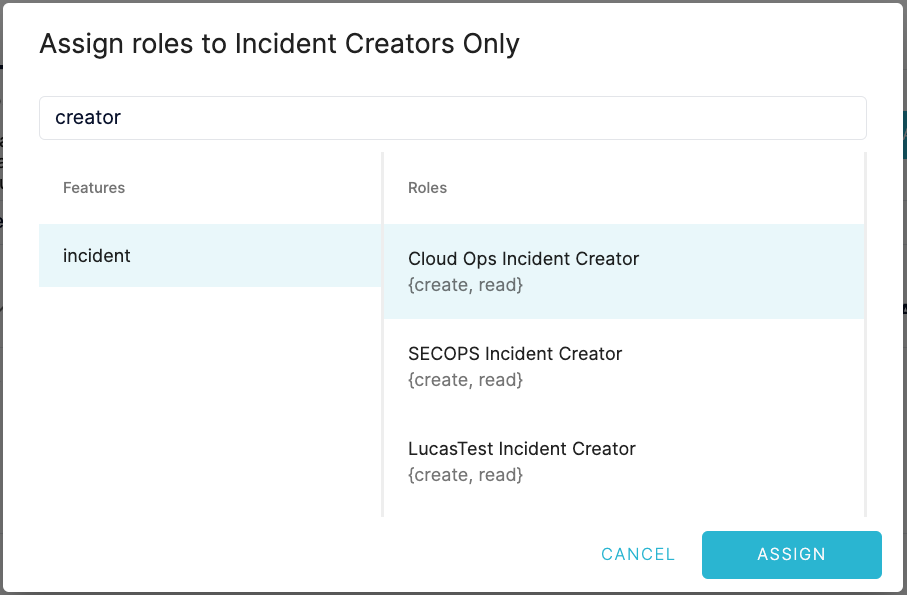
Users who have been granted the IncidentCreator role for a specific incident type are automatically invited to the incident they created and are granted permissions to execute a limited set of commands corresponding to the IncidentReader role (see incident roles), but only for incidents they created. Additionally, they can only access the incidents and retrospectives they have created via the Blameless incident. Other incidents (and retrospectives) will not be accessible to users who have only been granted the IncidentCreator role.
Additionally, users who have been granted the IncidentCreator role gain Reader permissions to the incident they created, which provides access to the same Blameless commands that the IncidentReader has access to today (see incident roles).
Note that you should make sure that users with the IncidentCreator role, are also not assigned one of the other default incident roles such as the IncidentReader, IncidentWriter or IncidentAdmin for a selected incident type, otherwise it would override the restricted permissions set by the IncidentCreator role, still granting them access to all incidents of the same type.
Updating permissions during the incident
Conditions may change after incidents have started, so Blameless provides the flexibility to grant more Blameless permissions to users as they join incidents or to revoke permissions to access the Blameless incident (and retrospective) if the incident has to be handled and accessed only by a reduced number of authorized users.
You can view and change user permissions (grant/revoke) at the incident level only (local roles) without leaving the incident channel in Slack using the new /blameless set permission command or from the incident detailed page in the Blameless web UI. For security reasons, note that only users with the IncidentWriter role for this incident type have permission to change the local user permissions.
View permissions
You can view the user permissions (local and global roles) for any users joining the incident, including the creator of the incident and anyone who joins the incident.
- Users joining an incident may have permissions set either at the incident-level only (local) or at the global level per incident type (or all incident types)
- Note that if a user has a role set at both the global and local level, the permissions at the global level prevail.
Changing permissions
You can change permissions for users with local roles only. Permissions inherited at the global level (per incident type) can only be updated under Identity Management in Blameless.
Call to action
To benefit from this new role-based access control (RBAC) enhancement (permission per incident), contact your Blameless administrator responsible for managing user access in Blameless under the Identity Management section, to start granting users with the permission to access only the incident (and retrospective) they create. Check the instructions on how to configure and change permission per incident here: https://docs.blameless.com/hc/en-us/articles/22773768650007-Permissions-per-incident
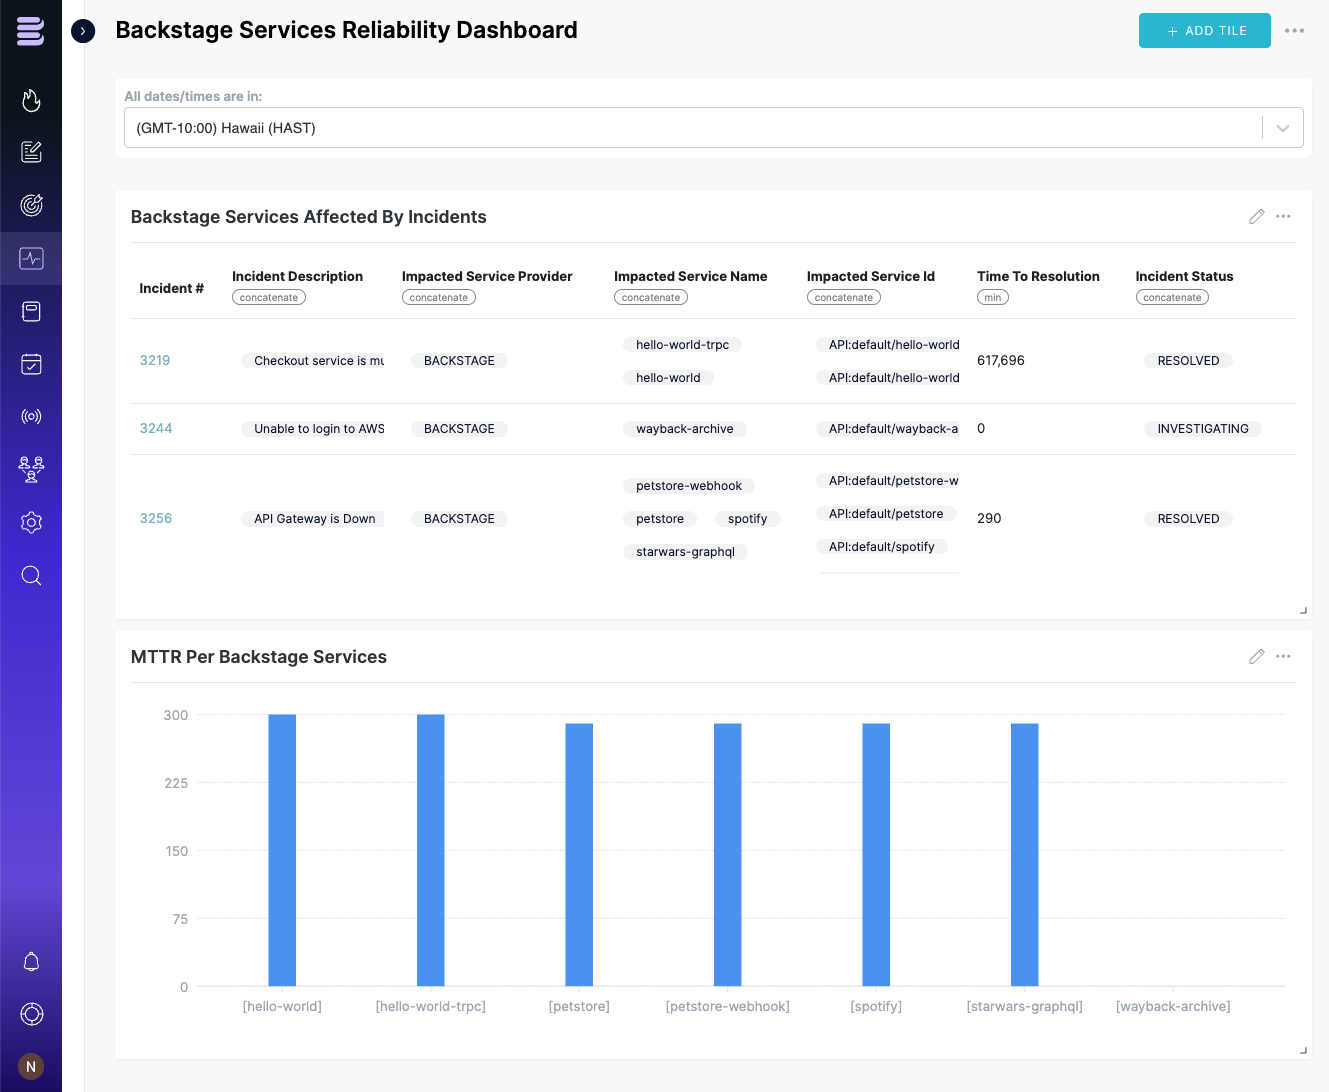
By integrating Blameless with your Backstage catalog, your incident response teams can now more accurately tie incidents to the exact affected parts of your production environment (e.g. services, components, APIs, resources, etc), providing critical context to drive the investigation more rapidly in the right direction and fast access to a wealth of information stored in your Backstage catalog. Then post-incidents, using Reliability Insights in Blameless, each team responsible for those services or components can draw some new learnings by more effectively identifying the most vulnerable parts of their production environment based on the severity and number of incidents, among many other dimensions.
Mapping Backstage resources to incidents
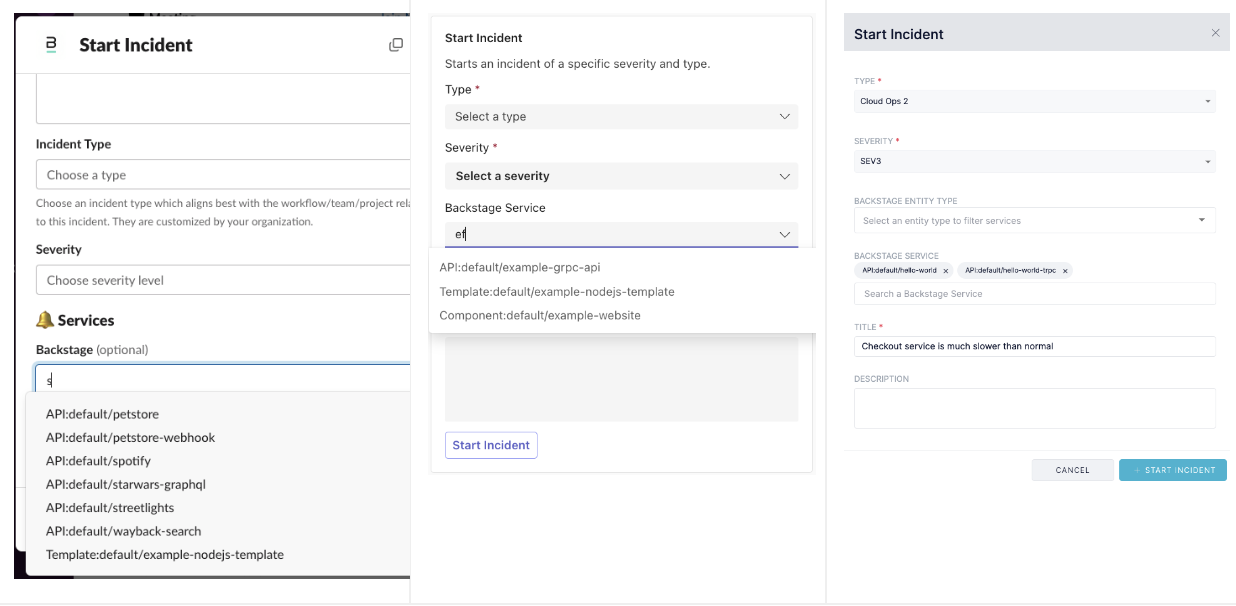
Blameless provides the flexibility to specify one or more entities as defined in Backstage, immediately at the start of an incident from the Blameless web UI or when using the Blameless app directly from within Slack or Microsoft Teams.
Blameless purposefully follows Backstage's naming convention for entities, which uniquely identifies them and makes it easier to search for the kind of entity you are looking for and the namespace the entity belongs to. This is particularly useful when the same entity name is used across multiple namespaces: <kind>:<namespace>/<name>
As the list of Backstage entities could be very long, you can quickly find the entities you want to map to your new incident with a type-ahead search approach in Slack and Microsoft Teams. For additional convenience, if you start incidents from the Blameless web UI, the list of Backstage services can be pre-filtered with the “Backstage entity type” dropdown.
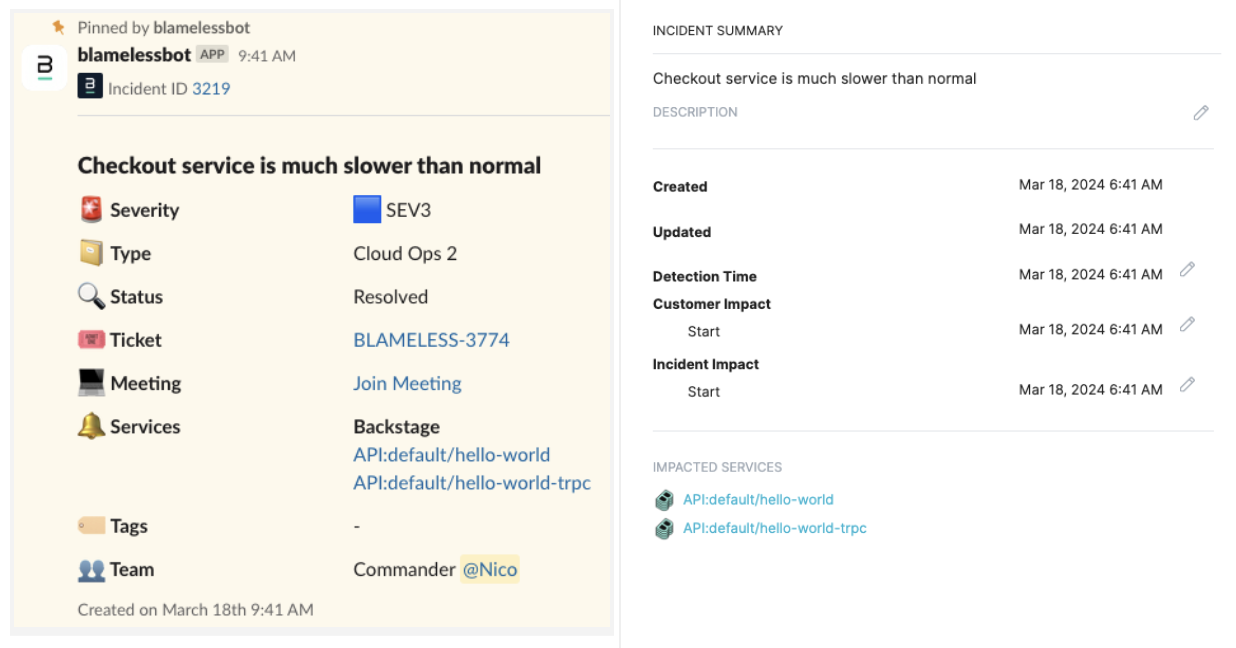
Impacted services linked to Backstage
After you start the incident, all selected Backstage services (entities) are displayed in key areas of the Blameless application, readily available to incident responders during incidents and post incident resolution. Each impacted service is hyperlinked to its description page on your Backstage web server, providing incident responders with direct access to a wealth of information about the affected services (owners, dependencies, release dates, software repositories, etc).
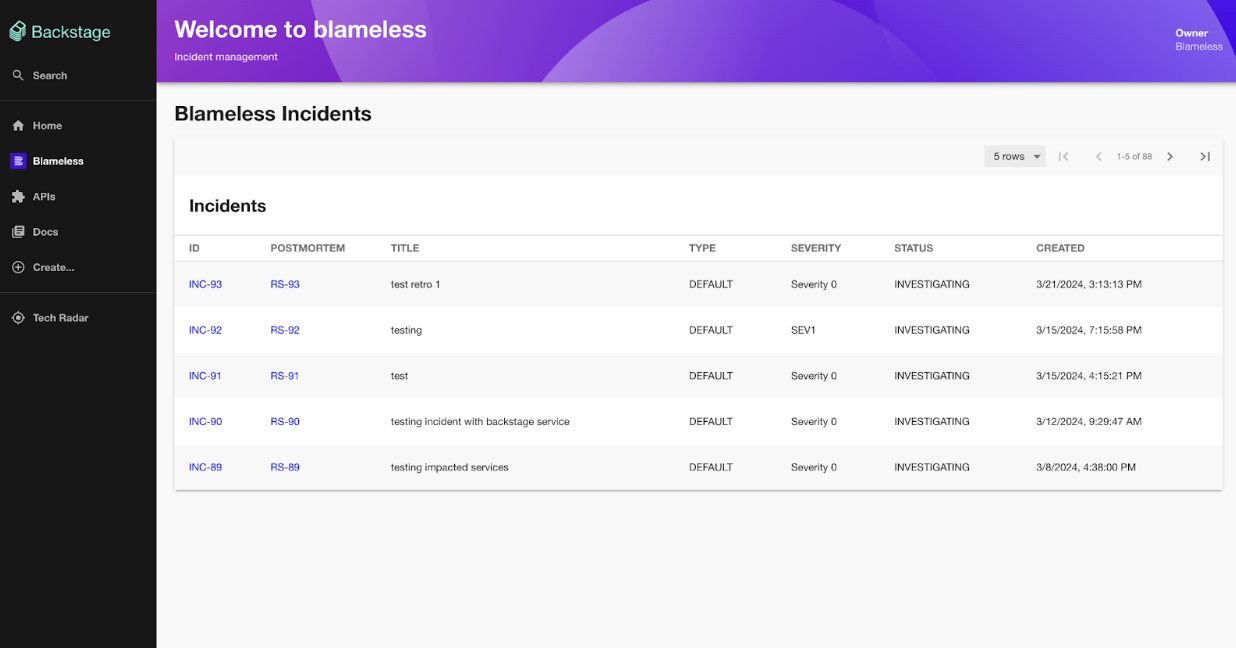
Tracking Blameless incidents from within Backstage
As part of the integration with your Backstage server, you must install the Blameless plugin for Backstage on your Backstage server (see installation instructions) which provides the following capabilities:
- How frequently you want to synchronize Blameless with your Backstage catalog
- List of Blameless incidents
Without leaving Backstage, you can explore the history of incidents that have affected your Backstage services (entities), helping draw attention from your engineering team towards the vulnerability level of different parts of their production environment.
Reporting on incident statistics related to Backstage services
Ultimately, Blameless Reliability Insights provides all the key insights your leadership needs to assess the overall reliability and vulnerability of your production environment, projecting incident statistics (e.g. mean time to resolution) across multiple dimensions (e.g. severity, incident type, Backstage service and entity kind, incident tags, timeframes, etc) leveraging a large selection of chart types (pie, bars, lines, etc) to produce custom and powerful dashboards.
Getting Started
Integrating Blameless with your Backstage server is very easy. Contact your Blameless administrator and Backstage administrator and have them follow those installation instructions: https://docs.blameless.com/hc/en-us/articles/22151438605719-Backstage
Blameless is excited to share how we’ve transformed the user experience of incident responders using the Blameless app in Microsoft Teams. By enabling the use of group chats to run incidents, we’ve streamlined the incident management workflow in Microsoft Teams. This also allows responders to reserve the thread in their team channel for the core investigation. Users can still start incidents from any channel in Microsoft Teams and access all the resources of Blameless wherever they choose to do their work. After two years on the Microsoft AppSource store, Blameless remains the leading choice for incident management for organizations relying on Microsoft Teams. These changes have all been built in collaboration with Microsoft Teams users, and we are excited to announce their availability in the form of a more intuitive Blameless experience.
With Blameless, Microsoft Teams users benefit from a broad collection of customizable automation, from automatically recruiting on-call engineers to the incident channel to automatically updating internal stakeholders on incident progress. Moreover, with Blameless, your reliability journey does not stop when the incident is resolved. All incidents run from within your Microsoft Teams workspace, producing a wealth of knowledge that you can leverage to produce higher-quality retrospectives and analyze, painting your overall Reliability map directly in Blameless.
Whether you have been using the Blameless app for Microsoft Teams over the past two years or you are new to Blameless, you will immediately notice the following new capabilities but also the power of the capabilities we kept intact in this updated version of the app:
🚀 What’s new
- Run incidents in dedicated group chats instead of team channels
- Start incidents from team channels (and group chats) where the Blameless app is installed
- Customize the incident group chat name with incident title, severity, status and more
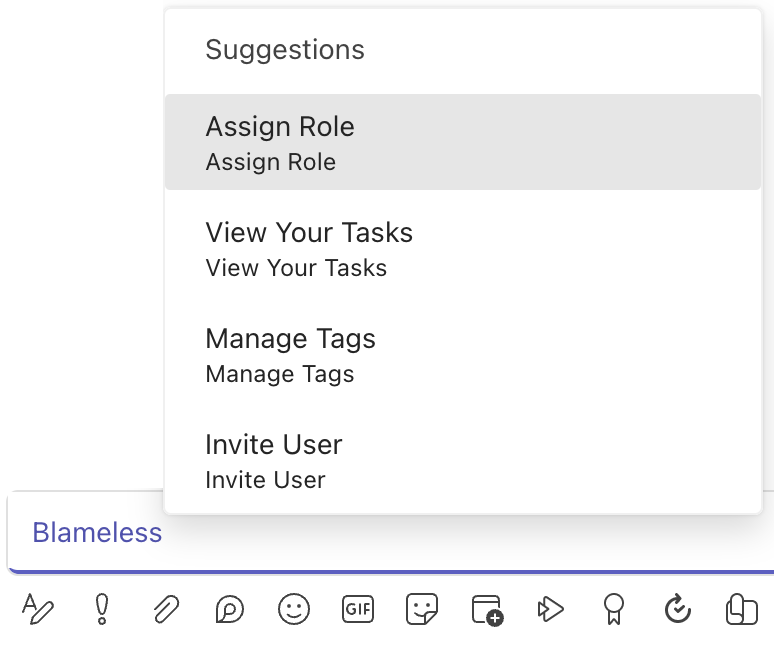
- Faster and easier access to most commonly used Blameless actions, through the @blameless suggestions and action buttons in the welcome message.
- More verbose responses when triggering alerts via PagerDuty and OpsGenie
- Centralized tag management in the web UI
- Easier incident type configuration in the web UI
🛠️ What’s still there
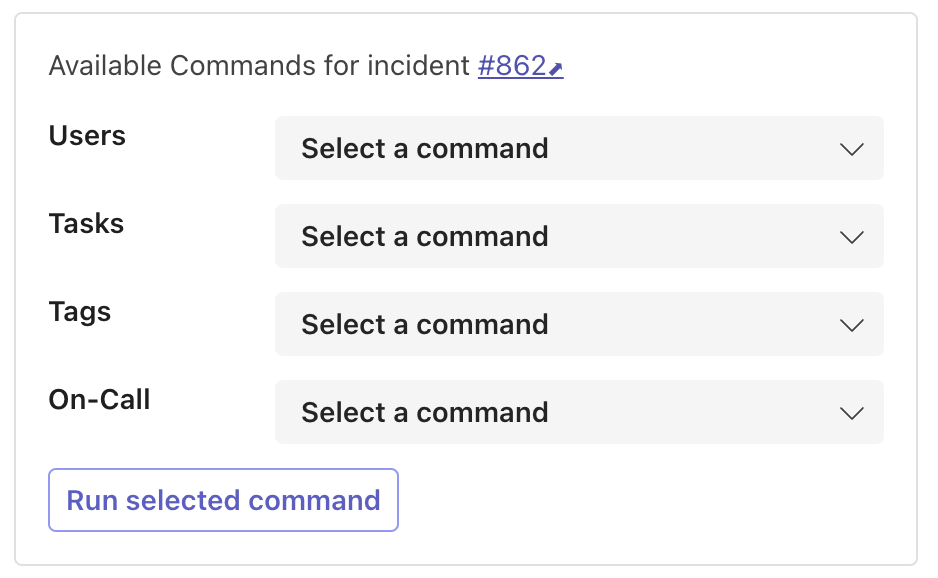
The @blameless command to display and execute selected Blameless commands
- Invite users, Assign roles, Manage tags, Trigger Alerts, and more
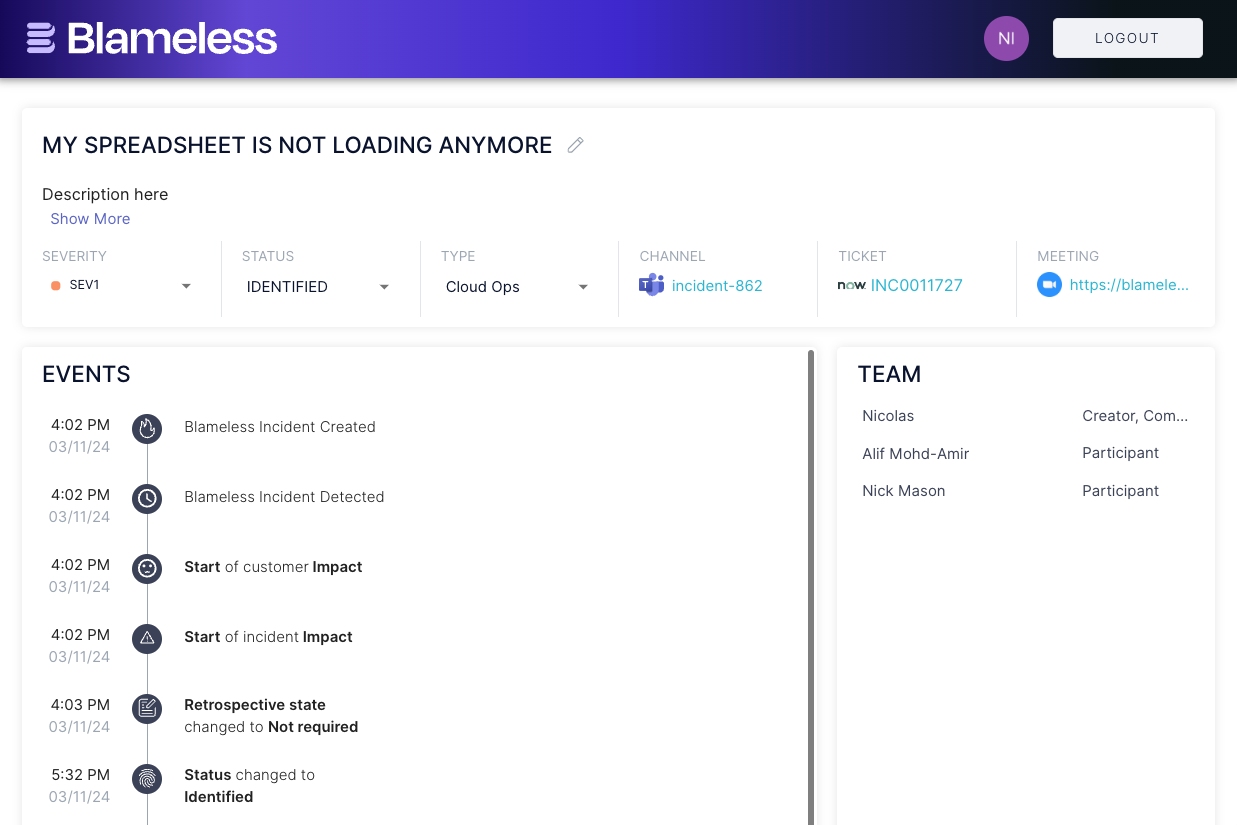
- The powerful incident Overview tab
- Quickly check and update the incident title, description, status, severity and type. It also provides visibility into the incident timeline, your team (automatically matching users in your incident group chat)
- Access to a few key resources (Jira and/or ServiceNow incident tickets and link to the dedicated video conference such as Microsoft Teams, Zoom, etc)
- Auto-inviting users paged via PagerDuty or OpsGenie
- Single sign-on with Blameless instance and your Microsoft Active Directory authentication service
For more information about the Blameless app in Microsoft Teams:
Call to action
To benefit from those enhanced capabilities, existing customers who have previously been using the Blameless app in Microsoft Teams, contact your Blameless administrator to re-authenticate your Blameless instance with your Microsoft Teams workspace using the same credentials you previously used.
If you are integrating Blameless with Microsoft Teams for the first time, just follow these instructions provided here.
The team here is hard at work expanding Blameless, adding new, powerful features and integrations to help transform how engineering teams approach incident management. But every now and then, we take a step back from all that innovation to focus on the little details. Here, we’re dotting the i’s and crossing the t’s to make sure you have a fantastic experience using Blameless every day. So here’s an update coming out of our recent bug smash where we tackled the backlog of feature enhancements you’ve been asking for. Usability improvements, UX tweaks, feature upgrades, we’ve got it all here for you. Enjoy!
🛠️Improved Task Creation in Blameless Create Task Modal in the UI
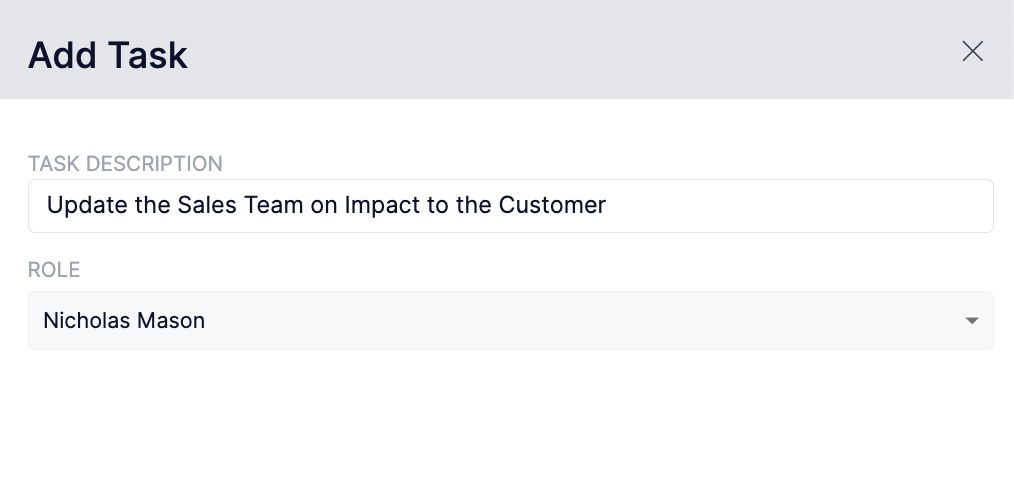
In our latest update, we've streamlined this task-creation process by removing the option to select a status when creating a new task. This helps users focus on task creation by eliminating the redundancy of having to select a “status” for the task when one can already be inferred by Blameless. This optimizes workflow efficiency and ensures that tasks are consistently assigned with the appropriate status, ultimately fostering improved team collaboration and overall productivity.
🔒 Enhanced Reliability Insights: DashboardReader Permissions

We’ve made some interesting enhancements to Reliability Insights that make it easier for your teammates to access the custom dashboards you create. We’ve given members of your team with the “DashboardReader” role read access to custom dashboards. This allows DashboardReader role holders to seamlessly access and glean insights from custom dashboards, empowering them to make informed decisions and contribute meaningfully to their teams' objectives. This change has the power to amplify the utility and relevance of all the dashboards you create while ensuring that every user on your team has the tools they need to thrive in their role.
🔍Improved Timeline Display: Seamless Time Zone Synchronization!
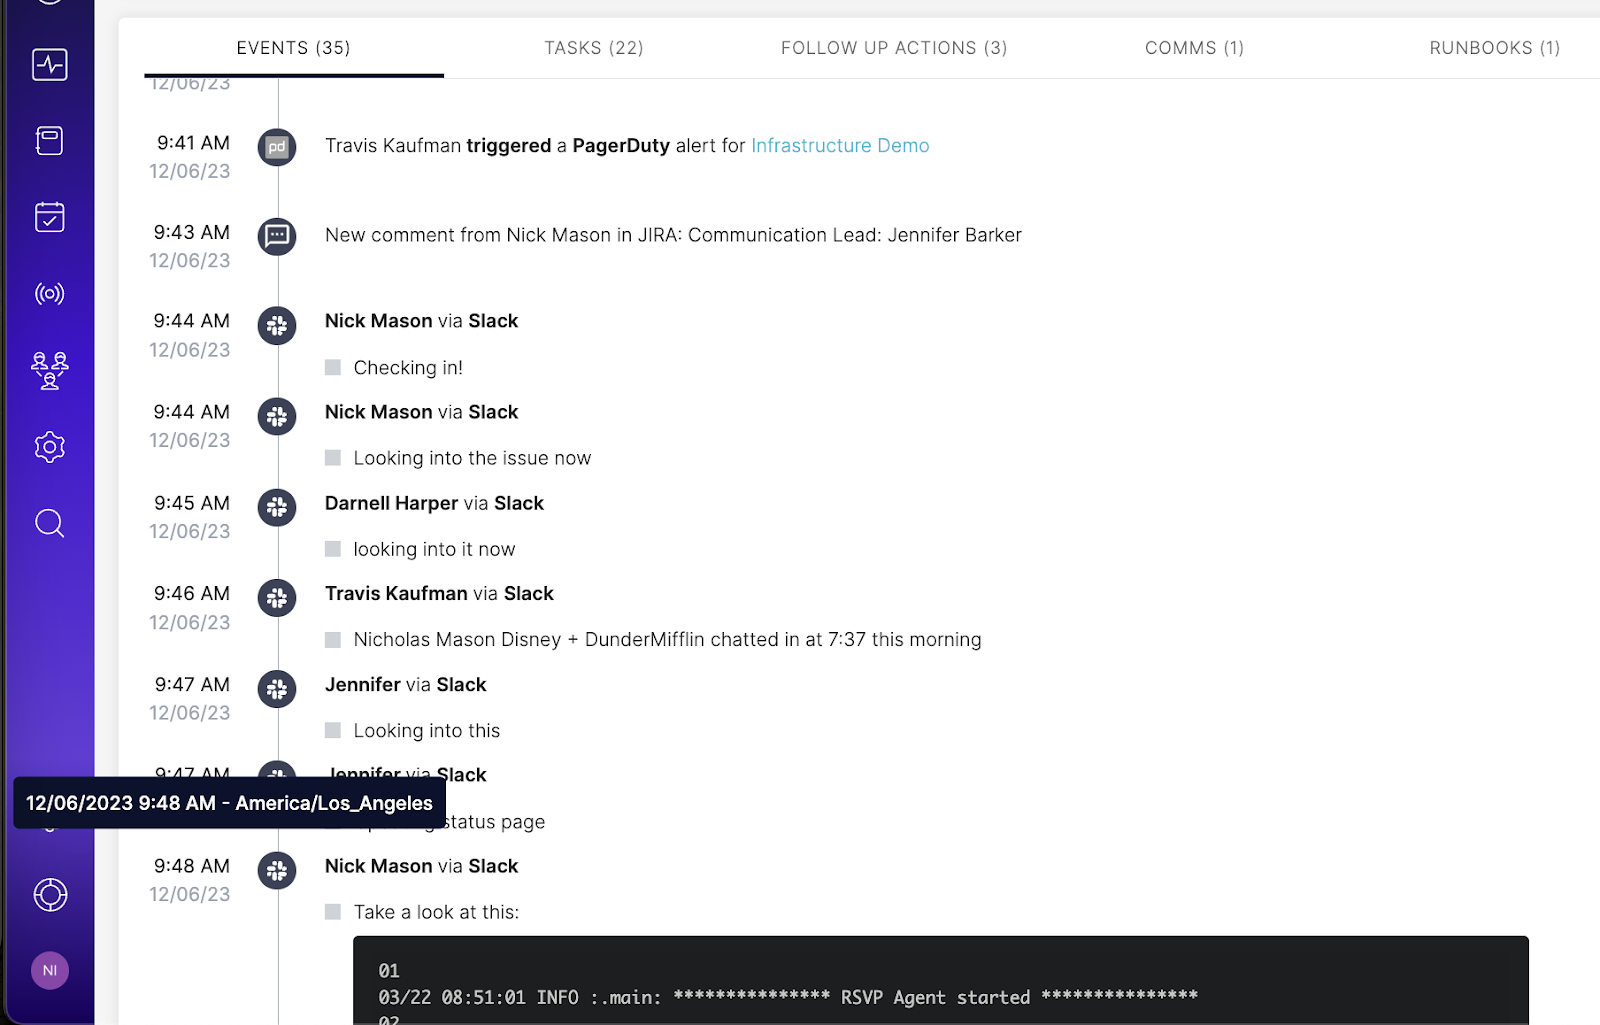
We've addressed a common issue affecting timeline clarity and efficiency. With our latest timeline enhancement, all events are accurately displayed according to the chosen user's time zone. This eliminates any ambiguity around the timeline of critical events and makes collaborating during the post-incident retrospective process even easier.
🚀 Exciting Update: Enhanced Incident Type Auto Invite Functionality!

We're thrilled to unveil a powerful enhancement to our Incident Type Auto Invite Users feature. Previously, users encountered difficulty distinguishing between Slack users with identical display names when selecting auto-invites for incident channels. We've improved this process by adding an additional field for user distinction. Now, you can effortlessly identify and invite the right team members, ensuring swift and effective incident response every time. This enhancement not only streamlines collaboration but also reinforces our commitment to providing intuitive solutions tailored to your needs.
🌟 New Feature Alert: Enhanced Retrospective Reminders!

We've made some big updates to our Retrospective tool by enhancing the Reminders feature. We’ve given users the power to exclude weekends and US Holidays from their retrospective reminders, ensuring that teams only get notified when they are working. This is a really important step forward in helping teams avoid engineering burnout by eliminating unwanted notifications to your team on their days off.
Have you wondered how long it takes your team to complete critical tasks like acknowledging alerts or escalating an incident to the next level in PagerDuty? Making the team more efficient at completing these types of tasks can have a big impact on their overall effectiveness. These types of data points are great to examine during the retrospective process, but only if you capture them in the first place. Blameless now captures all those PagerDuty actions in your incident timelines as “critical events”. Each one clearly displayed, easily accessible, and ready to be discussed at your next retrospective meeting.
Notifications, acknowledgments, transitions to other teammates, manual or triggered escalations, priority changes, manual resolutions, all of these event types can now become part of your analysis of each incident. These new dimensions can help you get right to the heart of your team's standard incident response performance.
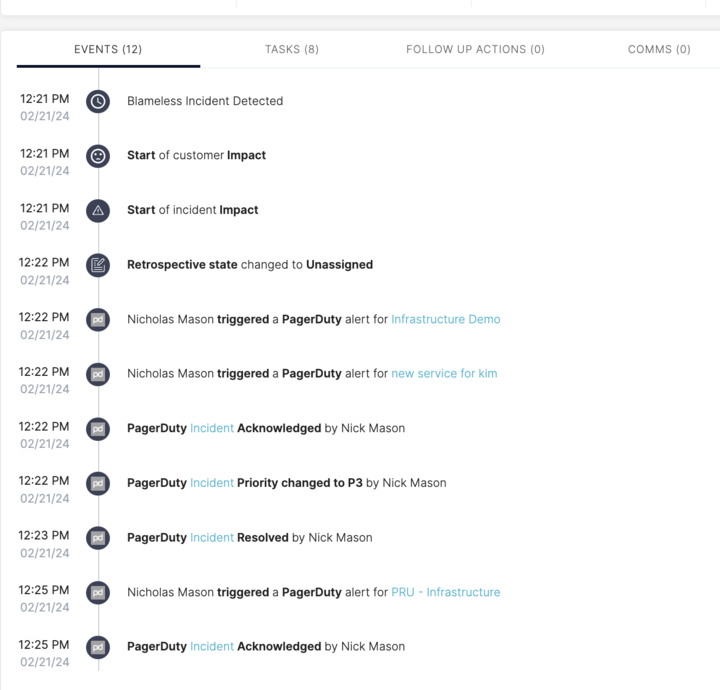
PagerDuty events in the Incident timeline
Out of the box, Blameless automatically captures the following critical PagerDuty actions in the incident event timelines:
- Triggered PagerDuty alerts
- Acknowledged PagerDuty incidents (related
- Unacknowledged PagerDuty incidents
- Escalated incidents
- Changed incident priorities
- Changed incident status (resolved)
Each record captured in the Blameless incident timeline includes a link back to the related PagerDuty alert or incidents, including the name of the responder who triggered the action in PagerDuty, so that you can easily correlate who did what when.
Then, when doing retrospectives, the incident timeline is readily available to users collaborating on crafting their retrospective and blamelessly assessing what could have been done differently to resolve incidents faster.
Reporting PagerDuty event statistics using Reliability Insights
With all these new PagerDuty events captured in Blameless, team leaders can produce powerful dashboards and reports to extract critical insights and trends using reliability insights. These can be shared with key stakeholders to identify more opportunities for improving the performance of the incident response team.
For example, reporting on the time from event triggering to acknowledgment in PagerDuty offers valuable insights into operational efficiency, but also SLA compliance, team performance, root cause analysis, real-time visibility, and continuous improvement, ultimately contributing to more effective incident management and better organizational resilience.
As you build new tiles (tables or graphs) in your dashboards in Reliability Insights, you can view and filter such PagerDuty events matching the following event types by filtering those starting with the word PAGER:
- PAGER_TRIGGERED
- PAGER_INCIDENT_RESPONDER_ADDED
- PAGER_INCIDENT_PRIORITY_CHANGED
- PAGER_INCIDENT_ACKNOWLEDGED
- PAGER_INCIDENT_RESOLVED
- PAGER_INCIDENT_ESCALATED
Call to action
To benefit from those new enhancements, immediately contact your Blameless administrator to disable and re-enable the integration of your Blameless instance with your PagerDuty account.
For brand new integrations with PagerDuty, Blameless will automatically place the new Blameless webhook in PagerDuty for Blameless to automatically capture those PagerDuty actions in the incident timeline.
Every incident responder has the same problem when they first join an incident. They need to get up to speed “yesterday” so they can figure out how to help the team move forward. Trying to read through, and glean the context they need, from a chaotic Slack thread is not an efficient use of time and energy. Relying on your incident commander to onboard each participant to the incident is just as slow and unreliable. Don’t worry, the Blameless Incident Assistant™ is here to solve this problem for you. Incident Assistant generates a comprehensive incident summary for every member of your team. Instantly available on-demand at any time during or even after the incident has been resolved.
Whether you are part of the incident from the very beginning, or you’re pulled in later to help out, the Blameless Incident Assistant™ Will hand you every piece of critical information you need to contribute from the moment you enter the incident channel. The incident summary is comprehensive and focused on what you need most: A short and long description of the issue, its actual impact, the list of impacted capabilities, and how the investigation has progressed so far to mitigate the issue.
Powered by OpenAI, the Blameless Instant Assistant™ is available now in Preview mode, ready to assist anyone involved directly or indirectly with the incident when they need it most!
Blameless Incident Assistant™ does more than just get your responders up to speed, it can keep your team on the same page from declaration to resolution. Your team can easily prompt Blameless Incident Assistant™ at any point throughout the process to provide a succinct, comprehensive assessment of what is known so far about the incident.
Invoke the incident summary at any time
It just takes a few messages in Slack at the beginning of the incident to generate a succinct and useful incident summary. Anyone who joins the incident channel in Slack has multiple ways to access the incident summary whenever they need it.
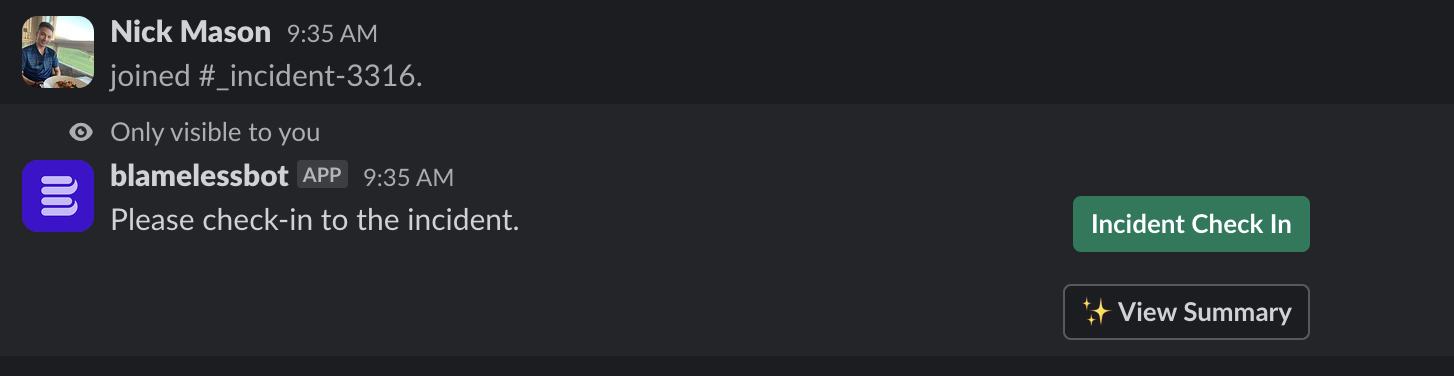
First, whenever incident responders join an incident, they are provided the option to view the latest AI-generated incident summary with a View Summary button presented in the main incident welcome message at the beginning of the incident and also in the personalized welcome message presented to users each time they check-in to the incident channel in Slack.

Additionally, during the incident, users can use the following easy-to-remember Blameless command to display the incident summary at any time during the incident.
/blameless view summary
Note that users must have the IncidentReader or IncidentWriter roles per incident type to be able to execute this Blameless command.
Understanding your incident summaries
Because the incident summary is continuously being updated with the latest messages captured in the incident channel, you can access the summary in a pop-up window that also be minimized or closed at any time using either the Blameless command or clicking on the View Summary button.

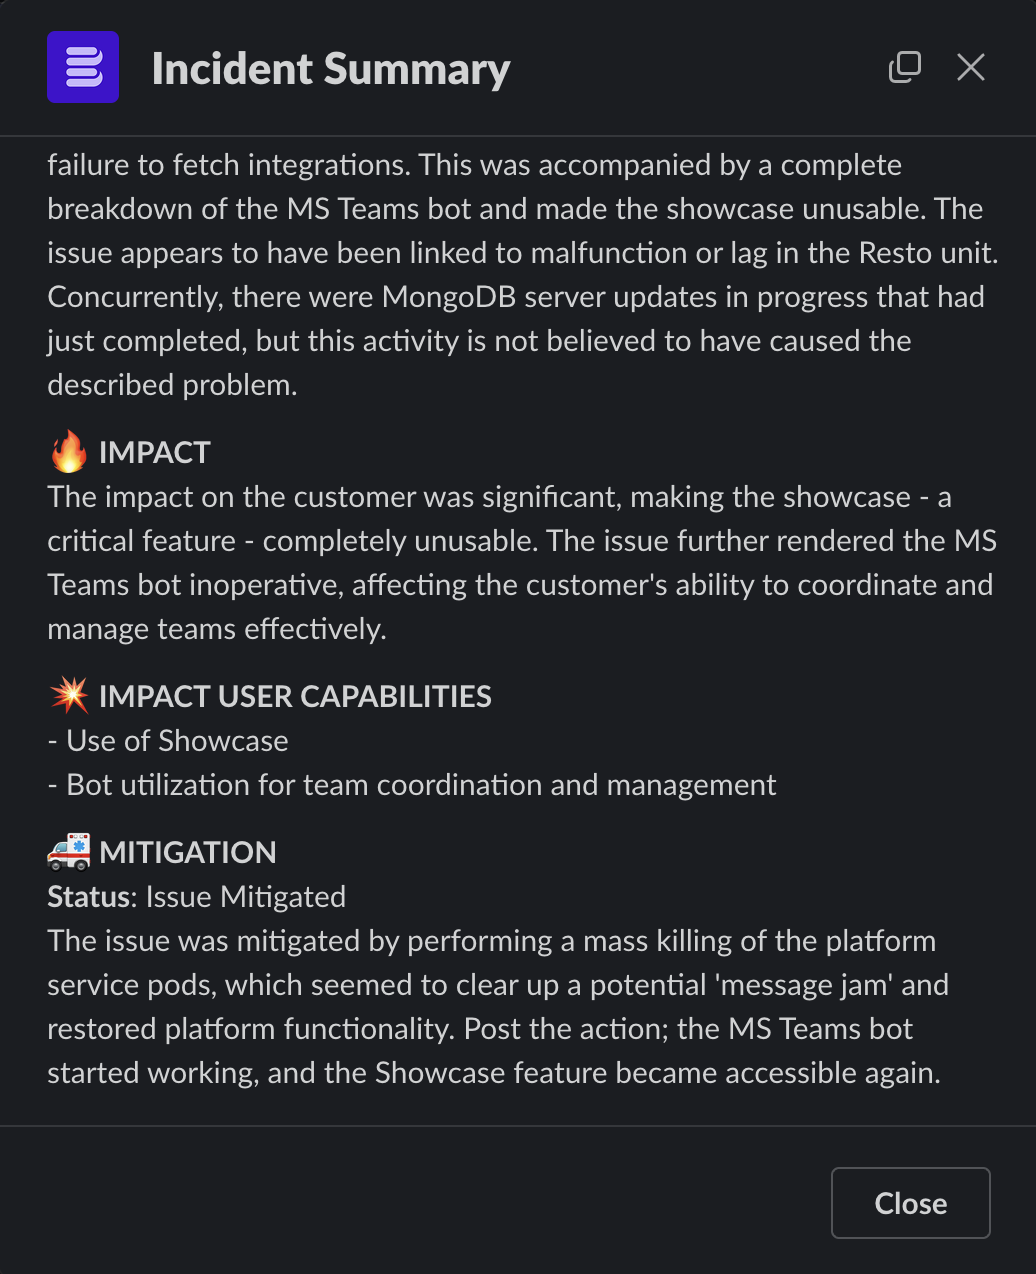
As you can see, the incident summary contains the following succinct but powerful, easy to read in a blink of an eye overview of the incident and what the team has done so far, etc:
- Issue: one sentence description of the issue
- Detailed: short summary of what is known so far about the issue,
- Impact: how this issue is impacting your customers and/or users,
- Impacted capabilities: list of capabilities affected by the incident
- Mitigation: what has been accomplished so far
Integrate with your own OpenAI account
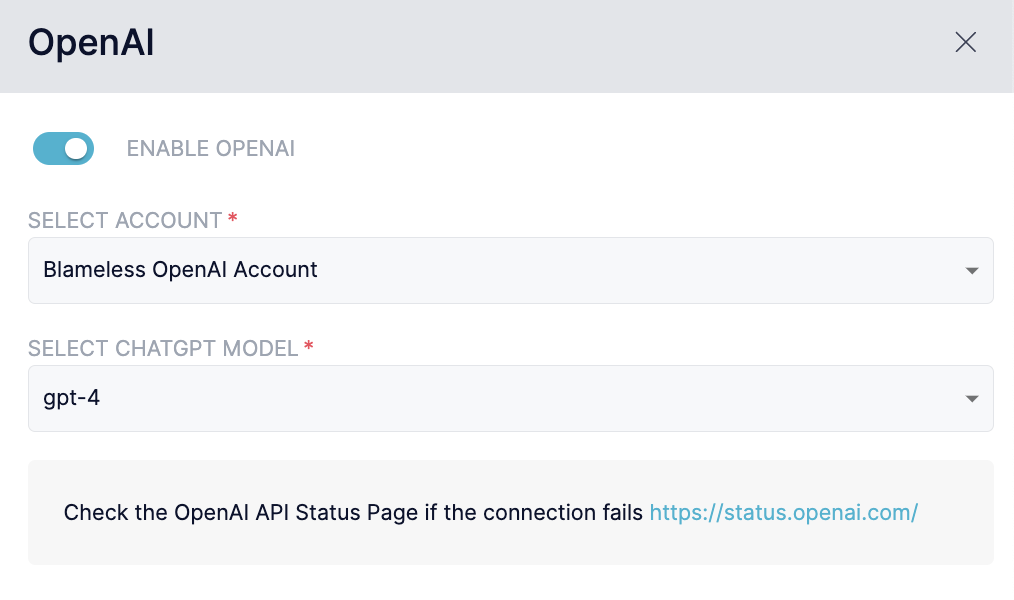
Out of the box, by default, the integration with OpenAI is disabled in Blameless, giving you the option to enable it, when you are ready, using your own OpenAI account as followed:
After you log in to your OpenAI account, go to https://platform.openai.com/api-keys generate and copy/save a new OpenAI API key
Then log in to your Blameless instance, and go to the OpenAI integration settings (Settings > Integrations > Generative AI) to enter your new key and enable the integration.
Call to action
Ask your Blameless administrator to integrate your Blameless instance with your OpenAI account or use Blameless OpenAI account as described above. If you are using Blameless with Microsoft Teams, expect to have access to the Incident Assistant in the very near future.
Finding the right subject matter experts to join an investigation is something you wish happened yesterday. Failing that, you’ll probably settle for “As soon as humanely possible”. Fast recruitment of the right experts when an incident kicks off can be a difficult task, but it can all be the difference between quick resolution and a problem spiraling out of control.
That moment when an incident starts is really stressful, so we’ve made finding the right people to help you as easy as possible. We’ve expanded our integration with PagerDuty and given you new ways to bring experts into your incident sooner, faster, and at any time during an incident.
We know recruiting styles can vary greatly from one organization to the next so we’ve made sure we can support them all. Whether you’re using PagerDuty as a true service catalog, as a series of escalation policies, or just as a way to page the same person for different incident types, we’ve got you covered.
With Blameless, incident responders can trigger PagerDuty alerts multiple times, at any point during the incident. NOW, those responders can select one or more PagerDuty escalation policies or PagerDuty responders explicitly, directly from their incident channels in Slack. This is perfect for scenarios where incident responders may not initially know which specific services or teams are affected, but they know which people might be able to help. This gives your team significantly more flexibility to choose the best way to recruit experts throughout the duration of an incident.
Do more with the same Slack command
Incident responders don’t need to learn anything new to take advantage of those new capabilities. Simply continue to use the existing Blameless command to trigger PagerDuty alerts at any time during the incident from within their Slack incident channels: /blameless trigger alert

Note that Blameless users working in Slack, need to be granted the IncidentWriter Blameless role for each specific incident type to be able to execute this command. For more information on Blameless RBAC functionality go here).
More ways to escalate with an improved user experience
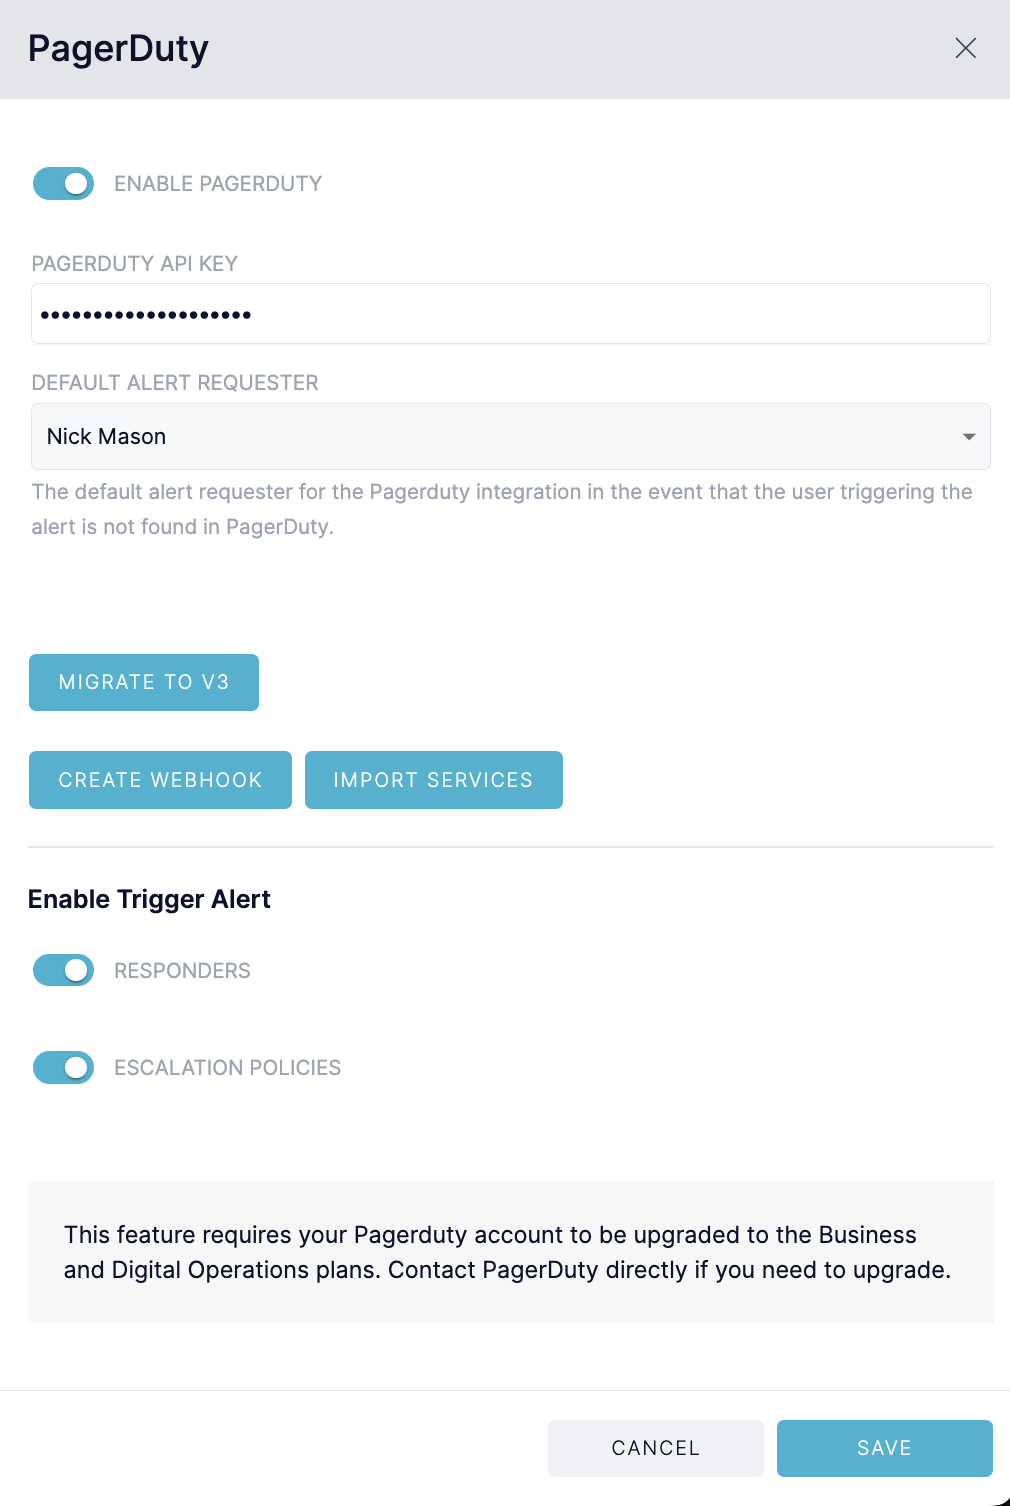
When this command is executed, Blameless presents incident responders with a new Slack pop-up window where they can decide the best way for them to recruit the right responders, either by selecting a service, one or more escalation policies or one or more responders.

However, if escalating by directly selecting an escalation policy and/or a responder is not the way you want your incident responders to operate, you can decide to hide one or both new options to enforce your preferred method to recruit specialists to your Blameless incidents. Simply have your Blameless administrator, enable or disable those options in the PagerDuty integration configuration settings:
Already built-in automation
If you are new to Blameless, you should also know that Blameless automatically invites all Pagerduty users to your Slack incident channel whether they have been notified by selecting a service, an escalation policy or directly by their username. However, to be invited to a Slack channel, the notified PagerDuty user has to have a user identity in Slack matching the same email address.
Additionally, if you have a simpler escalation model for incident response operations, while keeping your service catalog, team members and escalation policies up to date in PagerDuty, Blameless can make your life easier. By simply mapping Pagerduty services to Blameless incident types, you are telling Blameless to automatically recruit incident responders which are currently responsible for the services when starting an incident, without having to manually trigger an alert from your Slack incident channel. And, if you still need to recruit additional specialists to your incident, you can then manually trigger alerts using the above Blameless command at any time.
Call to action
Ask your Blameless administrator to enable one or both options in Blameless under the PagerDuty integration setting page at your earlier convenience and let us know how this is helping you recruit team members faster and more easily.
Blameless Comms Assistant™, powered by OpenAI™, makes sending effective incident updates to various audiences, easier than ever. Comms Assistant can now be integrated with your own OpenAI account. So, if you have policies governing the use of Generative AI products and have your own OpenAI’s ChatGPT Enterprise subscription, you can leverage your OpenAI account to keep your incident data private. Blameless lets you integrate with either the ChatGPT engine version 3.5 or 4.0, so you can choose which generation of model works the best for your team.
Frequently crafting incident updates that share the perfect amount of information, and strike the right tone can be incredibly time-consuming. Keeping all your stakeholders assured and the right slack channels updated requires more forethought and manual customization than you can afford in a crisis. So, in addition to its powerful default prompts, Blameless now gives you full control over the Generative AI prompts in Comms Assistant. This allows you to build a fully tailored communication strategy by audience for each incident update. Then let the system take over so you can get back to putting out the fire.
Integrate with your own OpenAI account
Out of the box, by default, the integration with OpenAI is disabled in Blameless, giving you the option to enable it, when you are ready, using your own OpenAI account as followed:
- After you log in to your OpenAI account, go to https://platform.openai.com/api-keys generate and copy/save a new OpenAI API key
- Then log in to your Blameless instance, and go to the OpenAI integration settings (Settings > Integrations > Generative AI) to enter your new key and enable the integration.

Customize the Comms Assistant
New Comms Assistant Settings
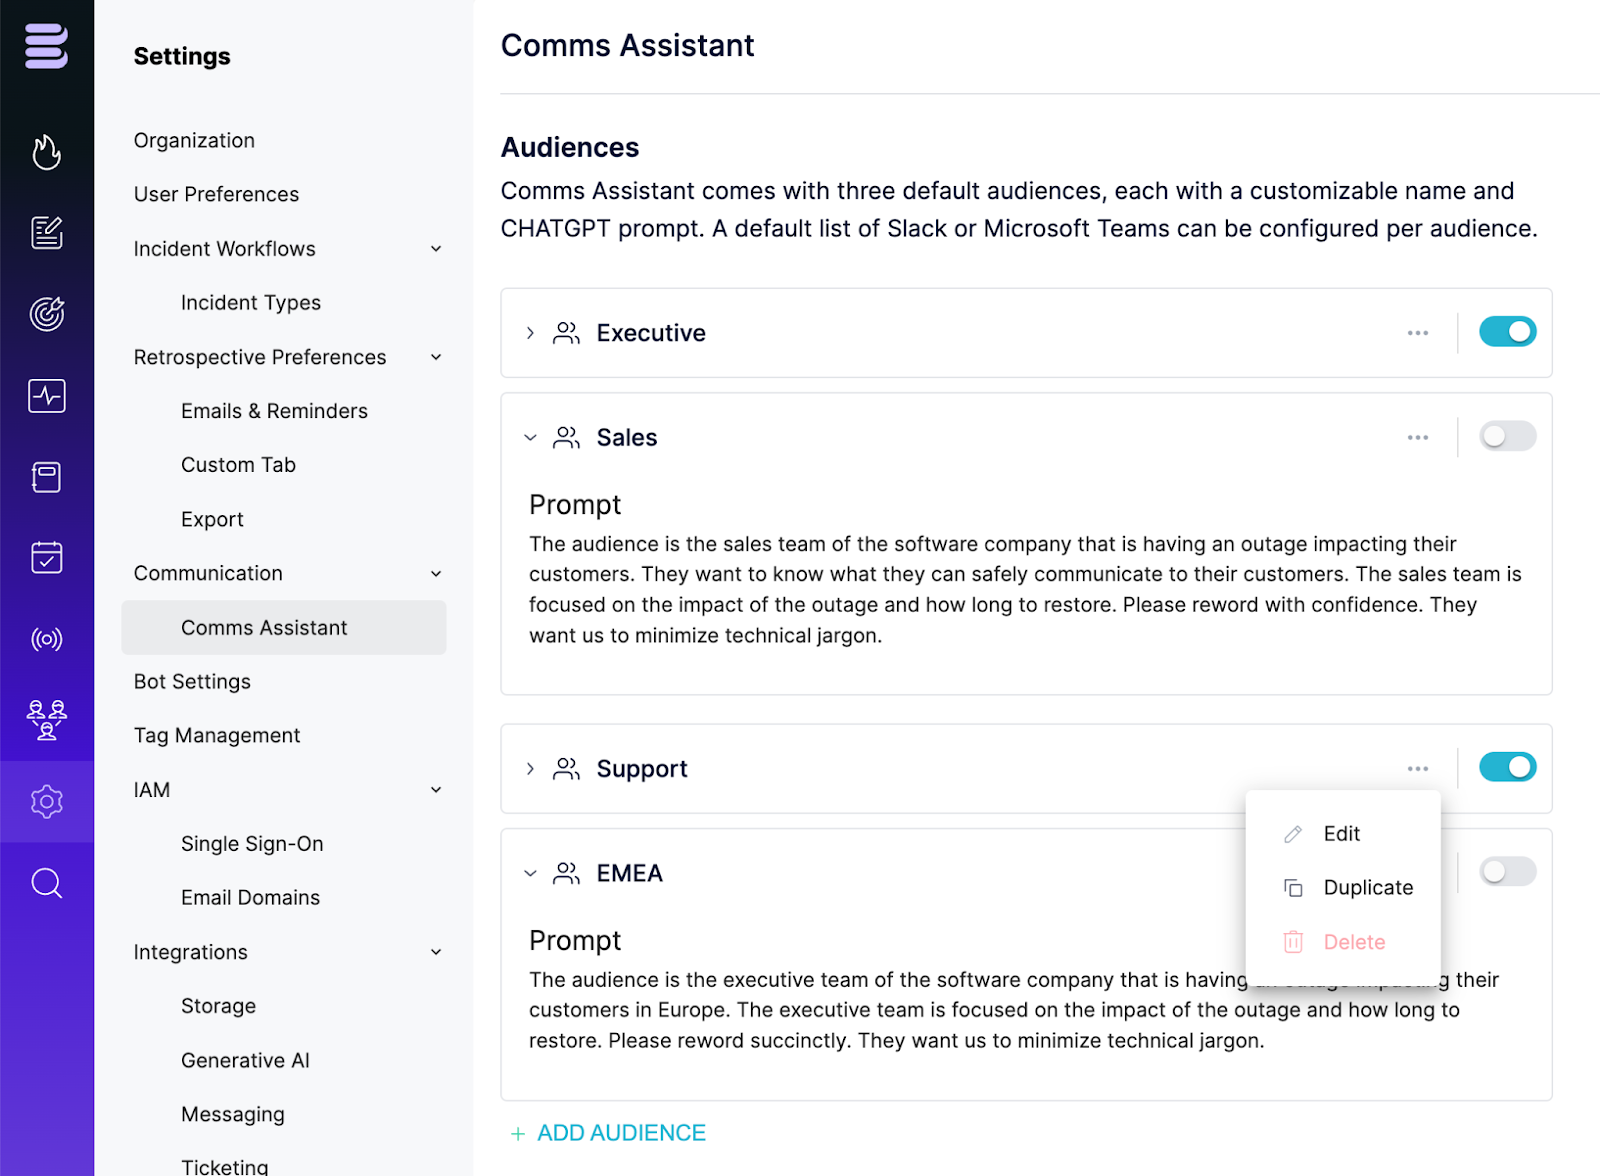
The Comms Assistant comes with its own setting page which can be found in the Settings section of your Blameless instance under the new Communication section (go to Settings > Communication > Comms Assistant).
Customize the audience list and design your own OpenAI prompts
Out of the box, Comms Assistant, gives you three default audiences with prompts carefully engineered by Blameless to effectively tailor your incident updates to either an Executive, Sales, or Customer Support team.
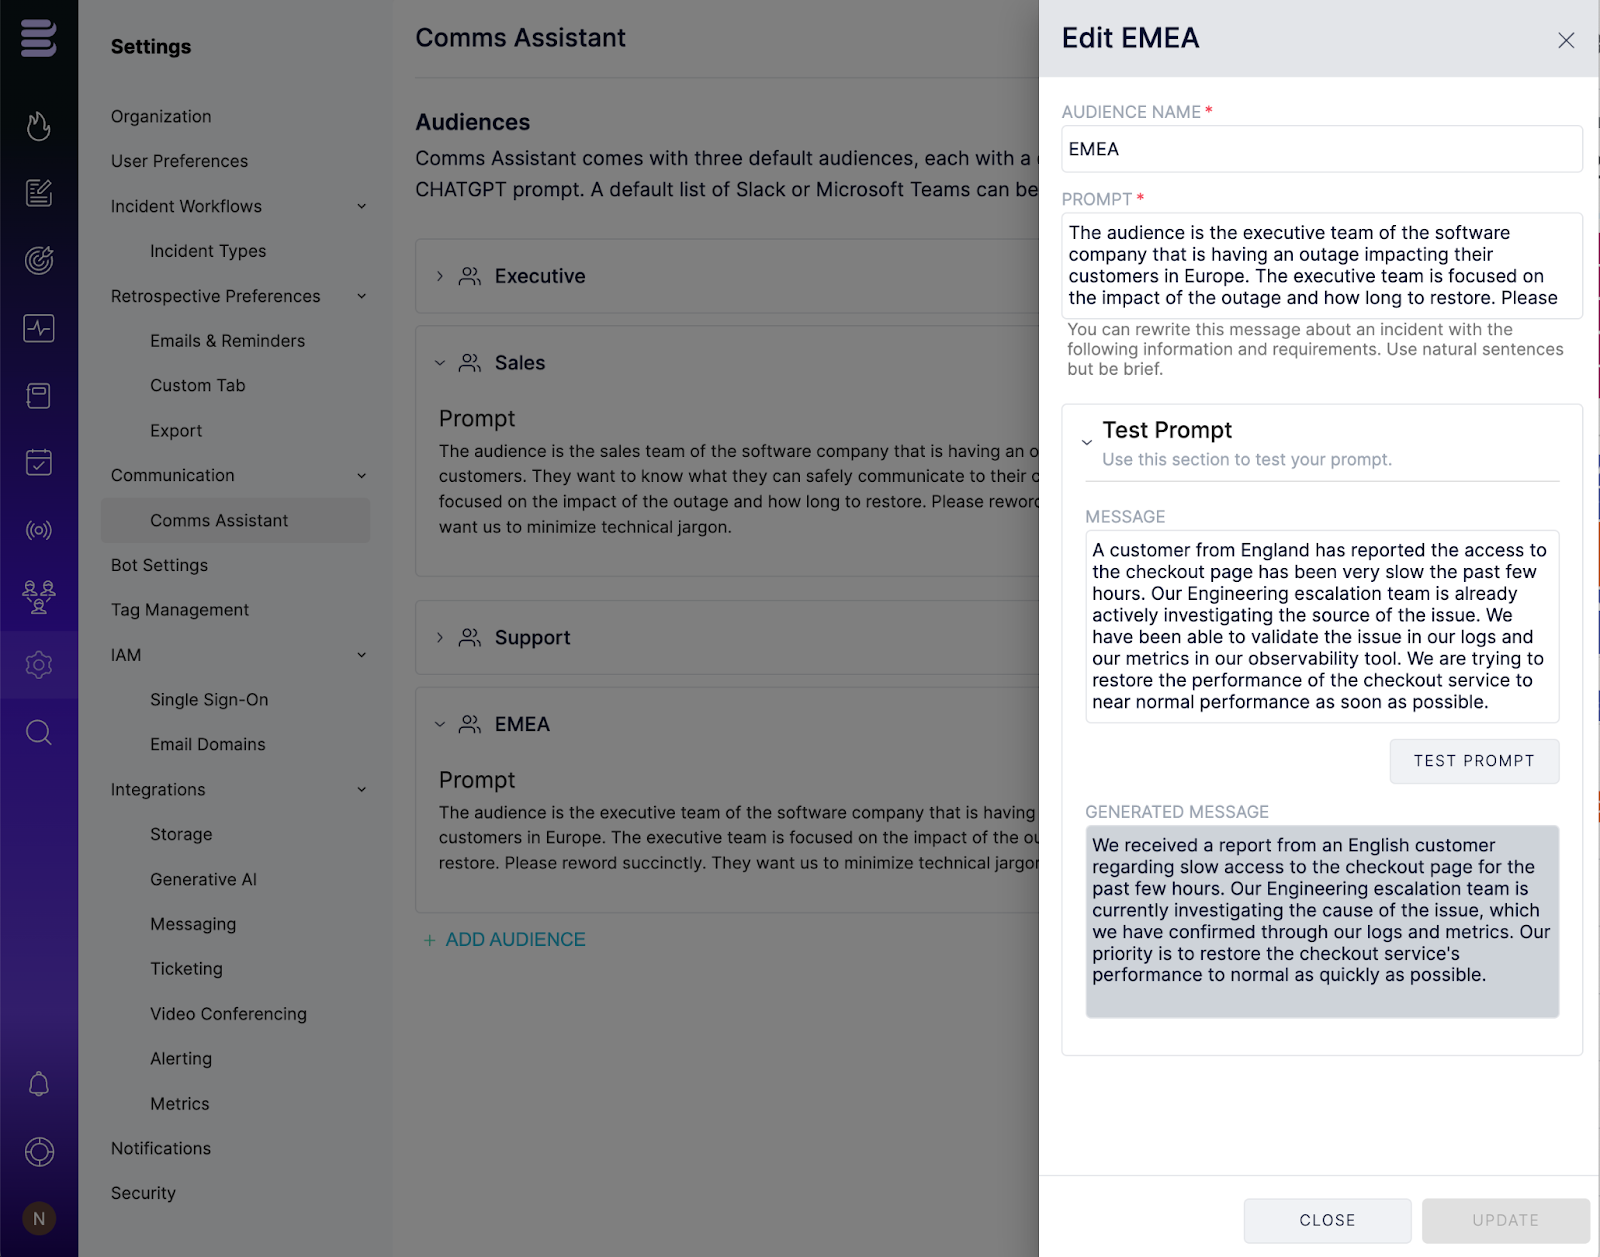
However, if you want more control over how incident updates should be generated, Blameless puts Generative AI at your fingertips. With the option to add new, additional audiences, each with their own custom prompt. You can experiment with these custom prompts directly in Blameless before ever engaging Comms Assistant in Slack.
Feature summary
- Activate/deactivate audiences - hides/shows the audience in the `send comms` modal in Slack
- Includes 3 default audiences out of the box, with default prompt engineered by Blameless, with the flexibility to edit the audience display name as well as the list of default Slack channels to be added to the `send comms` modal in Slack.
- Add, test, and activate new audiences with custom prompts, engineered by you, with the option to customize the list of default Slack channels, by duplicating any existing audiences with its current prompt (including the default audiences).
Test your prompt directly in the Comms Assistant settings
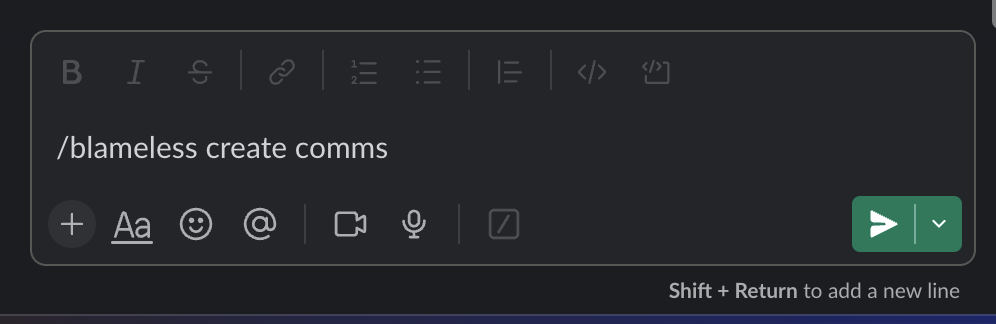
Using the Comms Assistant in Slack
Once you have configured the Comms Assistant to your custom needs and enabled the integration with your OpenAI account, incident responders can now more easily and more rapidly than before craft very effective incident updates directly from Slack, using the following Blameless send comms command at any point in time during the incident: /blameless send comms
Sending reminders using CommsFlow
Additionally, do not forget to create reminders in CommsFlow to remind your communication leaders (or any role name you choose) to send those ad-hoc incident updates at specific transitions of the incident of your choosing.
Getting Started!
Incident response and retrospective is a “multi-team” effort! For engineering organizations to embrace the principles of incident learning at scale, certain conditions must be met:
- Teams must be able to work in tandem without impeding each other's progress.
- Resources and learning created along the way must be reasonably organized or structured in order to be valuable.
- Every team member must have the capability to access and share this new wealth of knowledge, built through the production of high-quality retrospectives.
Sounds like a lot, but we’ve made it simple.
Blameless retrospectives can be automatically exported to Google Docs, and with this new update, can NOW be stored flexibly in any location across your folder system. This makes it easy to provide quick access to retrospective documentation for a specific team or your entire organization. This lets you quickly disseminate learning while leveraging Google access permissions to control who can engage your retrospective docs.
Additionally, the integration between Blameless and your Google Drive is now more secure. With the help of a Google user or service account, you have complete control over granting Blameless access to your Google Drive.
Use Cases
Think about how you organize your Blameless Incident Types today. Maybe you organize Incident Types by Internal Teams, Products you support, or Use Cases, such as Customer Incidents, Security Incidents, and Planned Outages. When you start a Blameless incident, the Incident Type helps you categorize incidents and controls who has permission to read, write, or access the incident at all.
With the new Google Docs Export Folders enhancement, you can predefine where a Blameless retrospective will be stored within your Google Drive. This lets you control permissions internally regarding who can see your post-incident documents. Security Incidents might have different users in Google Drive that can view your Retrospectives than Customer Incidents, for example. The moral of the story is that Blameless’ Google Docs Export capabilities are flexible to fit your needs!
Key Enhancements
- Integrate Blameless with a Google Drive using a dedicated Google service user account
- Export all retrospectives as Google Docs to a default folder
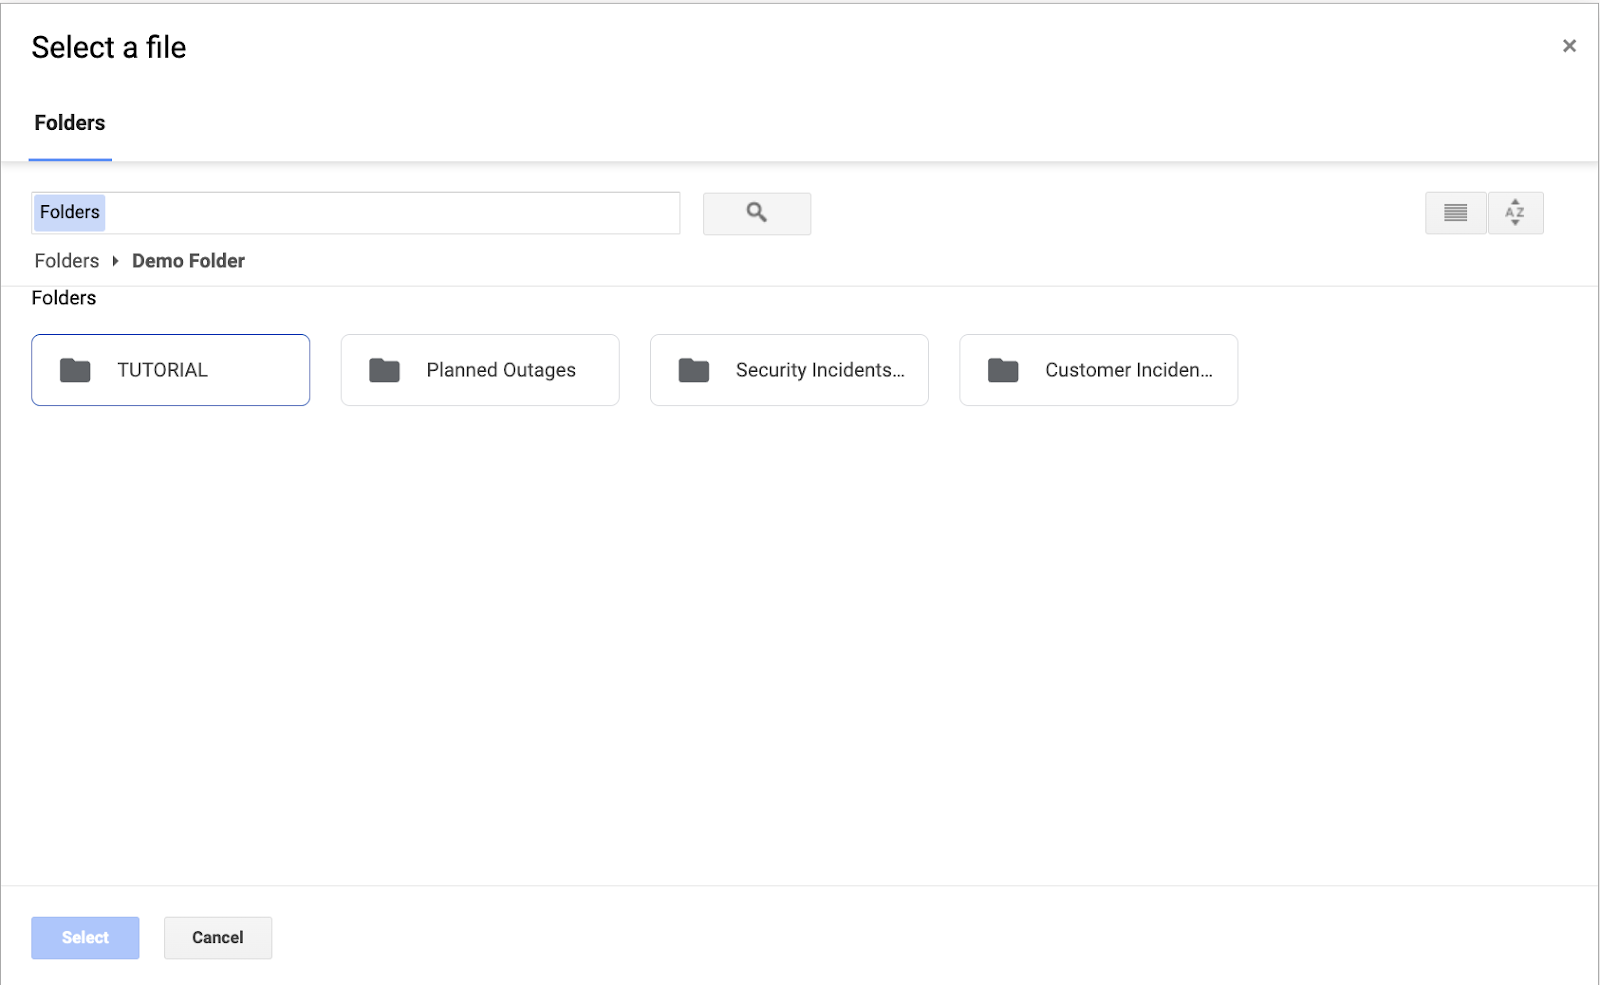
- Configure multiple folders where you want to route and store your Retrospective as Google Docs based on selected incident types
- New Export settings page under Retrospective settings to enable the automated export, and configure your default folder and custom folders.
- Using Google Drive native folder picker modal
Call to Action
High-impact IT Operations groups are always on the lookout for opportunities to improve their product and process. Blameless Reliability Insights supports these teams by delivering key insights about infrastructure and team performance. Visualizing trends in data drawn from across your monitoring, observability, on-call management, ticketing, and incident management tooling. But in order for insights like these to effectively guide your engineering investments, they also need to be easily accessible and digestible for your business and technical stakeholders. Reliability Insights dashboards can now be easily exported as a PDF to share with colleagues via Slack, Microsoft Teams, email, or your own corporate portals like Confluence. This takes the pressure off your stakeholders to locate dashboards in Blameless and makes it easy for IT Operations leaders to keep their stakeholders up to speed.
Exporting dashboards on demand
Dashboards in Reliability Insights are highly customizable reports that can be used to examine incident and retrospective data against things like your team structure or service architecture. Each dashboard contains charts (tiles) and tables that can be customized to specific audiences like an individual engineering team, your executives, customer support representatives, etc.
To ensure the right Reliability dashboards make it to their intended audience for ad-hoc or end-of-month reporting, the owner of any given dashboard can export it directly as a PDF file by clicking on the 3 dots at the top right of the dashboard.
The generated PDF is a multi-page, well-formatted document, automatically downloaded to the folder your web browser uses to store any downloaded files. You can now choose to attach this PDF file to an email, Slack message, etc or also post it on one of your internal web portals.
Go try it yourself now, and see how your dashboard charts and tables are automatically and properly organized in the rendered PDF document, in the order they appear in your dashboard (left to right and top to bottom), with up to two charts per row, and with tables displayed after the charts, allowing all table rows to be printed. All pages are numbered, with the name of the dashboard as the title of the document and the date the document was generated, at the top of the first page.
Getting Started Video
Anything you learn from past incidents and through retrospectives eventually results in some form of action that your organization wants to take to prevent similar incidents from recurring, whether it is about improving processes, software stacks, or professional skills, just to name a few. To make it easier to capture and assign such action items via the Blameless web UI, we have streamlined the process of creating follow up actions and linking them to the appropriate external ticketing system of your choice.
When creating a follow up action via the Blameless web UI, you now have the following options, which can be used concurrently for as many follow up actions as you need to create per incident:
- Created in Blameless, with the option to link the follow up action to an existing ticket from any external third party ticketing systems (e.g. Github issue, Linear, Shortcut, etc)
- Created in Blameless and integrated with Jira in the following 2 ways:
- Linking it to an existing Jira ticket, automatically importing the Jira ticket summary as the title of the follow up action.
- Linked to a Jira ticket created by Blameless, mapping data from the Blameless incident to required Jira ticket fields, which is customizable per incident type.
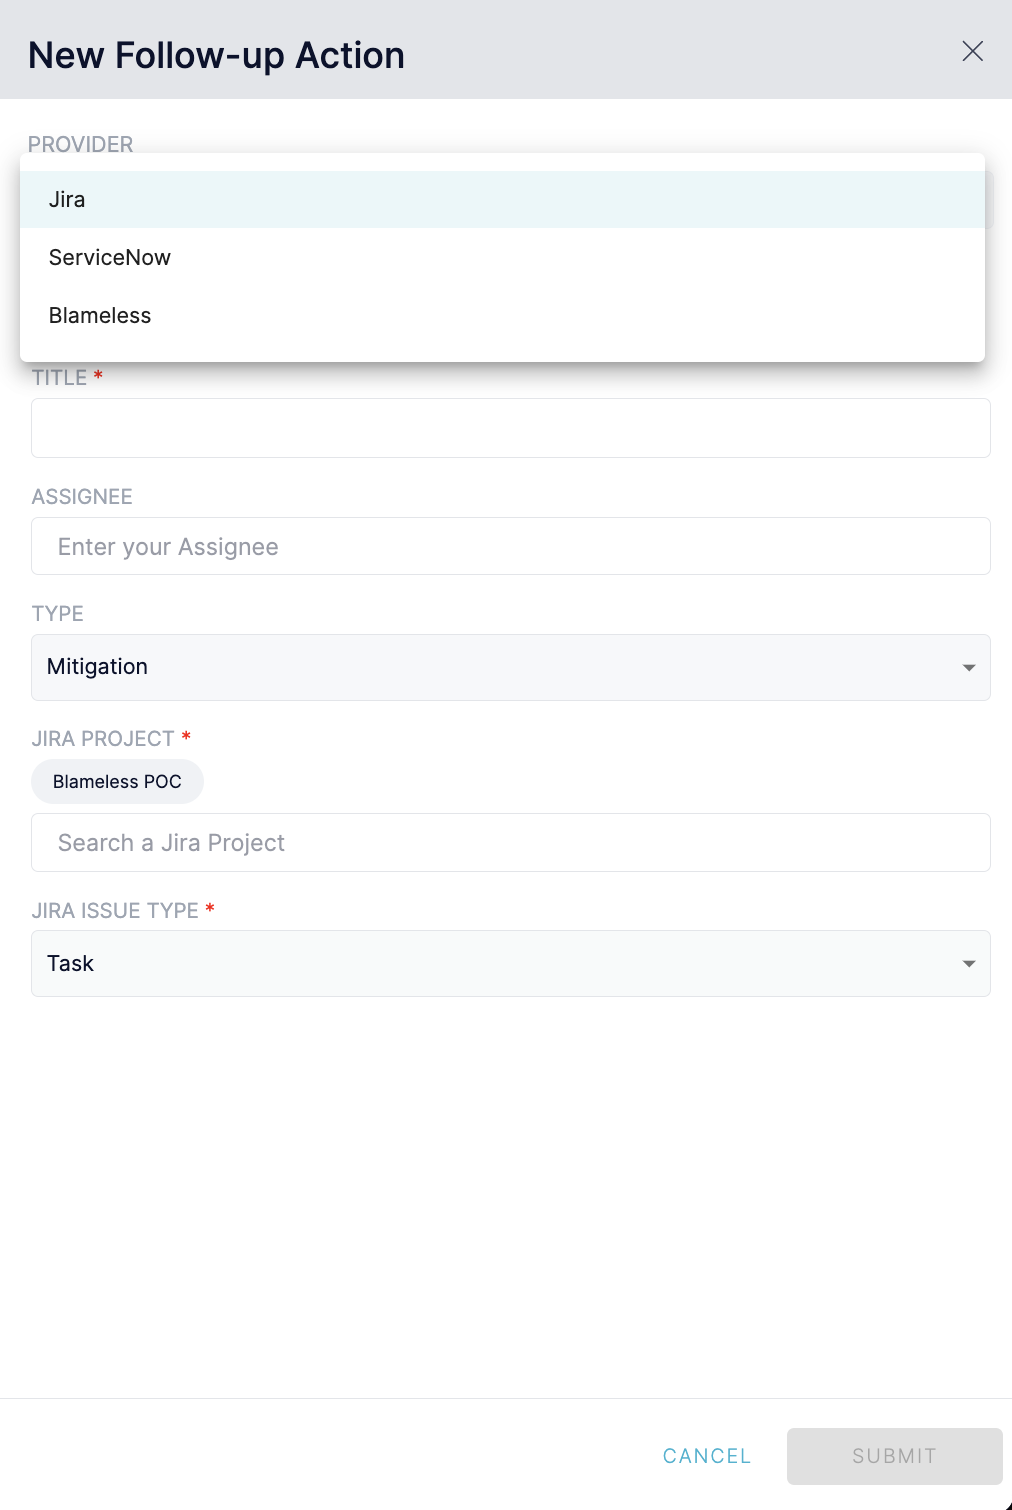
To benefit from the option to integrate your follow up actions with Jira, you first need to integrate your Blameless instance with your Jira account, otherwise this option will remain hidden to not confuse users.
Follow up actions are now created using the exact same workflow from a single “Add Action” button, whether from the Follow Up Actions tab under the incident detailed page or from the corresponding retrospective detailed page under the Overview tab. Both provide access to the same list of follow up actions, whether linked to an external ticket or to a Jira ticket or without linking it.
Starting now, we are inviting you to create your next follow up action via the Blameless web UI, and contact your Blameless administrator to enable the integration of your Blameless instance with Jira if not already integrated.
Next, stay tuned for more great news about which next ticketing system Blameless is going to integrate follow up actions with very soon!
Getting Started Video
Communicating effectively with a broad set of stakeholders is a key characteristic of good Incident response. Everyone who has a stake in recovering from a high severity issue wants to be reasonably informed of status or progress towards resolution. However, crafting and delivering regular updates to satisfy these folks takes time and focus. Two things that incident responders often can’t afford in the midst of a high severity incident.
To empower communication leaders and incident responders in providing fast, frequent and meaningful incident updates to various audiences (executive, sales, support), Blameless is introducing the first generative AI-powered Automated Incident Communications With Comms Assistant™, available now in preview mode.
From the moment an incident starts, Comms Assistant™ makes it simple to quickly tailor updates for your respective audiences:
- Executive leadership looking for progress updates, business impact or tactical response plans.
- Sales or customer success interested in resolution status and looking for messaging for their customers.
- Support teams seeking technical details.
- Communications teams assisting with market notification.
- Customers looking for updates on resolution or when they can resume usage.
Each can receive their own specially tailored, and fully automated updates, thanks to the combination of Comms Assistant™ and CommsFlow™.
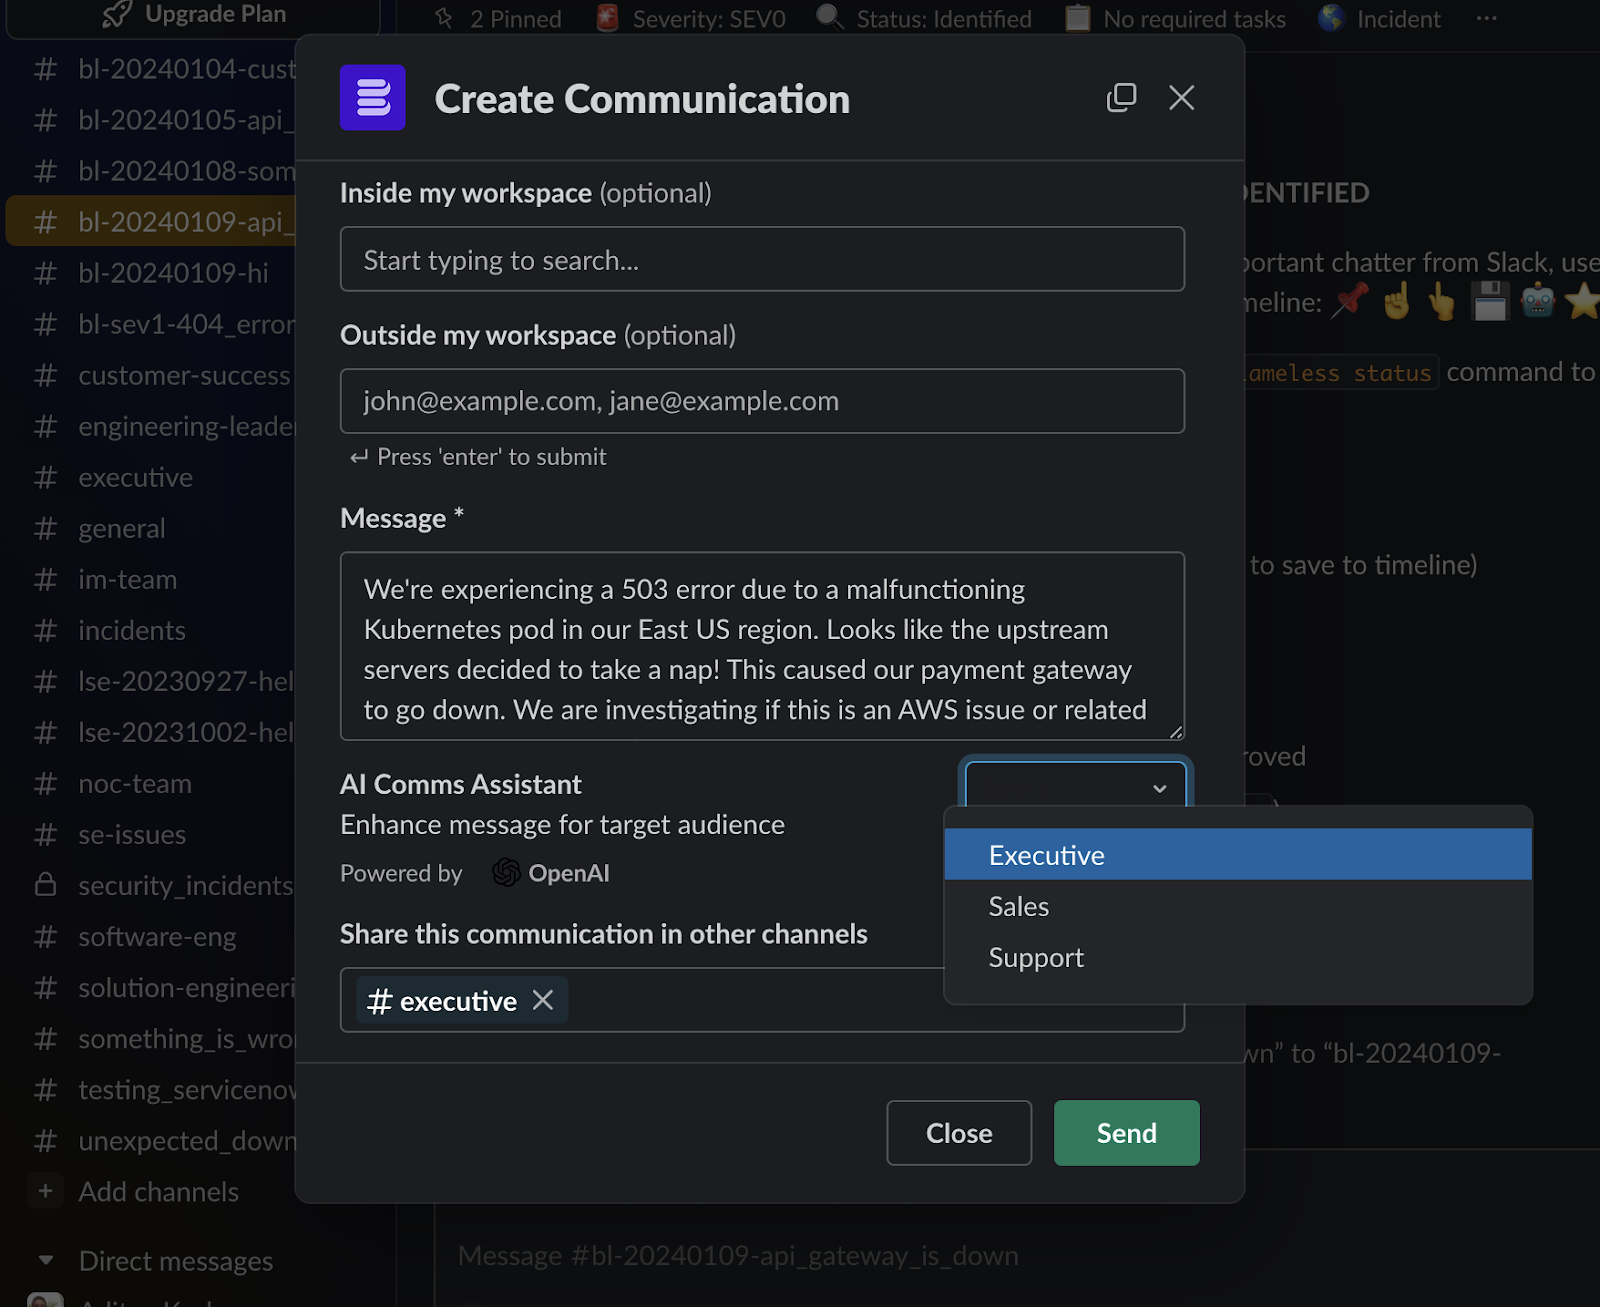
To access Comms Assistant™ through Slack, incident responders and communication leaders can leverage Blameless’ manual communication command. This is a fast and easy way to send incident updates to multiple users and audience on an ad-hoc basis via both email and Slack:
- First, you will provide a simple draft of your message.
- Then, below the message field, select one of the three default audiences provided.
- Comms Assistant™ will automatically generate a message tailored to the audience type you’ve selected, which you can further customize manually by editing it directly in the message field.

If you want to modify your original message and try again, the dropdown button gives you the option to restore your original message in the message field.
Before submitting your AI generated incident update, make sure to specify the Slack channels, users and/or emails you would like to send this higher quality message tailored to your targeted audience.
Reminder to send an update
Additionally, out of the box, don’t forget that Blameless provides a very convenient way to automatically send reminders, which can be used here to remind incident responders or even just the communication leader to submit incident updates at frequent intervals. In fact, the higher the severity of the incident is, the more frequent you might be asked to send an incident update, potentially down to every 15 minutes, depending on your communication strategy. So, go now to set up your reminders in CommsFlow™!!
Getting Started
- Contact your Customer Success Manager at Blameless to request access to a preview of this new feature.
Whether you're a Site Reliability Engineer (SRE) or a DevOps Engineer, Terraform is probably one of your favorite tools. Enterprise Reliability Management (ERM) best practices rely on incident response and retrospective workflows, that conform to Standards of Operations (SoPs) and change management control. Engineering organizations seeking a high level governance and control can now download and use the Blameless Terraform Provider to enforce critical configuration guardrails for incident workflow management in Blameless.
Blameless Terraform Provider provides the expanded flexibility to programmatically configure and update the following Blameless resources:
- Blameless organization settings
- Blameless severities and roles
- Blameless incident types, including Slack functionalities, task checklists and retrospectives.
Engineering organizations that use Blameless can now leverage the power of Terraform to reliably and securely track configuration changes (version control), track who applied the changes and when (auditing) and automate Blameless configuration changes along with their existing CI/CD workflows.
Managing incident types settings using Terraform
With the Blameless Terraform provider, managing incident types settings is easier than ever. While you can explicitly configure incident type settings on a per severity basis, you can also decide to configure the incident type settings once and apply the same settings to multiple severities. All thanks to the flexibility of the Terraform modular resource definition architecture.
Blameless Terraform provider opens the door for engineering operations leaders to do things like:
- Create a new incident type from an existing template (check Blameless resource templates available on Github)
- Update a retrospective analysis template across multiple incident types
- Ensure that incident channels created in Slack are made private for security sensitive incident workflows
- Temporarily deactivate or reactivate incident types, or deprecate an incident type entirely all by using Terraform.
How to get started
- Make sure you are up to date with the latest Terraform version
- Download the Blameless Terraform provider from the Terraform registry
- Download and customize the Blameless resource templates from our public repository: https://github.com/blamelesshq/terraform-provider-blameless/tree/main/modules
Initialize, plan, apply, and off you go!!
Starting incidents shouldn’t be stressful, especially not for the incident’s creator and leaders (aka commanders). Recruiting more incident responders, assigning roles to delegate tasks, paging on-call engineers, and affirming the set of tasks that the incident team needs to complete are all key actions that need to get underway as quickly as possible.
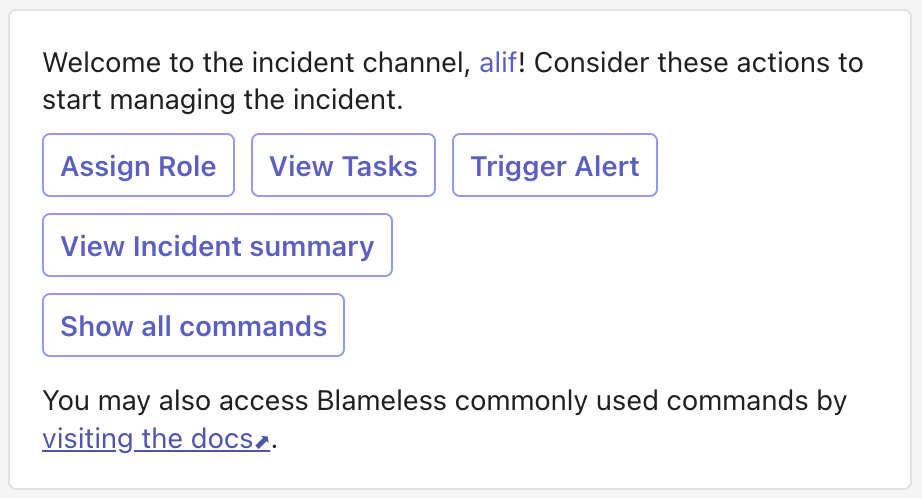
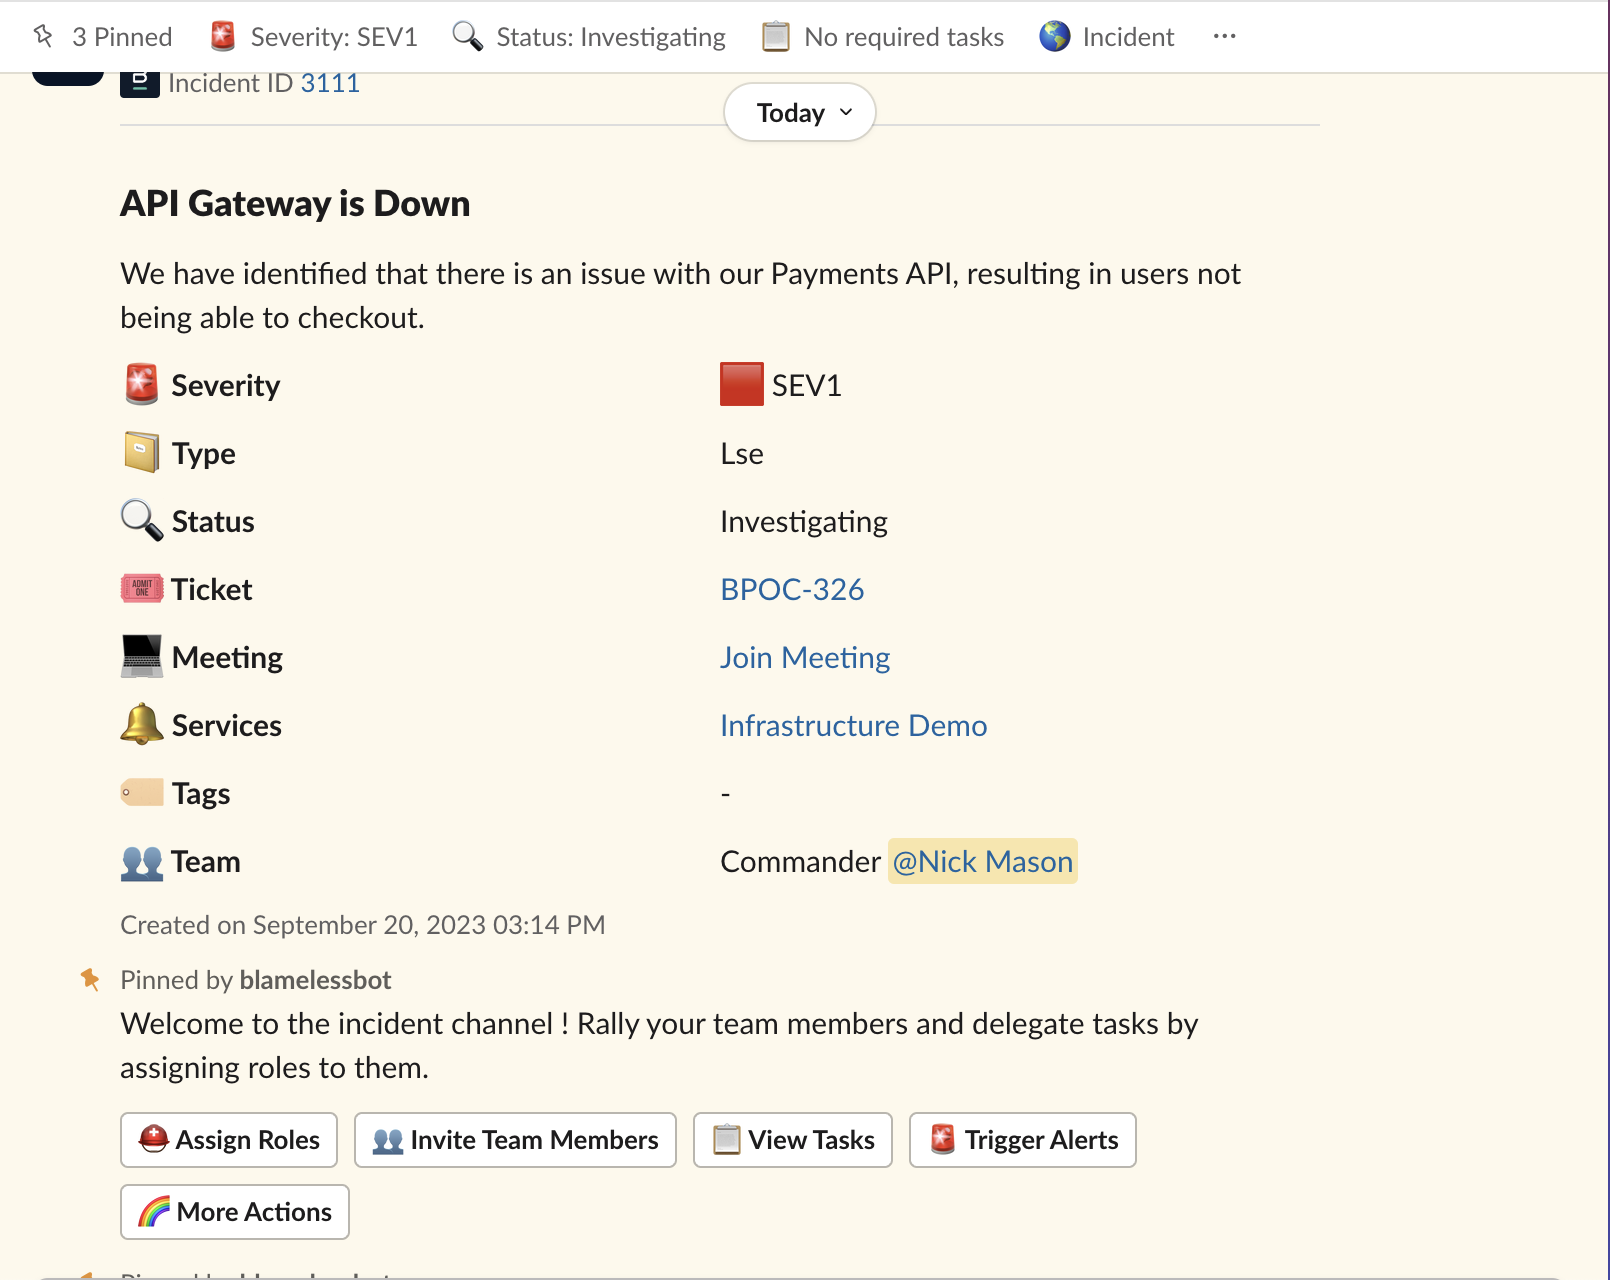
We want these types of tasks to be obvious and intuitive. So, we’ve streamlined the Blameless welcome sequence in incident channels in Slack, to include default and dynamic buttons to trigger the following most commonly used Blameless actions at the start of an incident:
- Assign roles
- Invite Team Members
- View Tasks
- Trigger Alerts - only displayed when you have integrate Blameless with Pagerduty or Opsgenie
- View incident summary - only displayed when the incident summary is excluded from the welcome sequence
- More actions
Rather than relying solely on inputting /Blameless slash commands, you and your incident responders can rapidly initiate the incident investigation and get engaged as a cohesive and productive team, with just a simple mouse-click.
Moreover, instead of displaying the task checklist at the start of the incident, it is now accessible on-demand using the new View Tasks button.
These buttons can be triggered throughout the life of the incident and the output of these Blameless commands will be displayed at the bottom of your channel like any other new direct messages.
Optionally exclude the incident summary
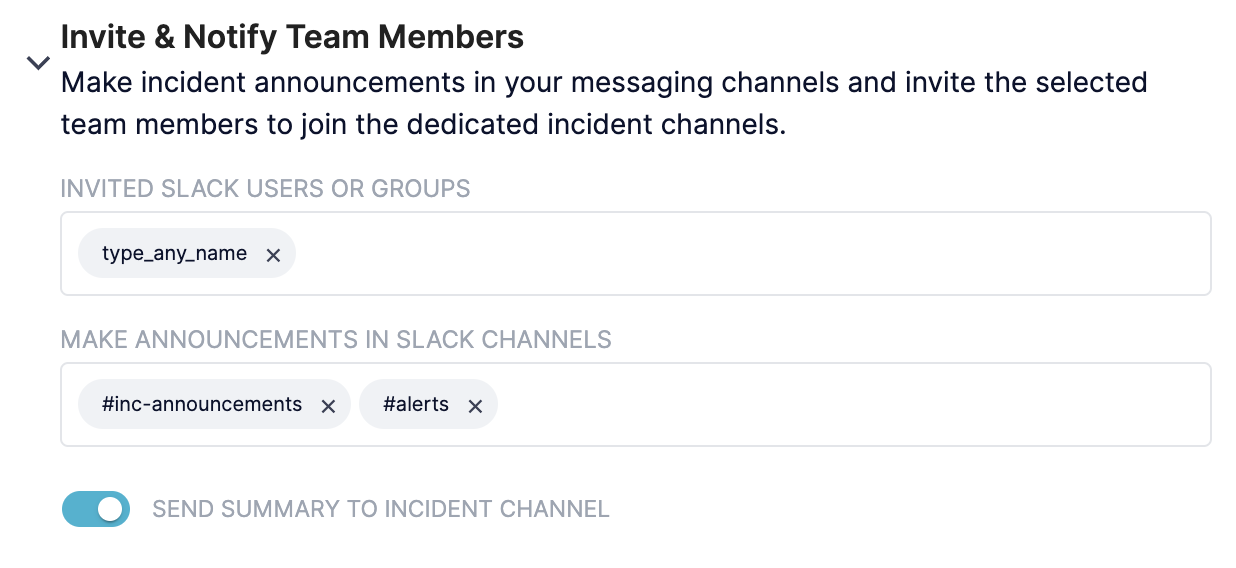
Additionally, if your team would rather not display the incident summary right at the top of the incident channel, you can now ask your Blameless administrator to exclude it from any future incident channels, which is customizable as a new setting under the Invite and Notify Users section on a per incident type basis:
Get started now!
Previously created incidents will not be affected by this change. Only new incidents created starting as of today will benefit from this improved and streamlined welcome sequence.
Running high-quality retrospectives is a team effort. Every member of the team collaborates to analyze incident data and converge on the best plan of action to prevent similar incidents from reoccurring.
Offering the best retrospective tool in the industry has been one of the pillars of our success at Blameless. Now, all the automated data collection and templated process standardization that Blameless Retrospectives provides can be seamlessly ported into Google Docs. Engineering organizations relying on Google Workspace, can now more efficiently produce, collaborate, and share high-impact Blameless retrospectives by automatically and securely exporting incident and retrospective data into Google Docs.
Automatic Data Export
Once incidents are resolved and the Google Drive integration is configured, Blameless automatically generates and exports incident and retrospective data into a newly created Google Doc. If, by policy, the incident type does not require a retrospective, no Google docs are created.
Effortless & Secure Access
A link to this Google Doc is automatically added to the retrospective details page within Blameless. Giving users quick and easy access and ensuring retrospective documentation doesn’t become a lost artifact in Google. Once in Google, users can add content and securely share access with a larger audience as needed, leveraging Google Docs' permission system (View, Comment, or Edit access modes).
Comprehensive Data Coverage & Easy to Navigate
The exported data comes pre-styled and properly converted to a Google Docs format. It includes incident and retrospective details like title, description, severity, incident type, timeline (including images captured from Slack or Microsoft Teams), incident tags, war room information (links to the Blameless incident, and corresponding Jira or ServiceNow tickets), the custom questionnaire, and the analysis template, which is customizable per incident type.
Refresh Data On-Demand
While the Google Doc is automatically created when the incident is resolved and fed with incident data collected up to that moment, users capturing more data post incident using the Blameless Retrospective questionnaire, tag management, and custom tab can update the linked Google Doc on-demand with the latest captured updates.
Secure Integration
Blameless only needs to know the specific Google Drive where you want Blameless to automatically create and store Google Docs. In this way, Blameless can operate within the folder system you assign without accessing other locations within drive that contain sensitive material.
Call to action
To get started creating and exporting retrospective data to Google Docs, ask your Blameless administrator to integrate your Blameless instance with a shared and secure Google Drive today!
New Feature Release
New Dynamic Bookmarks in Slack
At Blameless, one of our on-going missions is to maximize the productivity of your incident responders collaborating on incidents via Slack.
As additional areas of expertise become necessary, and new team members join the investigation, these new players need to quickly assess the urgency and importance of the issue at stake.
Now with NEW Dynamic Bookmarks, automatically added to each new incident channel, incident responders are provided fast access to vital incident information at any time during the investigation. Dynamic Bookmarks are a welcome complement to the incident summary, displayed at the top of the incident channel and on-demand using the `/blameless show incident` command.

From the very start of an incident, Blameless automatically adds the following key bookmarks to each incident channel in Slack:
- Severity: one of your custom severity labels
- Status: Investigating, Identified, Monitoring or Resolved
- Required tasks: 1/5 - dynamically updated as required tasks are completed per incident status (not across all statuses)
- Incident - Link to the incident detailed page on your Blameless account
- Retrospective - Link to the retrospective detailed page on your Blameless account
- Join Meeting - Link to the video conference
Required Tasks count is particularly powerful as it tracks the completion of steps necessary to progress the incident forward and can serve as a clear indicator of the team’s progress. This is an excellent reminder to task owners and incident leaders to complete the required tasks as soon as possible.
Immediate call to action
To benefit from this new feature enhancement in Slack, ask your Blameless administrator to re-authorize the Slack bot in Blameless at your earliest convenience.
Feature Releases
Slack
Customizable start incident modal
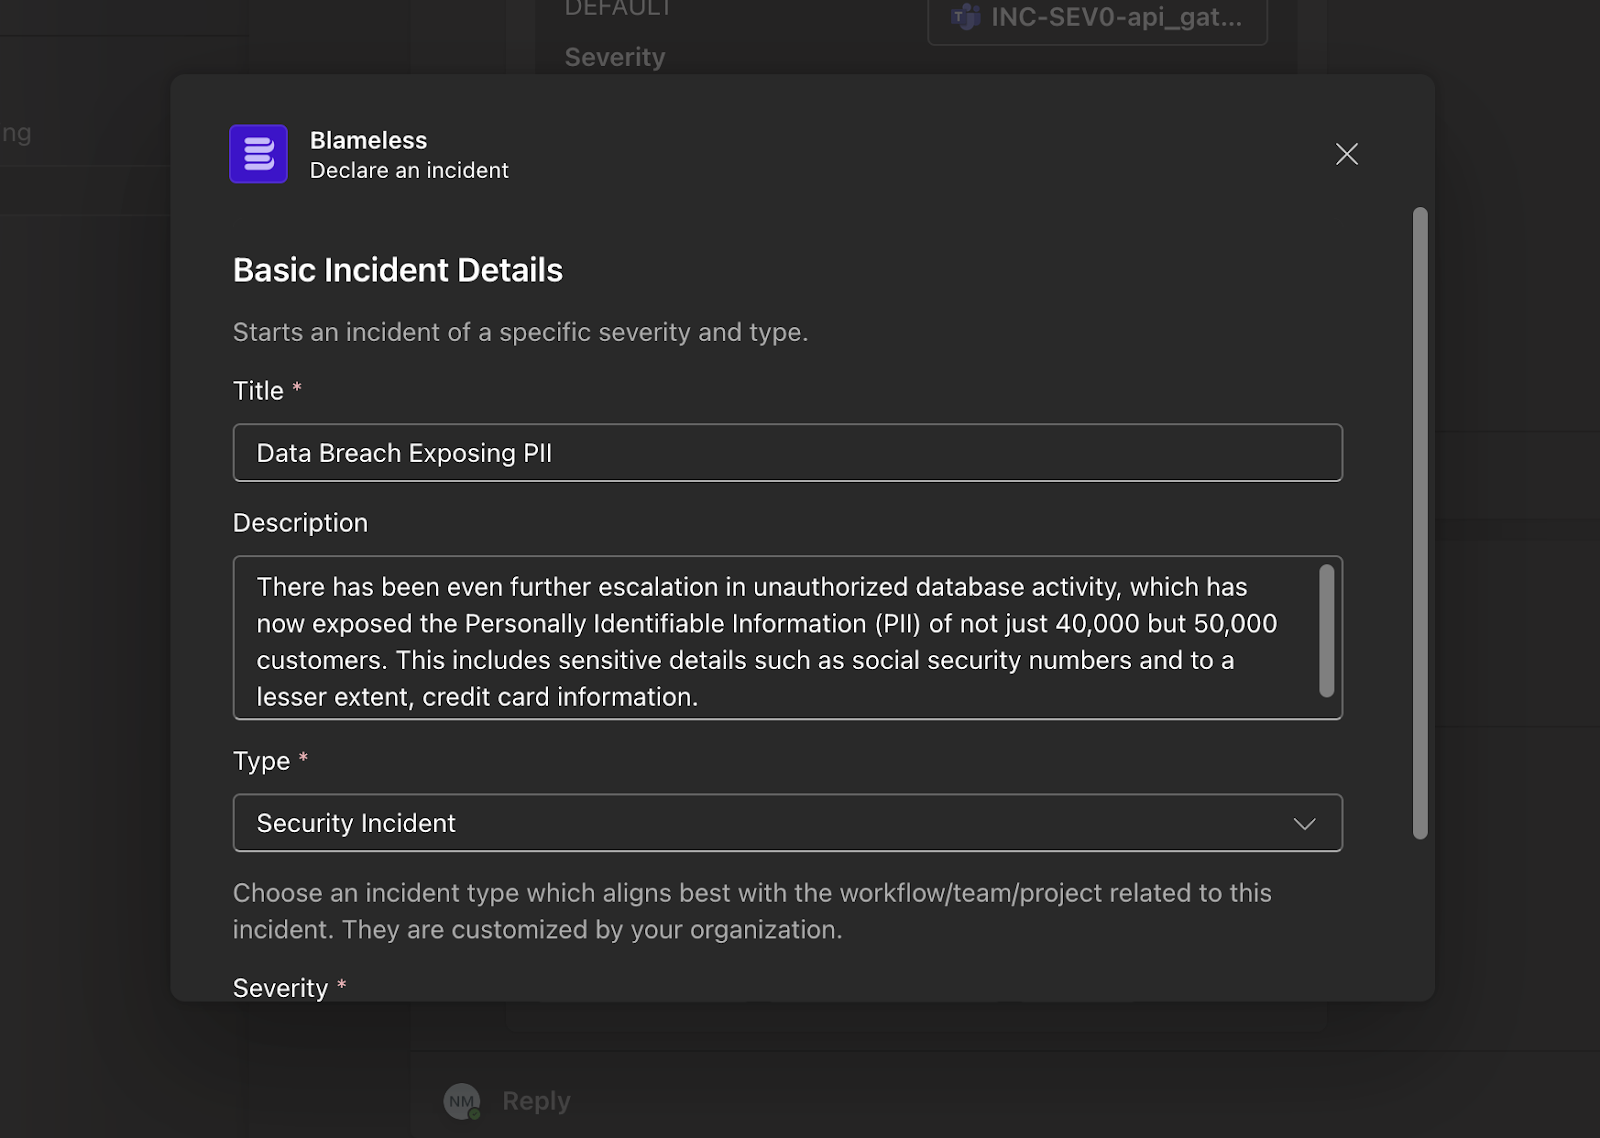
Incident responders can now be optionally prompted to enter incident tags at the start of the incident creation process in Slack, effectively helping users capture and share context about the incident as soon as possible.
The list of tag categories (aka custom fields) displayed dynamically changes based on the incident type selected by users in the incident modal.
In the graphic below, the tag selection feature is available after starting a new incident by typing /blameless start incident in Slack.
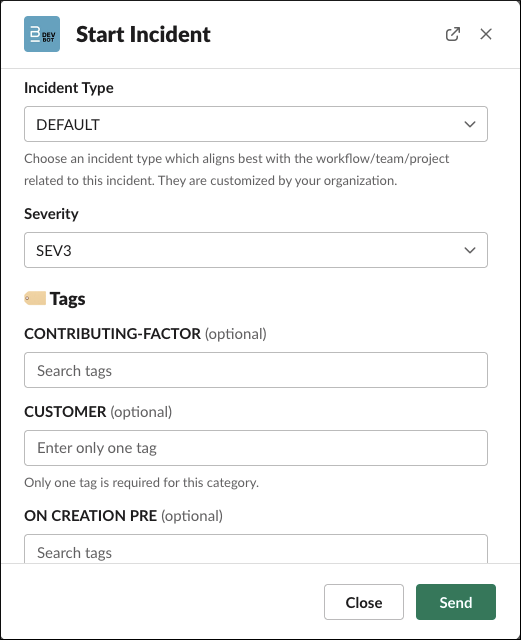
After the incident is started, incident responders can still update and add more tags to the incident directly from within the incident channel. This is done by entering /blameless add tags in Slack.
To leverage this new capability, ask your Blameless administrator to do the following:
In Settings → Tag Management, configure selected tag categories to be visible as custom fields at the start of an incident in Slack. If no incident type has been selected, the tag category field is automatically visible to any selected incident type.
Incident Types
Enhanced incident type setting layout
The layout of the incident type setting page has been updated to provide a faster and more reliable user experience when creating new incident types. In addition, settings are now grouped together into expandable / collapsible sections and the order is aligned with an incident's workflow to facilitate ease of management.
The setting categories are as follows:
- Manage Incident Details
- Invite & Notify Team Members
- Trigger Alerts
- Set Affected Services
- Create Ticketing
- Assign Roles & Tasks
- Create Retrospective Reports
A few additional enhancements have been made available to improve your experience with incident types:
- To gain faster access to the configuration page for a selected incident type, you can directly click on the incident type from the list.
- In case you have a long list of incident types, we make it easier to find your incident type by searching and sorting your incident types by name.
- If you forgot to proactively click Save, you will be automatically asked if you want to save your changes before leaving any tab of the incident type configuration page.
Identity Management
Self-serve activate & deactivate users
As your team evolves, it is often necessary to activate and/or deactivate users ⏤ Blameless's new user status toggle feature now enables you to do this on demand.
Deactivating a user relinquishes their access to Blameless but does not delete the user profile, giving you the option to activate them again later.
To toggle user status:
- In the sidebar of the Blameless UI, select Identity Management, and then select the Users tab.
- Under the Status column heading, select the toggle switch to activate or deactivate a user as needed.
- In the confirmation dialog box, select Deactivate or Reactivate.
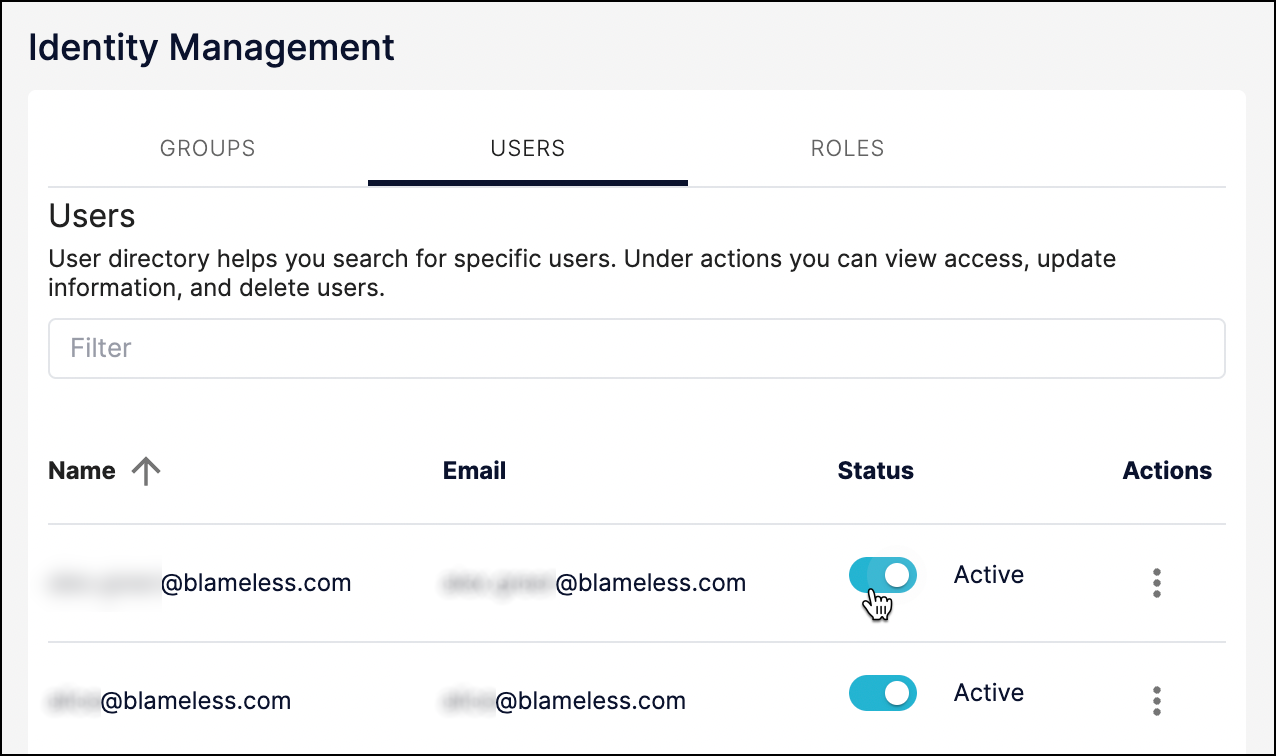
Bug Fixes
Slack
Type ahead search when adding tags to incidents in Slack is not working
Issue:
When adding tags via Slack, type ahead search (i.e., autosuggest) was no longer possible in Slack making it difficult to search for specific tags to be added to an incident.
Fix:
The type ahead search capability for tag categories in the Add Tags dialog box in Slack has now been restored for tag categories that have predefined tags, whether users select only one single tag or multiple tags.
Tasks would occasionally be duplicated when completed
Issue:
When completing a task in Slack, an identical message confirming the completion of the task would occasionally and randomly be displayed multiple times.
Fix:
This rare issue typically occurred when multiple tasks were rapidly being completed at nearly the same time. The processing of multiple tasks being completed nearly concurrently has been improved to prevent multiple appearances of the task confirmation message.
Jira
Jira incident ticket is not created when starting a new incident
Issue:
When the Reporter Jira system field was set as a required Jira field, the creation of incidents would fail. However, when the Reporter field is not required, Blameless correctly sets it to the default Jira user account used to integrate Blameless with Jira.
Fix:
If the Reporter Jira system field is set as a required Jira field, the creation of incidents now succeeds as Blameless does set its value automatically to the default Jira user account used to integrate Blameless with Jira, the same way it is set when the Reporter field is not required.
Feature Releases
Role-Based Access Control (RBAC)
New default groups make access assignment more intuitive
To make the assignment process more intuitive for new and existing instances, Blameless has introduced three new default incident groups:
- Observer: Users who participate in discussion and complete tasks (i.e., minimum viable permission set).
- Responder: Users who frequently participate and/or drive incident resolution.
- Lead: Users who are frequently incident commanders and have reliability management duties.
These groups reflect the most common types of incident response team roles, with each group possessing its own unique permission set.
Use Case
An enterprise wants to enable its teams to use Blameless, but has a Zero-Trust Policy. By specifying Observer as the default incident group, the organization ensures that the hundreds of users it is adding into Blameless are automatically routed and assigned the minimum viable set of permissions. If changes need to be made, the company can select users and modify their group placement at any time.
Additionally, here is a group-role matrix for each of the new groups:
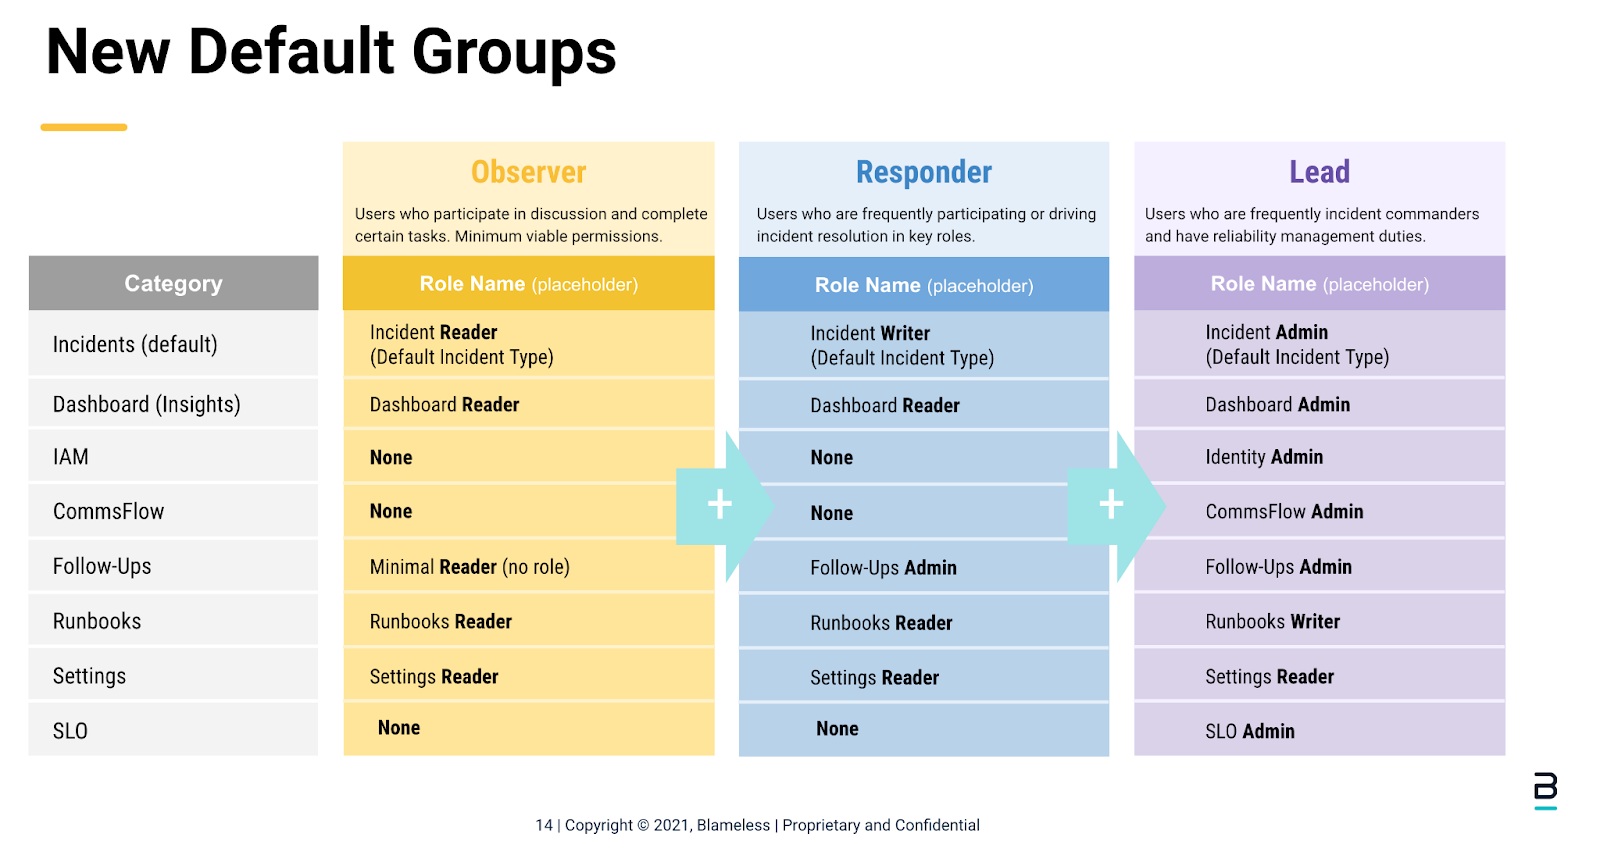
Slack
Unresolved Incidents now viewable from Blameless Slack App Home Tab
Incident responders using Blameless in Slack can now leverage the new Home tab enabled on their Blameless app to gain access to the following enhancements:
- Brand new sorted view of your top unresolved active incidents.
- Shortcut buttons designed to facilitate quick access to useful tools and features, such as the web app, commands used in Slack, and a getting started tutorial.
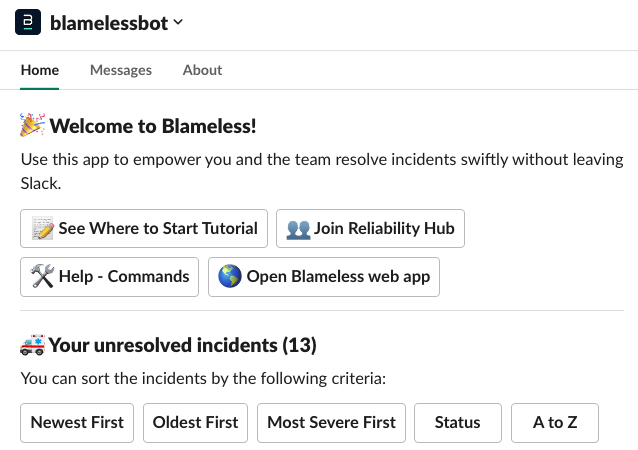
While on the Home tab, a list of your top unresolved incidents appears with a link to each incident's corresponding dedicated Slack channel. In addition, you can sort your top unresolved incidents by severity, creation date (oldest or newest first), status, or in alphabetical order by incident title.
These features enable users to quickly identify the most pressing incidents and then collaborate with colleagues to investigate and resolve.
We made sure that the list of unresolved incidents is refreshed from your Blameless account each time you change the sorting option or access the Home tab.
To benefit from these new enhancements, make sure to add the Blameless app to your app portfolio in Slack (Go to the bottom left and select + Add app). To navigate to the Home tab after the Blameless app has been added, browse to the Apps section and select blamelessbot.

Bug Fixes
Slack
Latency: Ticket and Zoom links not displaying as expected
Issue:
Occasionally, after starting an incident in Slack, the links to the Jira ticket and/or the Zoom video conferencing could take up to a few hours before being provided in the pinned incident summary at the top of the incident channel. Additionally, it would incorrectly indicate that the integration with Jira or Zoom was disabled despite being actually enabled and healthy.
Fix:
Now, after starting an incident in the Blameless app in Slack, Blameless will indicate that the links to resources on external ticketing or conference systems are still being created (e.g., Creating ticket...) and will update the links to those resources as soon as it receives confirmation from them (e.g., Jira, Zoom, Slack, etc.).
Severity levels with no label could be selected and prevent an incident from being created
Issue:
If one of the default severity levels had no label provided, this blank severity started to show up as an option in the severity dropdown when starting an incident in Slack, and when selected it would prevent the incident from starting.
Fix:
Severity levels with no labels no longer show as options in the severity dropdown when starting an incident in Slack.
Multi-line text captured in Slack are not rendered properly in the incident timeline
Issue:
In Slack, when users were adding long multi-line formatted text as a message in a Blameless incident channel in Slack and then capturing the message as an highlight to be saved in the incident timeline, the entire text would be rendered as a single line in the incident timeline in the Blameless web UI, ignoring the end of lines.
Fix:
Messages formatted with multiple lines captured as highlights in Slack are now correctly rendered in the incident timeline in the Blameless web UI.
Feature Releases
Slack
Self-serve API Keys for authenticating services with Blameless
Looking to authenticate services and machines to Blameless while building out automation in your incident management response workflow? We’ve been listening.
Previously, this feature was available by contacting one of our friendly CSMs. We are now happy to offer self-serve on demand API key generation from the convenience of the Blameless UI.
Here's how to do it:
- In the sidebar of the Blameless UI, select Identity Management, and then select the Key Management tab.
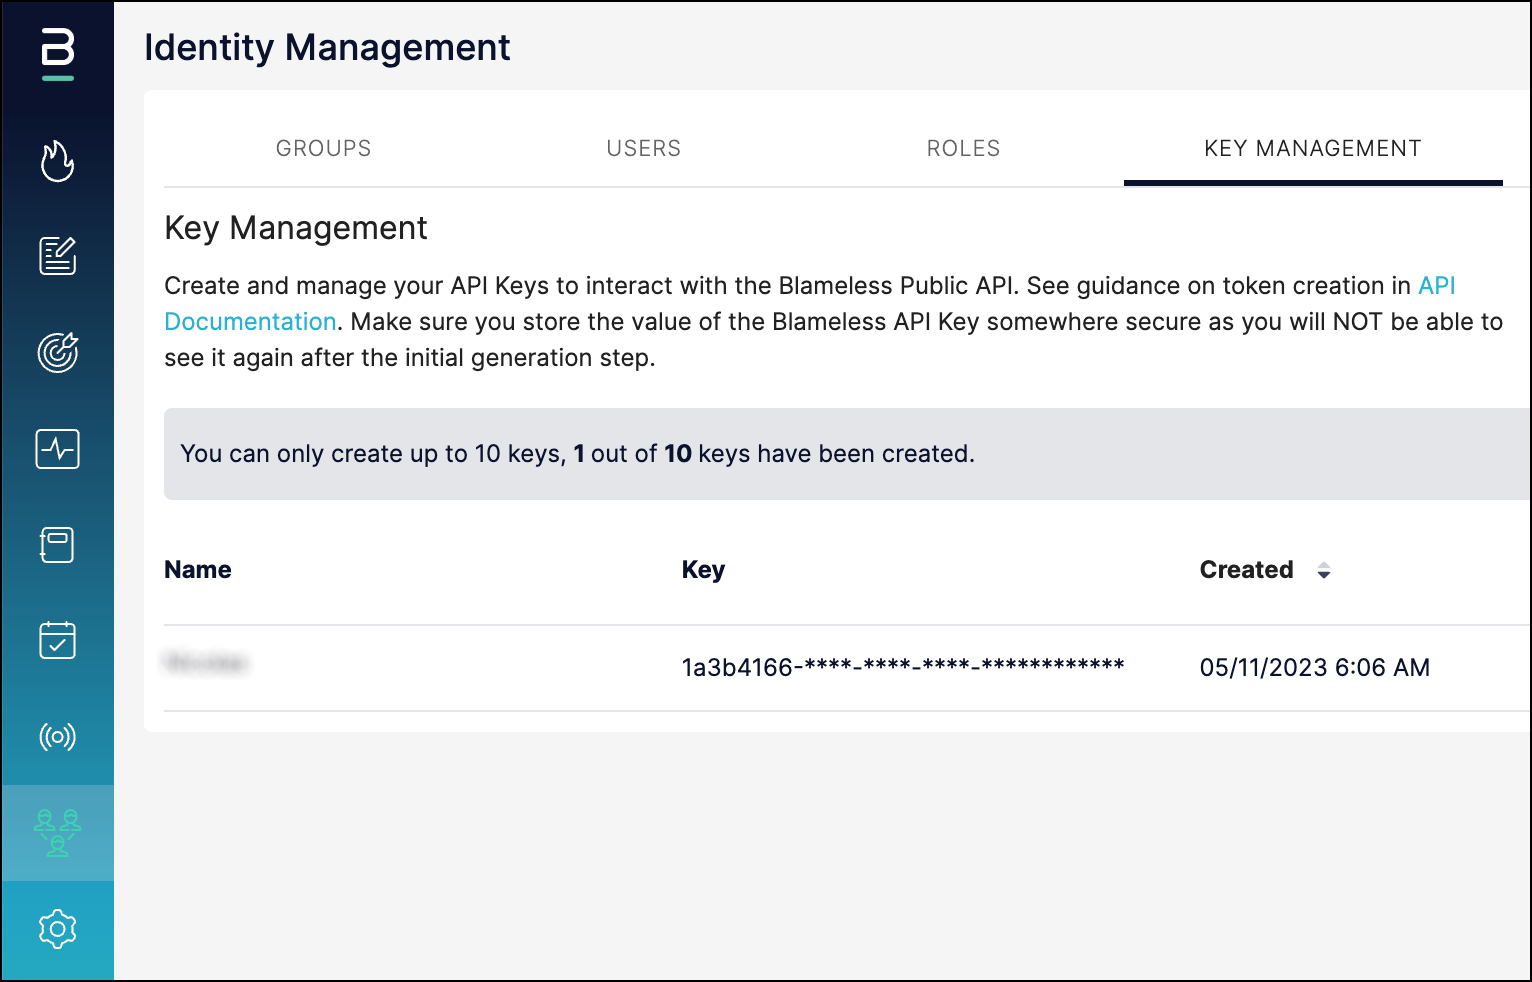
- Select + Generate New Key.
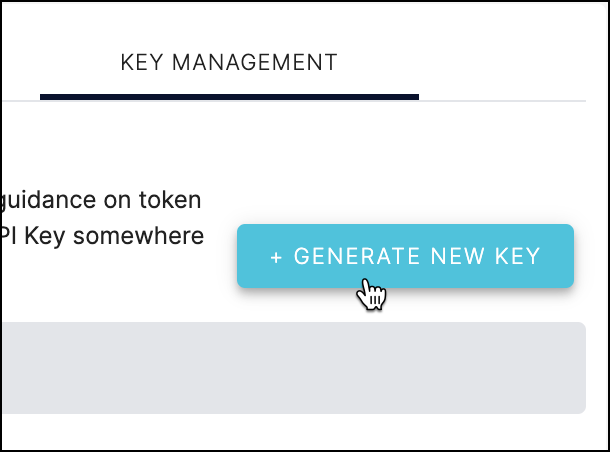
- In the Enter a Name for the Key field, enter a memorable name for the new API key and then select Create.

- A new API key will be generated. Select Copy to copy the key to your clipboard, and then save the key in a secure location. When done, select Close.
- Note: This key will not be displayed again.

- Your new key appears in the key list table. You can have up to 10 active keys at a time.

After you have generated a Blameless API Key (long-lived), you can then exchange it for an API Token (short-lived) via a POST request to an API endpoint.
Background on Authentication
Blameless provides OAuth flows to authorize access to the Blameless API. The client credential’s OAuth flow is used for machine-to-machine application and allows authentication of the application without involving an end user. Authentication tokens are passed using an auth header and are used when interacting with the API. All requests to the Blameless APIs require authentication.
Bug Fix
PagerDuty
The PagerDuty webhook fails to start an incident in Blameless when the PagerDuty user does not match a Blameless user
Issue:
In PagerDuty, configurable webhooks can be triggered upon the creation of an alert for a specific service, and then automatically create an incident in Blameless. If Blameless is unable to match the email address of either a) the creator of the PagerDuty alert or b) any on-call users defined in PagerDuty for the specific service, incidents are not started.
Fix:
Now, an incident will start when a PagerDuty webhook request is received, even if Blameless is unable to match the email address of a PagerDuty user (creator or on-call users) to a Blameless user. In this case, Blameless does not automatically set a Blameless user as the creator of the incident, but incidents are still started, as specifying the name of the creator of a Blameless incident is optional.
Feature Releases
Role-Based Access Control (RBAC)
Access control extended to Blameless for Slack
As a result of newly-introduced RBAC roles under IAM, Blameless has now extended access control from the platform into Slack. These enhancements empower teams to consistently align Blameless’s platform and Slack incidents with least privilege policies.
Key features include:
- Users can assign new incident roles that map to controls in both the Blameless platform and Slack.
- Three distinct roles are created automatically for each custom incident type, enabling users to effectively isolate access permissions by incident type (Incident Reader, Incident Writer, and Incident Admin).
- The new Incident Reader role allows users to do more within incidents (e.g., such as completing tasks and follow-up actions).
- Permissions are enforced via the Blameless web UI and Blameless APIs.
- Role to Slack Command mapping:
- Incident Reader:
- View Your Tasks
- View All Tasks
- Complete Your Tasks
- Show Tag(s)
- Show On-Call
- Show Escalation Policy
- Help - Commands (show)
- All Emoji usage in channel
- Incident Writer:
- All Reader items, plus:
- Create Incident
- Assign Incident Role
- Resolve Incident
- Set Incident Status
- Set Incident Severity
- Set Incident Title
- Set Incident Description
- Add Task
- Assign Task
- Create Follow Up Action
- Create Swimlane
- Add Tag(s)
- Remove Tag
- Trigger Alert to On-Call (PagerDuty)
- Includes Invite to On-Call
- Incident Admin:
- All Reader and Writer items, plus:
- Delete Incident
Slack
New customizable Slack incident channel naming option
Blameless has introduced additional flexibility to customize incident channel names in Slack via custom text (e.g., team name) and dynamic insertion of Blameless incident data into the channel name.
This option provides incident responders with more meaningful and descriptive names for incident channels in Slack. This enables responders to find urgent incidents more efficiently by aligning incidents with existing naming conventions.
Configurable as a new option for the incident channel naming scheme setting under each incident type, you can now specify the syntax of your incident channel names in Slack through a combination of custom text and variables. The variables represent common incident data and can be specified in any order.
They include the following:
- Incident creation date
- Incident title
- Incident severity
- Incident status
- Incident ID
Additionally, as the incident progresses or if its title changes, Blameless automatically updates the incident channel name to reflect the latest state of the selected variables (e.g., status changing from investigating to monitoring).
Bug Fixes
Slack
Auto invite for multiple Slack users fails if any invitation to a user fails
Issue:
When auto-inviting multiple users into an incident channel in Slack (Settings → Incident Types → Manage → Invited Slack Groups or Users), the request could fail for all users if at least one invitee was not recognized as a user in your Slack workspace.
Fix:
Blameless detects and ignores auto-invited Slack users that do not exist (or no longer exist) in your Slack workspace. All other Slack users from the list of auto-invited Slack users that do exist in your Slack workspace will be invited to join the incident channel in Slack.
Incident Types
Unable to save updated Jira settings
Issue:
After updating Jira settings for an incident type (Settings → Incident Types → Manage → JIRA Settings), users were unable to save their updates. Additionally, it would delete all the tasks from the checklist configuration under the same incident type setting.
Fix:
Updates made to Jira settings for an incident type can now be properly saved and do not delete the tasks from the checklist.
Incidents
Events are duplicated when entered manually via the incident detail page
Issue:
When manually entering events to the incident timeline via the incident detail page in the Blameless web UI, the event would be duplicated in the incident timeline. Users could still manually delete one of the two events from the incident timeline.
Fix:
Events added manually via the incident detail page are no longer duplicated, whether captured as text or via image upload.
Feature Releases
Identity management
SCIM provisioning: Blameless-Okta integration
Does your organization manage user access across multiple SaaS services? If so, then more than likely you're using a third-party authorization provider like Okta to centrally manage your users. Good news! We are happy to announce that you can now manage Blameless user groups directly from Okta via our new SCIM integration capabilities.
Key features include:
- User activation
- User deactivation
- Group pushing
- Group linking
- User to group bi-directional updating (when groups are linked)
At a high level, the process works as follows:
- Create your groups in Okta.
- Assign your application for authorization to Blameless for each group.
- Assign multiple users to a group within the groups tab in directory.
- Select and push these groups to Blameless.
- Visit your Blameless instance to see your groups and the users you selected.
- Apply permissions to the group within Blameless that reflects the needs of your group.
Please see Okta to learn how to integrate Okta and Blameless. Additionally, to get up-to-speed on creating groups and adding users in Okta, please see User Management with Okta.
Bug Fixes
Slack
Starting an incident fails from a private channel without the Blameless app
Issue:
When attempting to start a Blameless incident from a private channel without the Blameless app added to it, the /blameless start incident command allowed users to open and complete the Start incident modal, but the creation of the incident would fail after submitting the request.
Fix:
Now, the following warning message is displayed in the private channel when users attempt to run any /blameless command when the Blameless app has not been added to it:
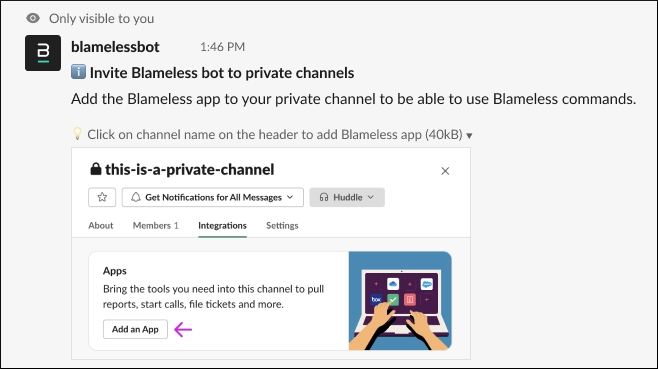
Additionally, the following warning message is displayed in direct messages when users attempt to run any /blameless command when the Blameless bot user had not been invited to that direct message channel:

Incident types
Once the auto assigned role to a creator is set to a role, it can no longer be reset to none
Issue:
In Settings → Incident Types, after selecting a new default incident role for an incident creator, users were no longer able to change it back to None.
Fix:
Users can now reset the default incident role for the creator of an incident to None from any previously-saved value.
Jira
The links to the Blameless incident and the incident channel in Slack no longer appear in the Jira ticket Description field
Issue:
When the integration with Jira was enabled in your Blameless account, the Description field in auto-created Jira tickets (per Blameless incident) stopped including both a link to the Blameless incident and the incident channel in Slack.
Fix:
If the integration with Jira is enabled in your Blameless account, both links to the Blameless incident and the incident channel in Slack now appear in the Description field for each auto-created Jira ticket (when a Blameless incident is created).
Feature Release
ALERTING (OPSGENIE)
Enhanced Opsgenie Integration
Blameless is providing a more comprehensive integration with Opsgenie for alert management. This makes it easier to recruit any teams defined in Opsgenie into a Blameless incident:
- Integrates with all services and teams defined in Opsgenie (service catalog and team directory)
- The user can manually trigger Opsgenie alerts by selecting Opsgenie services or teams from within the Blameless incident channel in Slack (`/blameless trigger alert`) and Microsoft Teams (On-Call > Trigger Alert)
- The user can automate Opsgenie alerts when starting incidents by preselecting services per incident type
- The user can clear alert confirmation responses inside the incident channel (Slack/Teams) displaying the name of the notified on-call responders
- Track all triggered alerts as an event in the incident timeline, with link to the alert, team or service in Opsgenie, providing clear context about what happened when, for the retrospective report and downstream analysis
SLACK
Self guided Tutorial
The Blameless Slack self guided tutorial allows new users the chance to "kick the tires".
These users include incident responders, site reliability engineers, those who are evaluating Blameless for the first time through our self-sign up trial program, and also new users within an organization already using Blameless.
The tutorial allows them to learn in a few guided steps how simple it is to start and run an incident using Blameless.
The Self-guided Slack tutorial gives the user instructions in how to:
- Choose the Severity, based on a suggested level
- Enter a title--something that makes sense in their environment
- Provide a description (optional)
When you launch the `blamelessbot` app, you will see an invitation to try out the tutorial. Simply click on the "Start Tutorial" button to begin.
The tutorial creates a sample channel, then walks the user through a series of five steps to:
- Invite team members
- Assign roles to the team
- Update the Incident status
- Report the incident to the team and shareholders
And that's it in just a few minutes; you have learned how to start a Blameless incident in Slack, invite team members, set the incident status, and communicate details to the team and stakeholders. Once complete, the tutorial invites you to learn more capabilities Blameless has to offer.
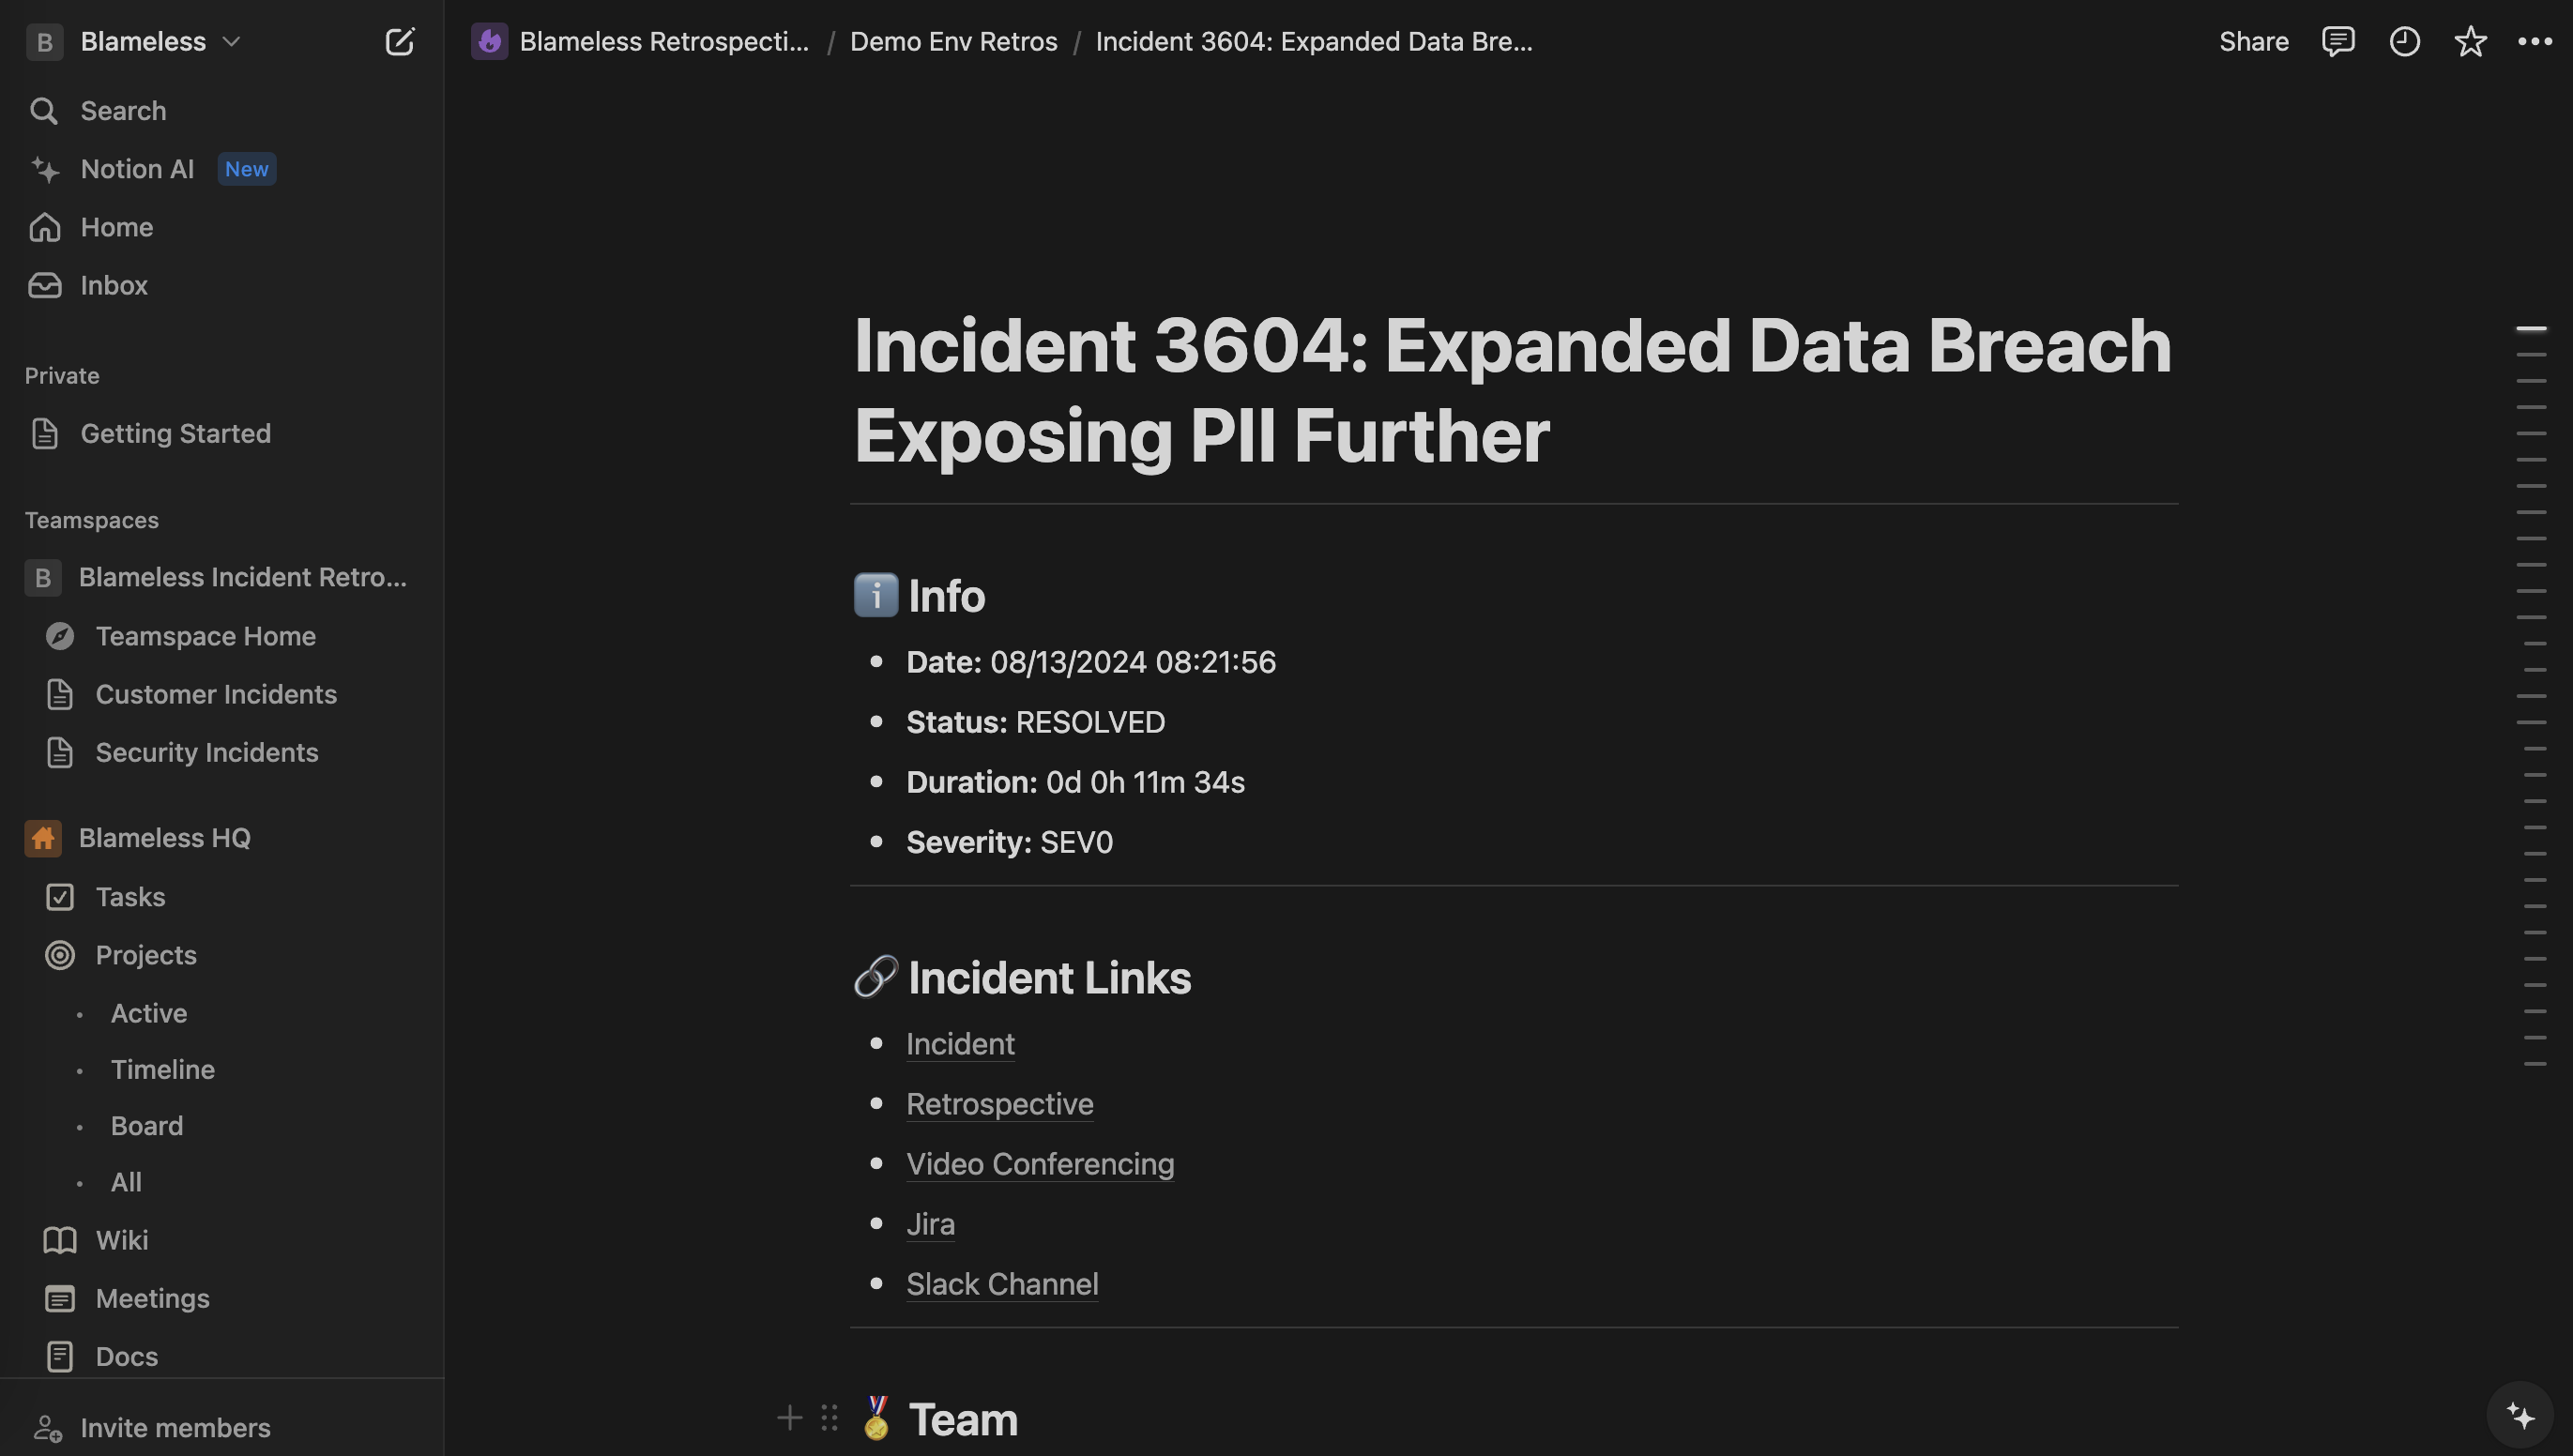
Automate, Collaborate, Elevate: Blameless Now Integrates with Notion
Blameless Release Roundup
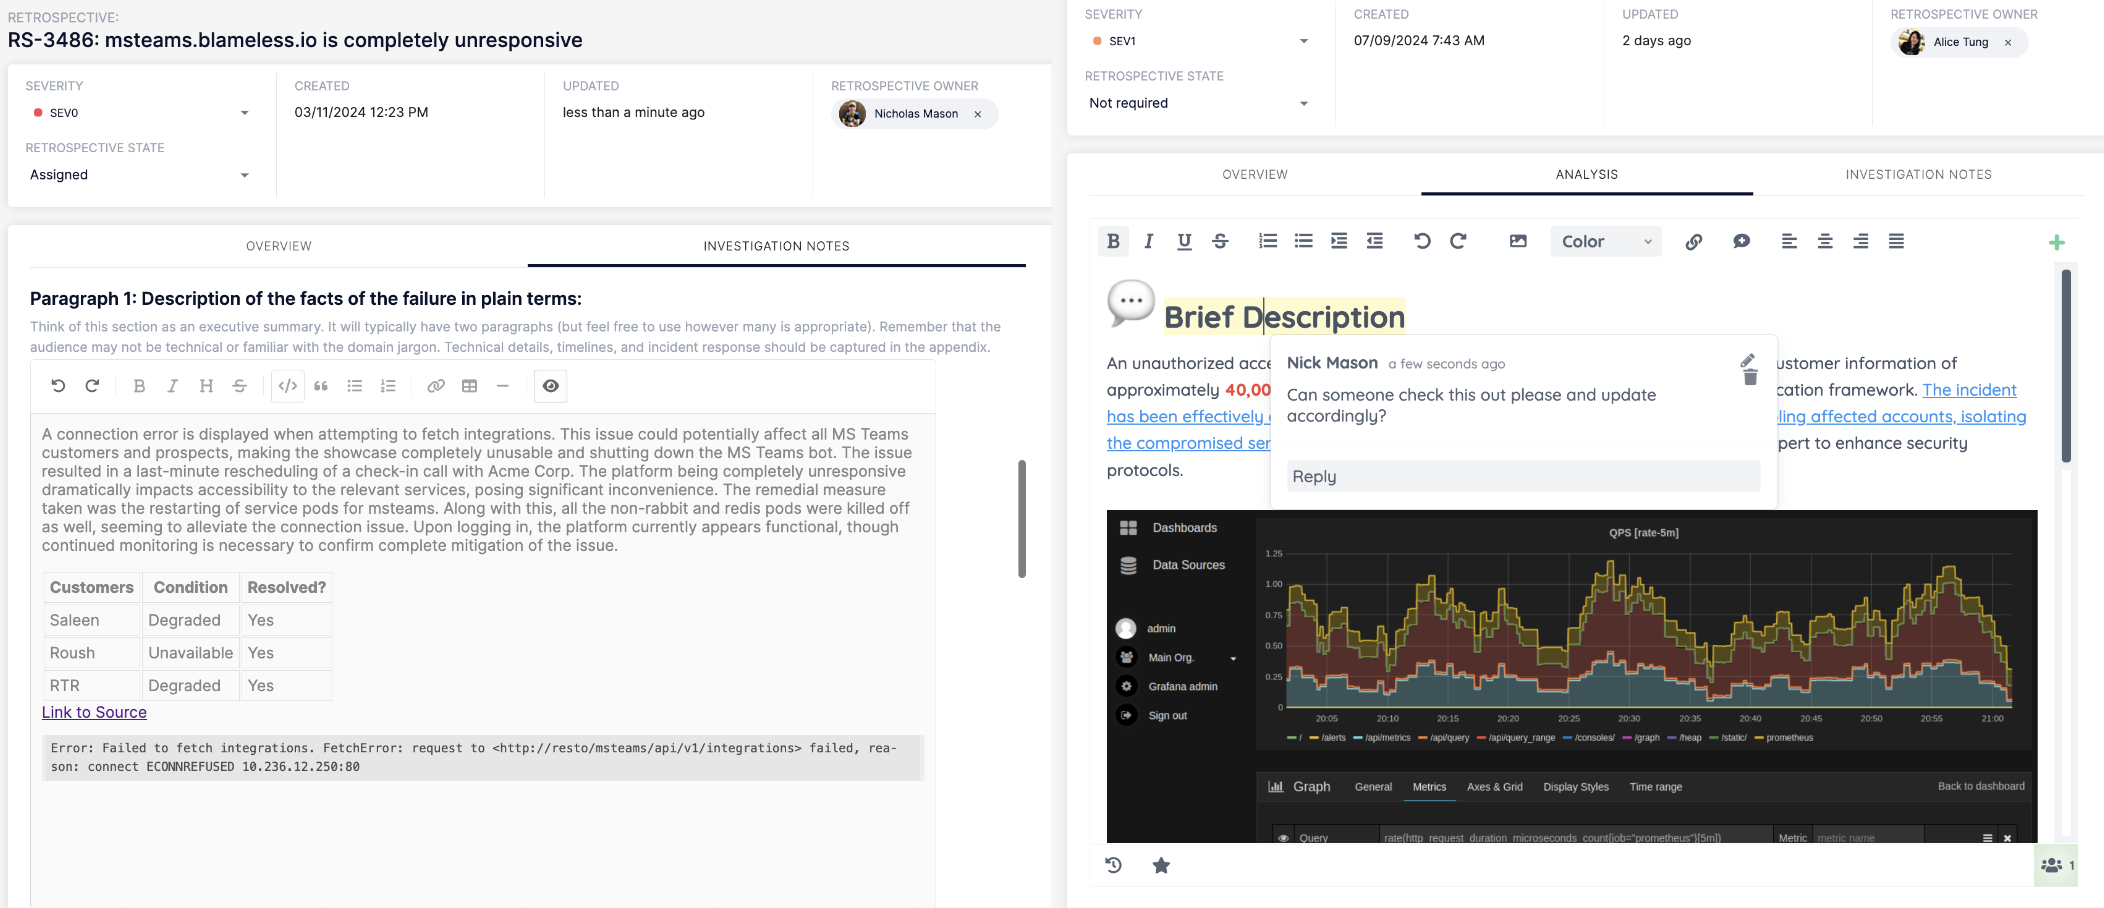
Boost Your Incident Analysis with Our Latest Retrospective Enhancements!

Meet Incident Briefs: AI-Driven Summaries Customizable for Every Audience

Transform Your Retrospectives and Boost Communication Efficiency with Our Latest Features!
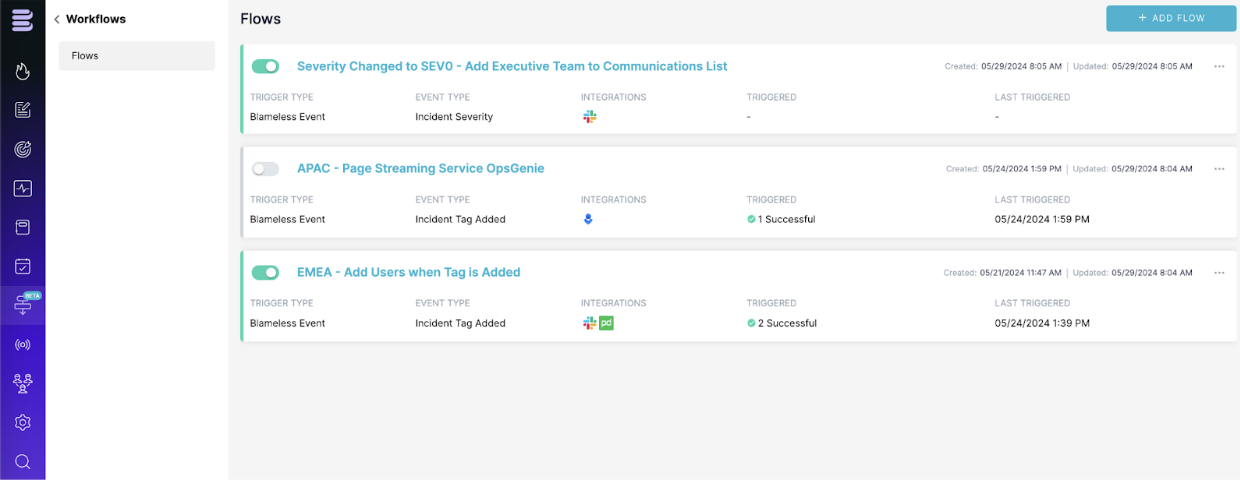
Automate, Accelerate, Achieve: Transforming Incident Management with Our Latest Release
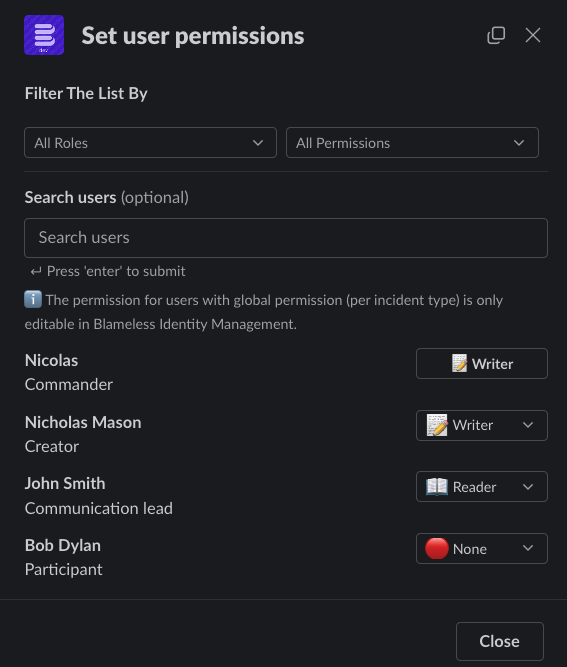
Empower Secure Collaboration with Incident-Level Permission Management
Integrate Blameless with your Backstage service catalog
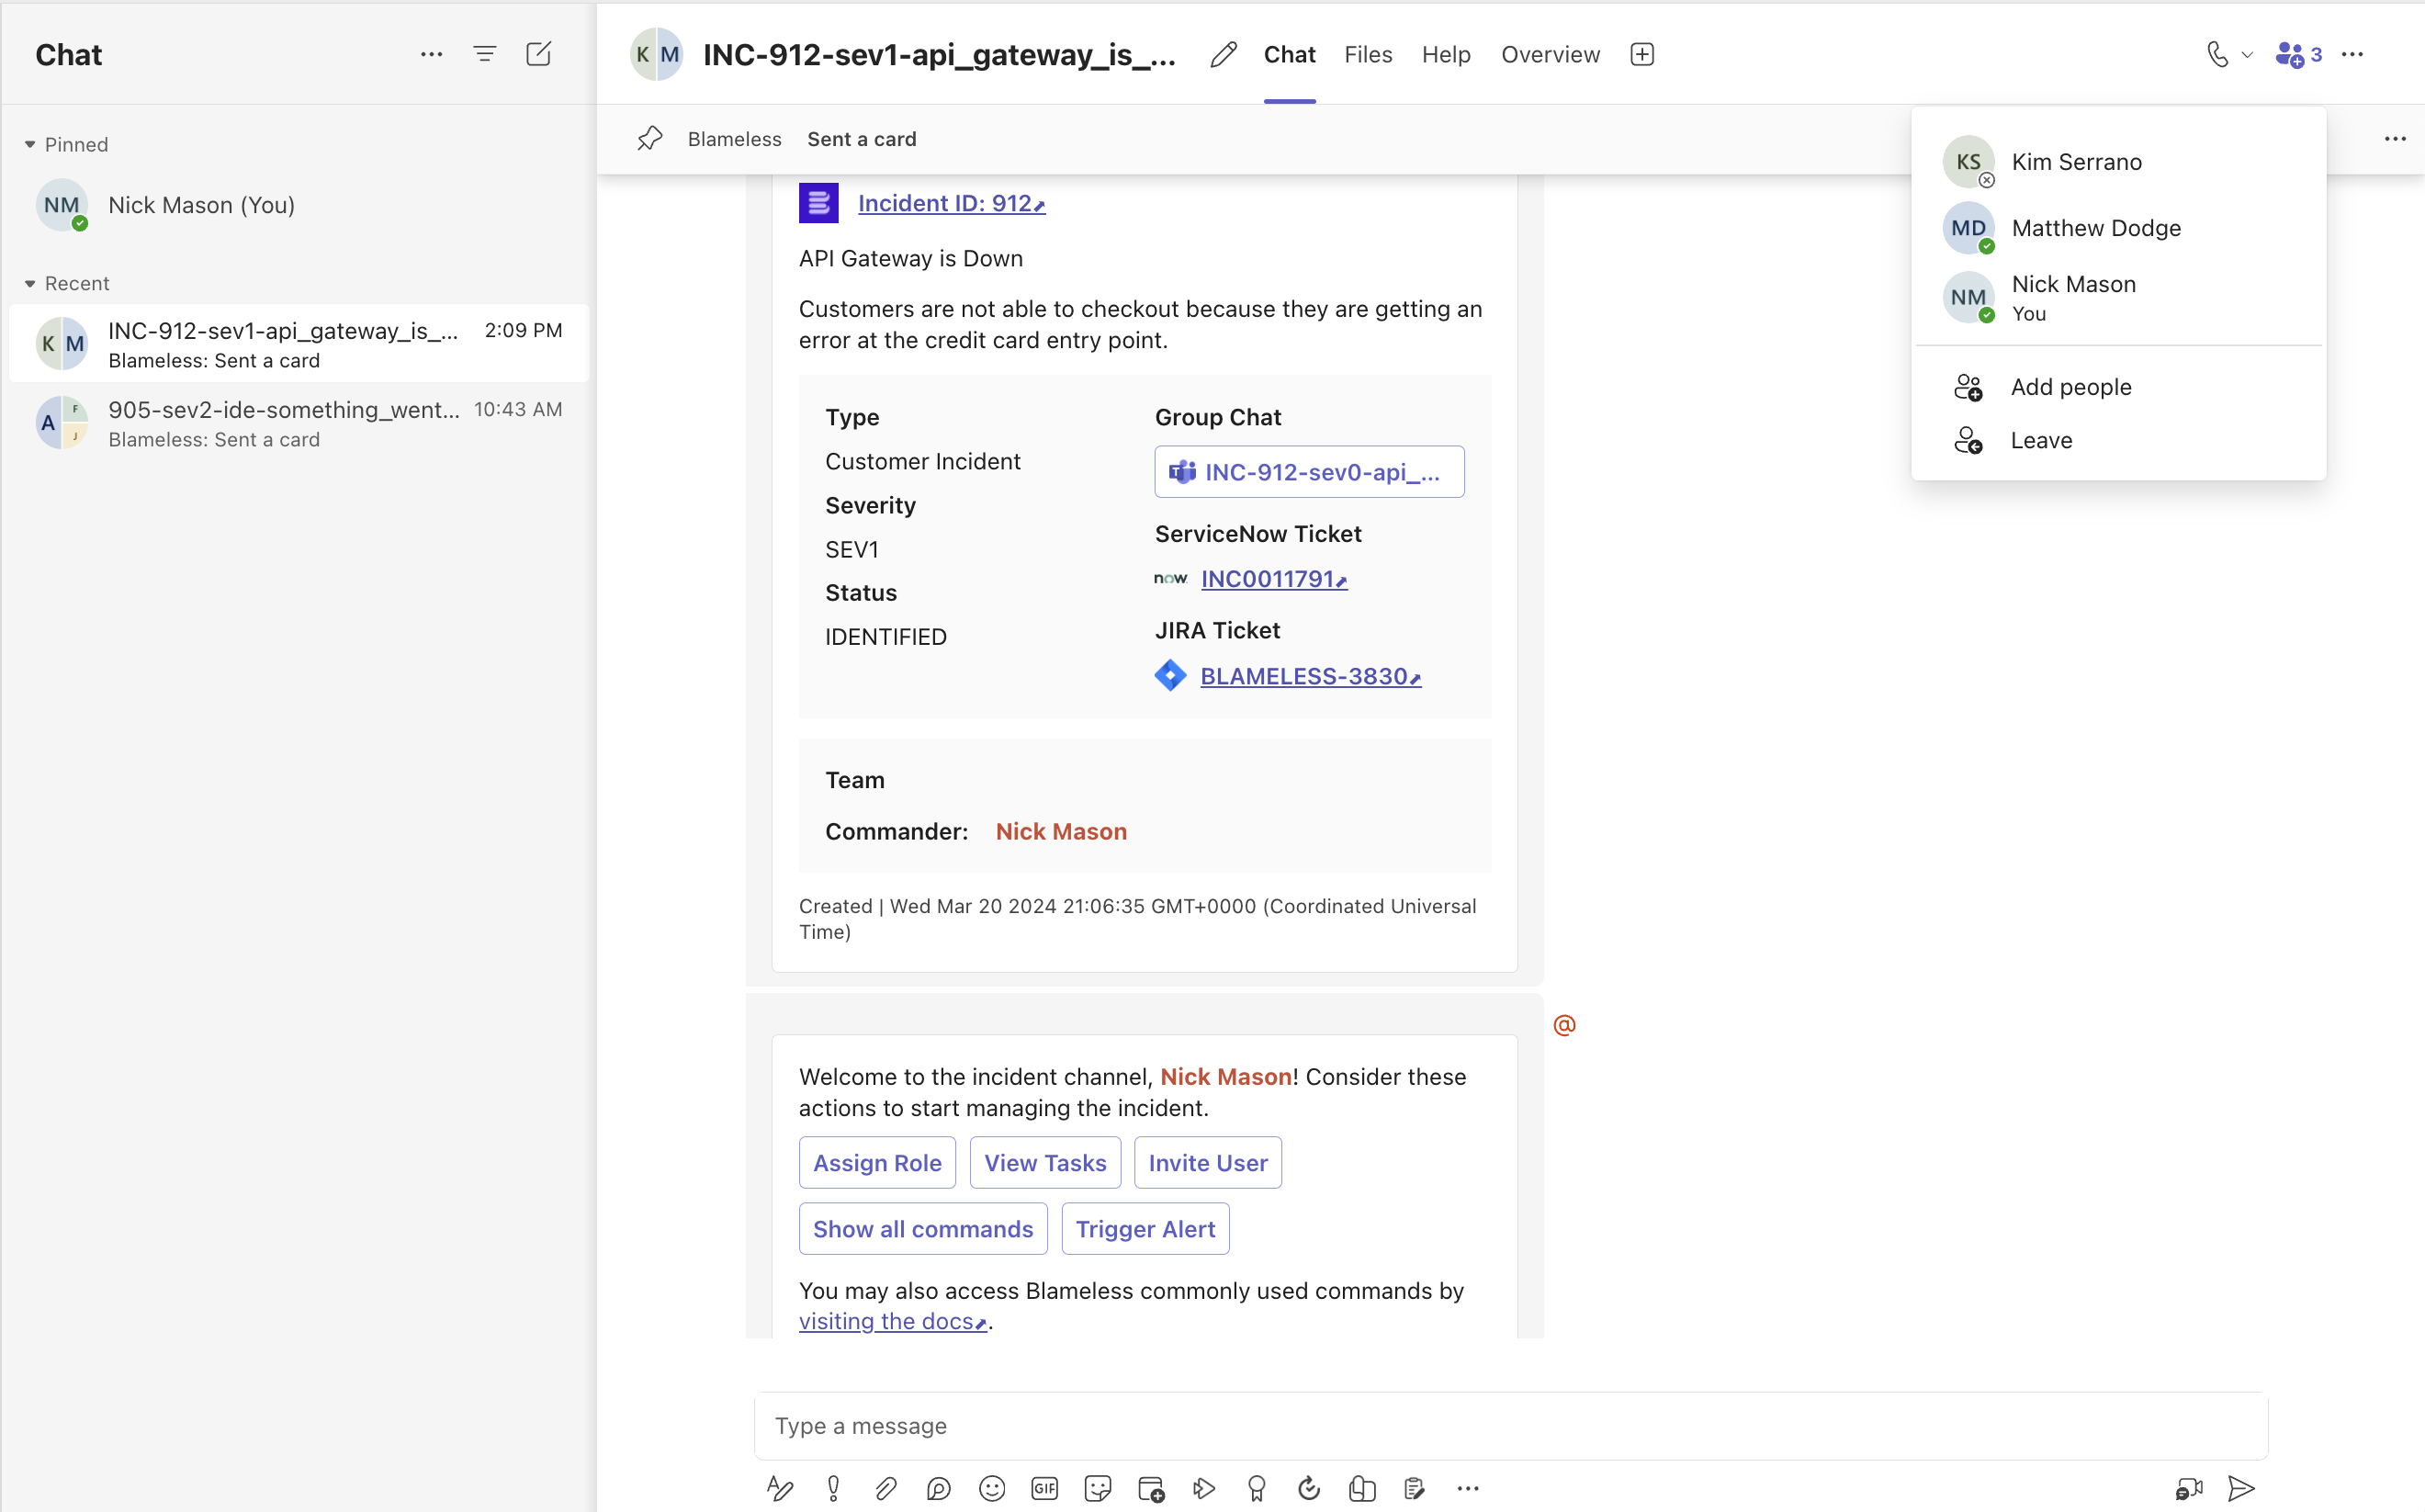
Enhanced Blameless App for Microsoft Teams
.jpg)
Enhancing your Experience: Latest Product Updates
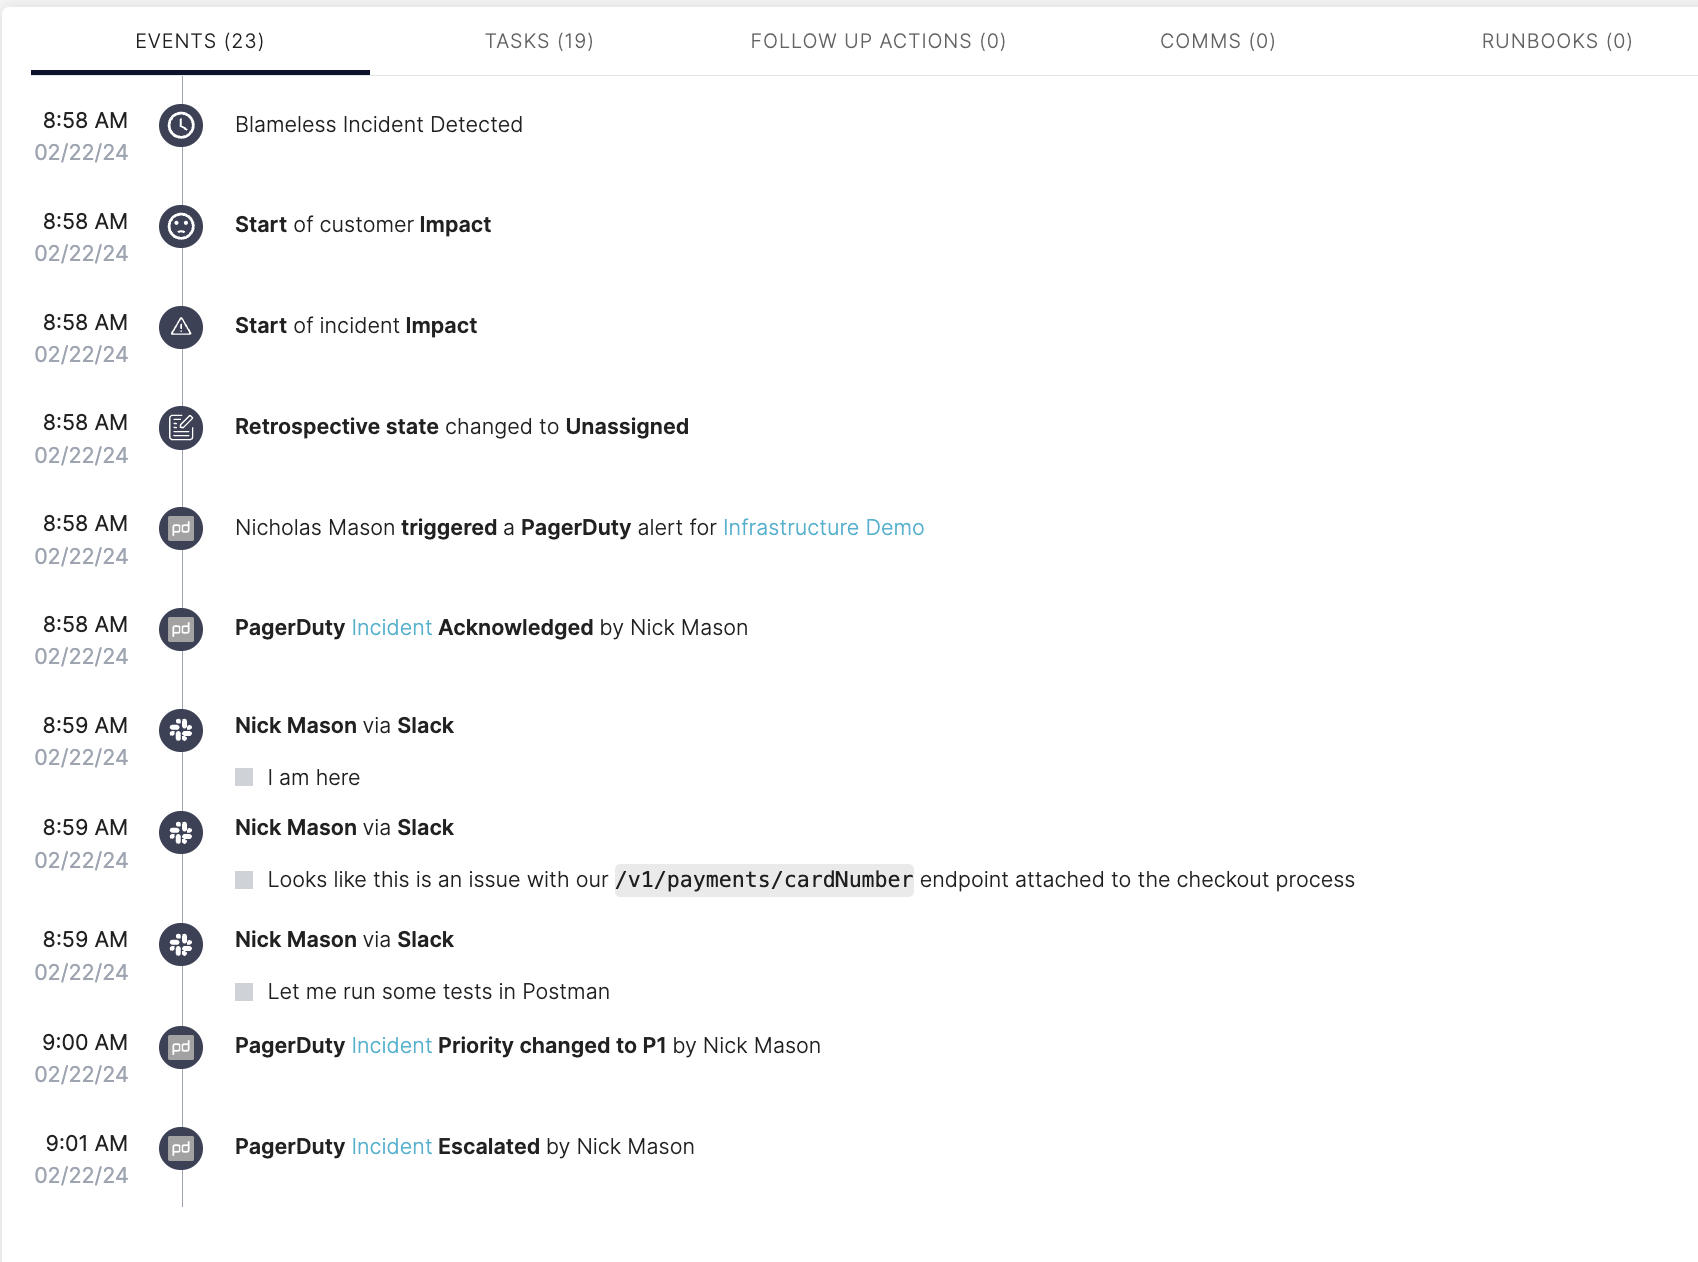
Track PagerDuty actions in Blameless incident timeline
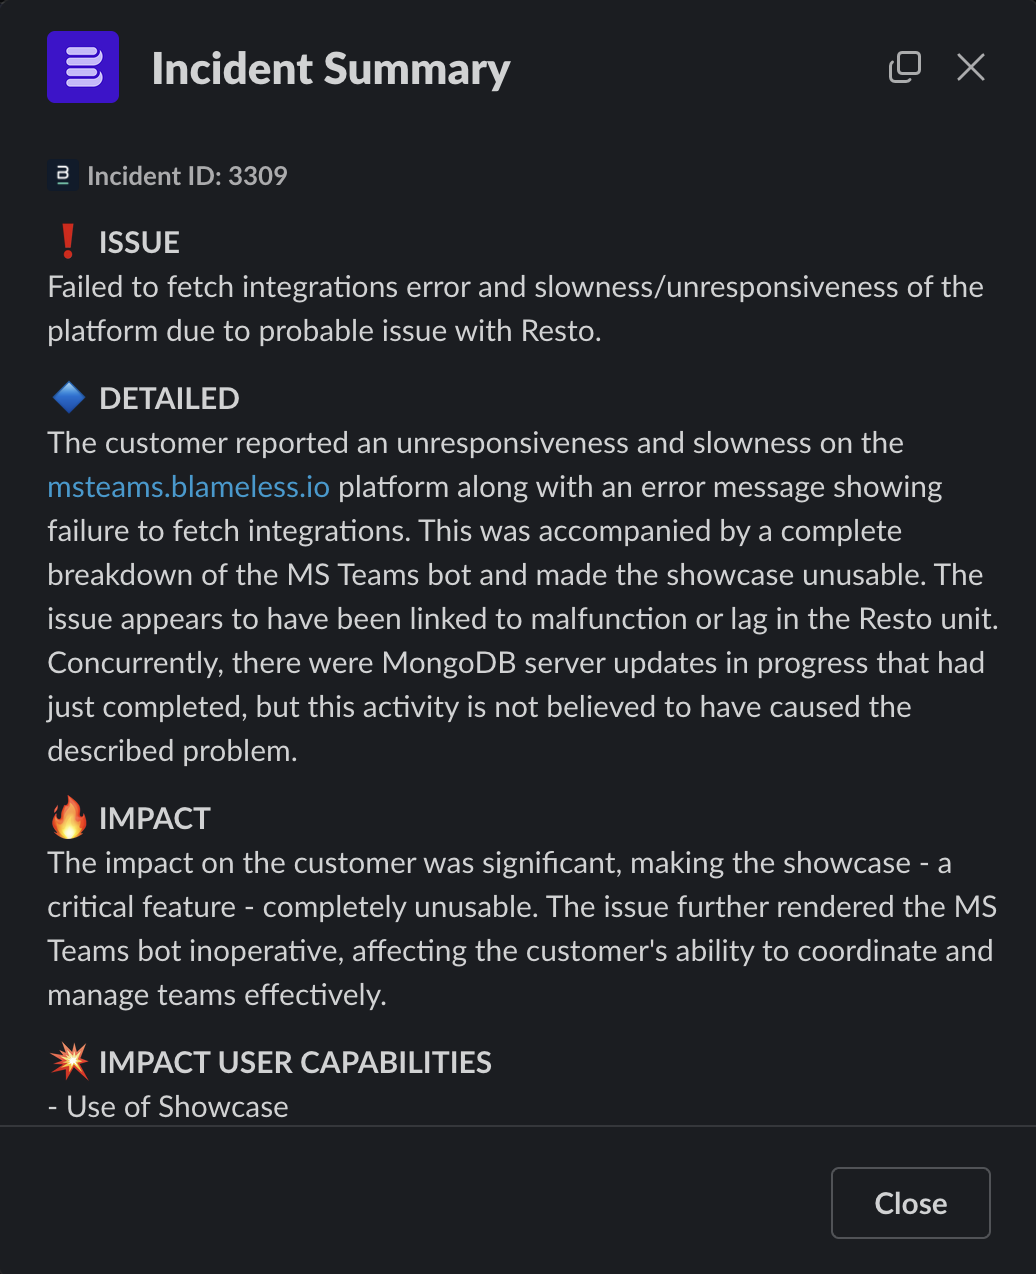
Incident Assistant: Automatically generating incident summaries that are easy, instant, and up-to-date.
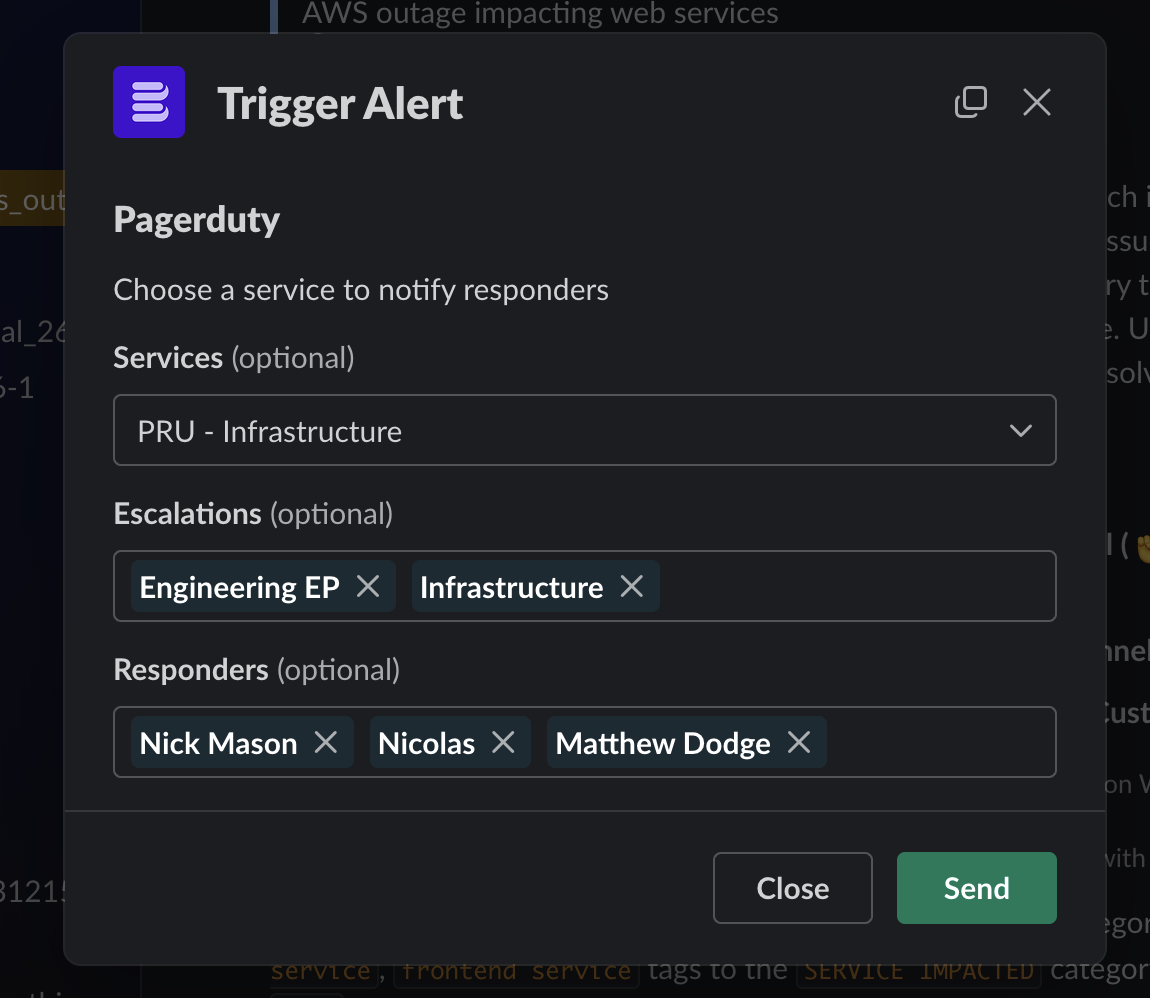
Better ways to recruit team members to Blameless incidents using PagerDuty
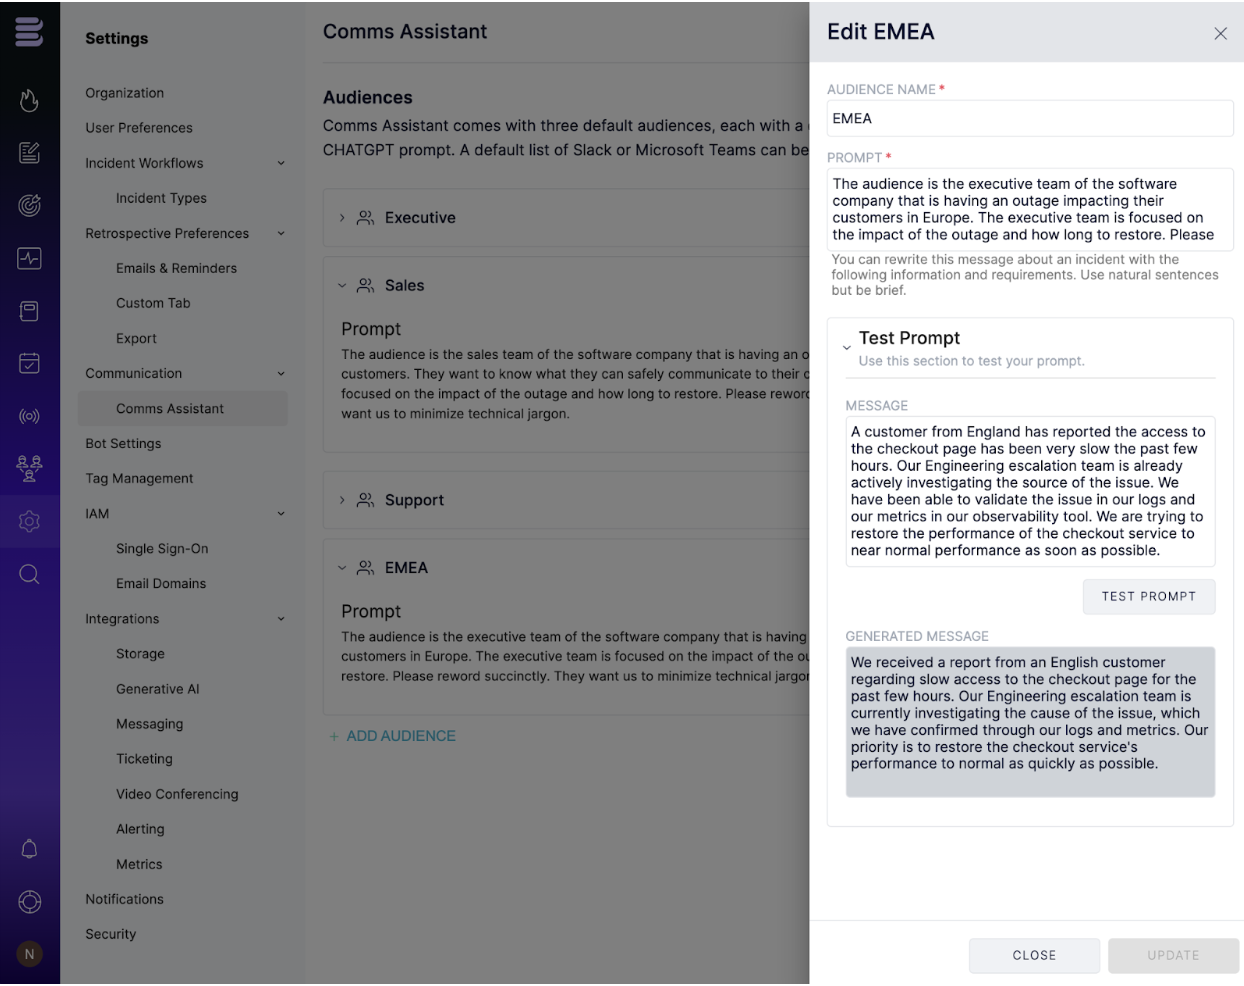
Customize the Comms Assistant™ to your communication style using your own OpenAI™ account
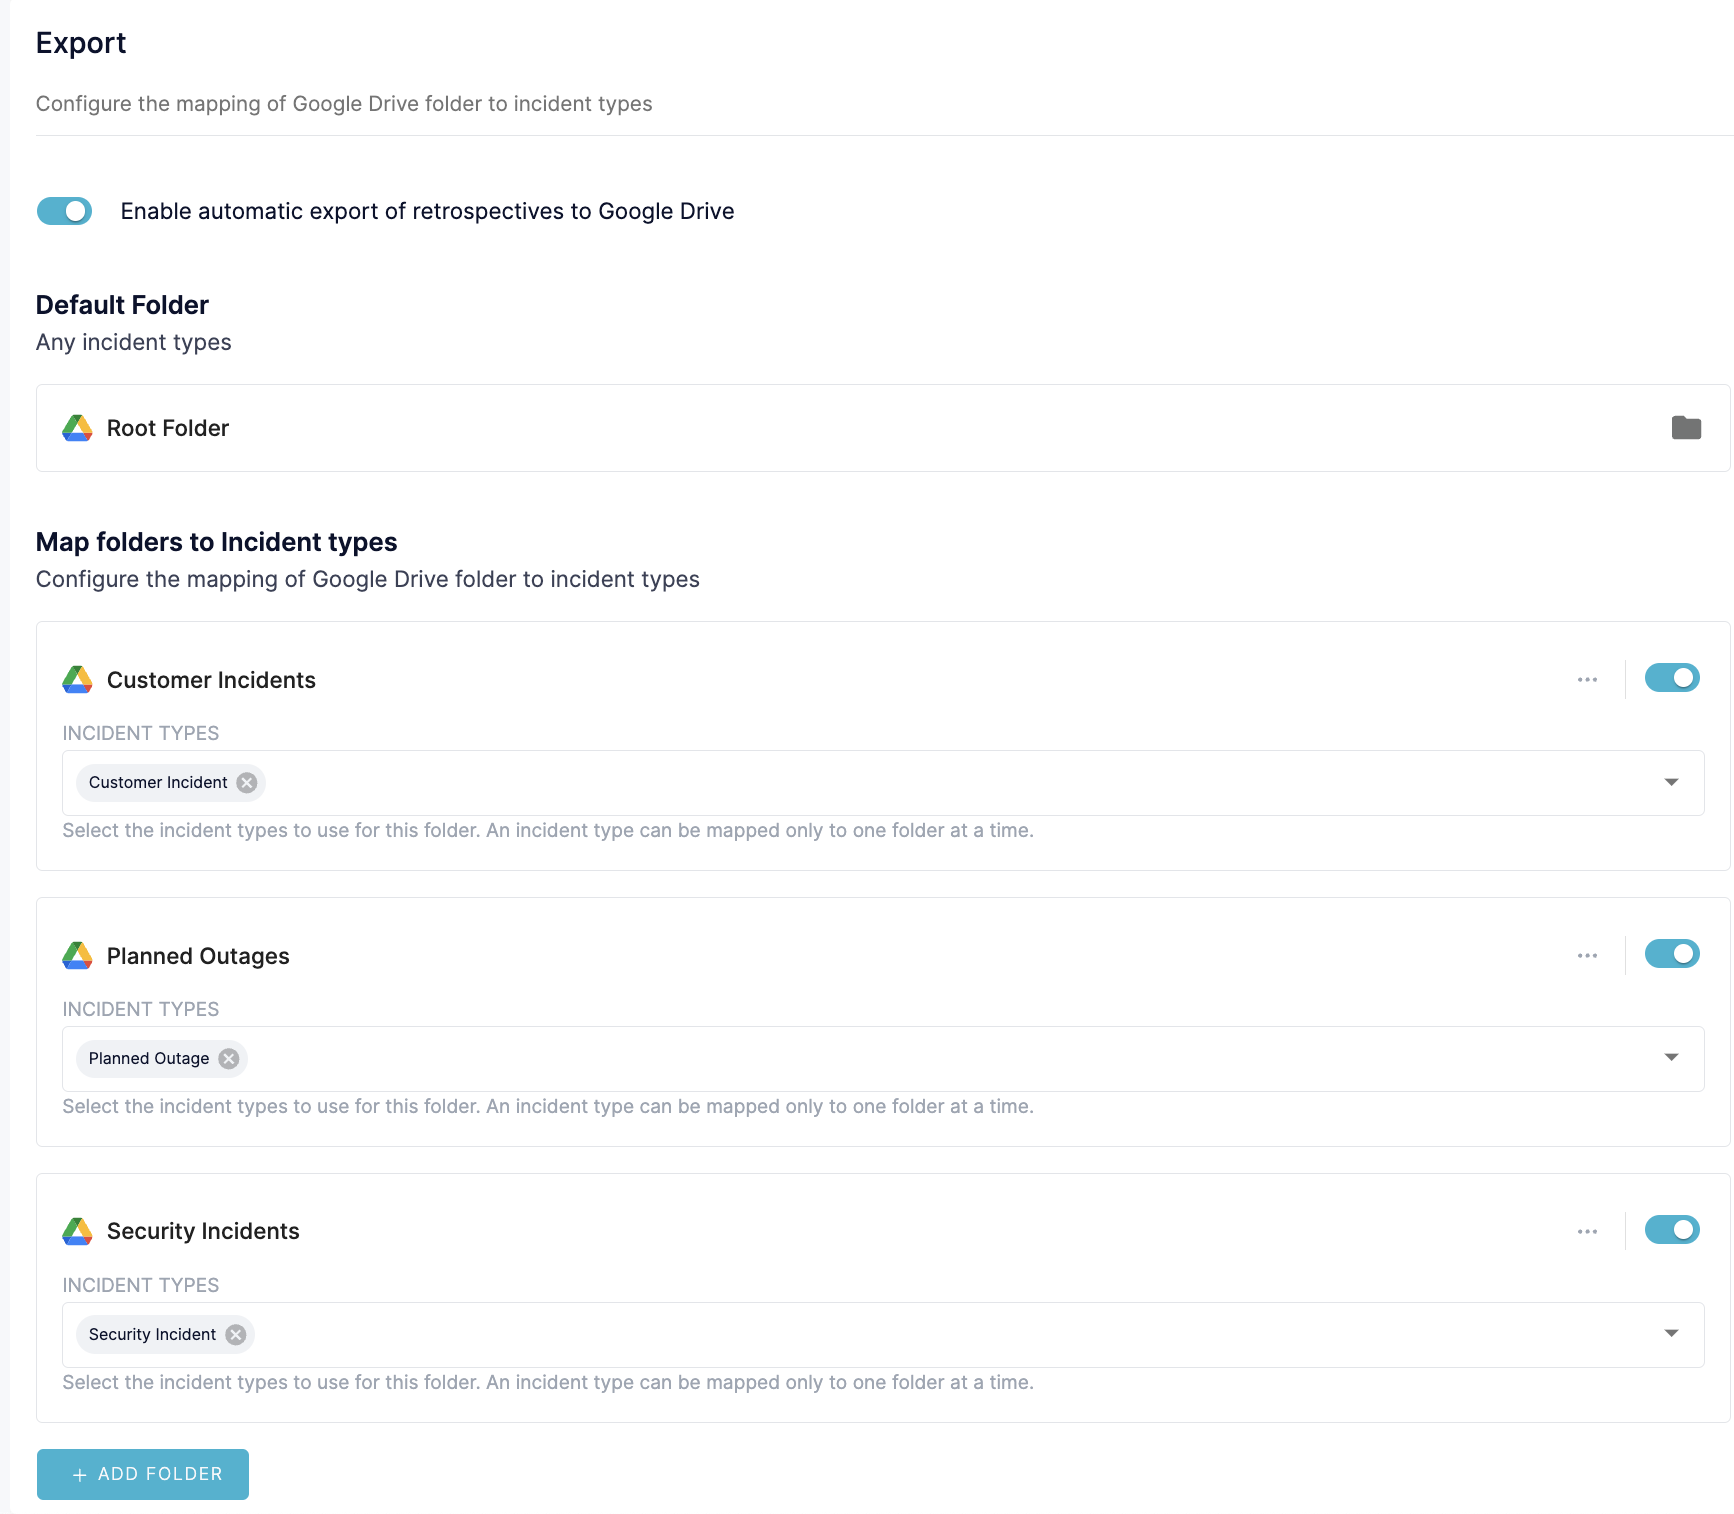
Export Retrospectives to Google Docs with more flexibility and security

Export Enterprise Reliability reports to keep your teammates in the loop
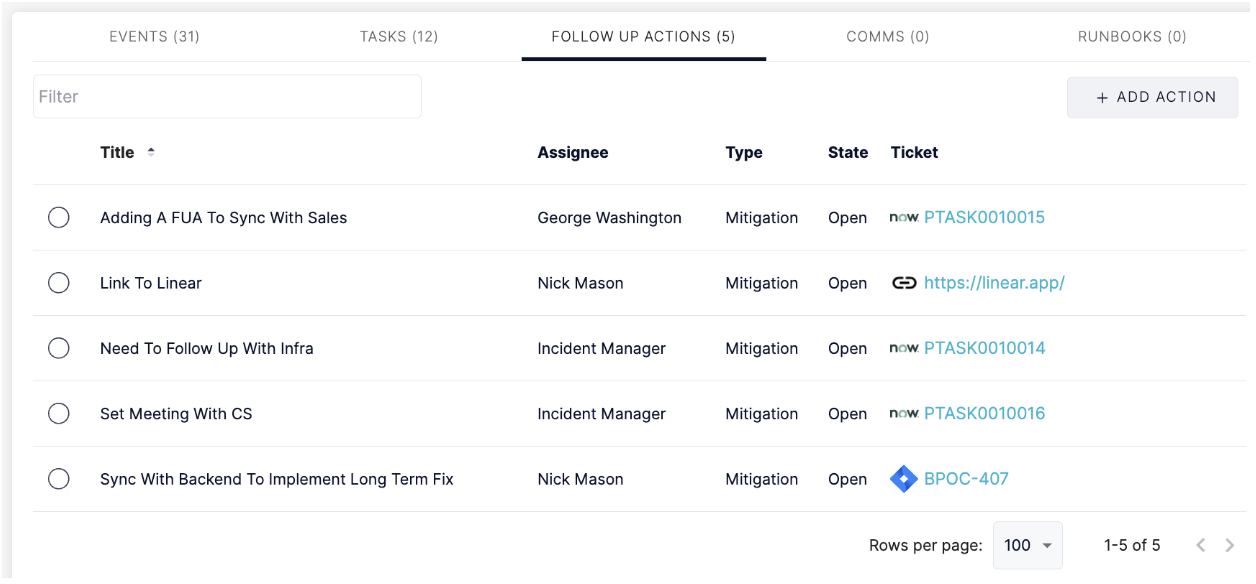
Capturing follow up actions in Blameless is easier than ever!
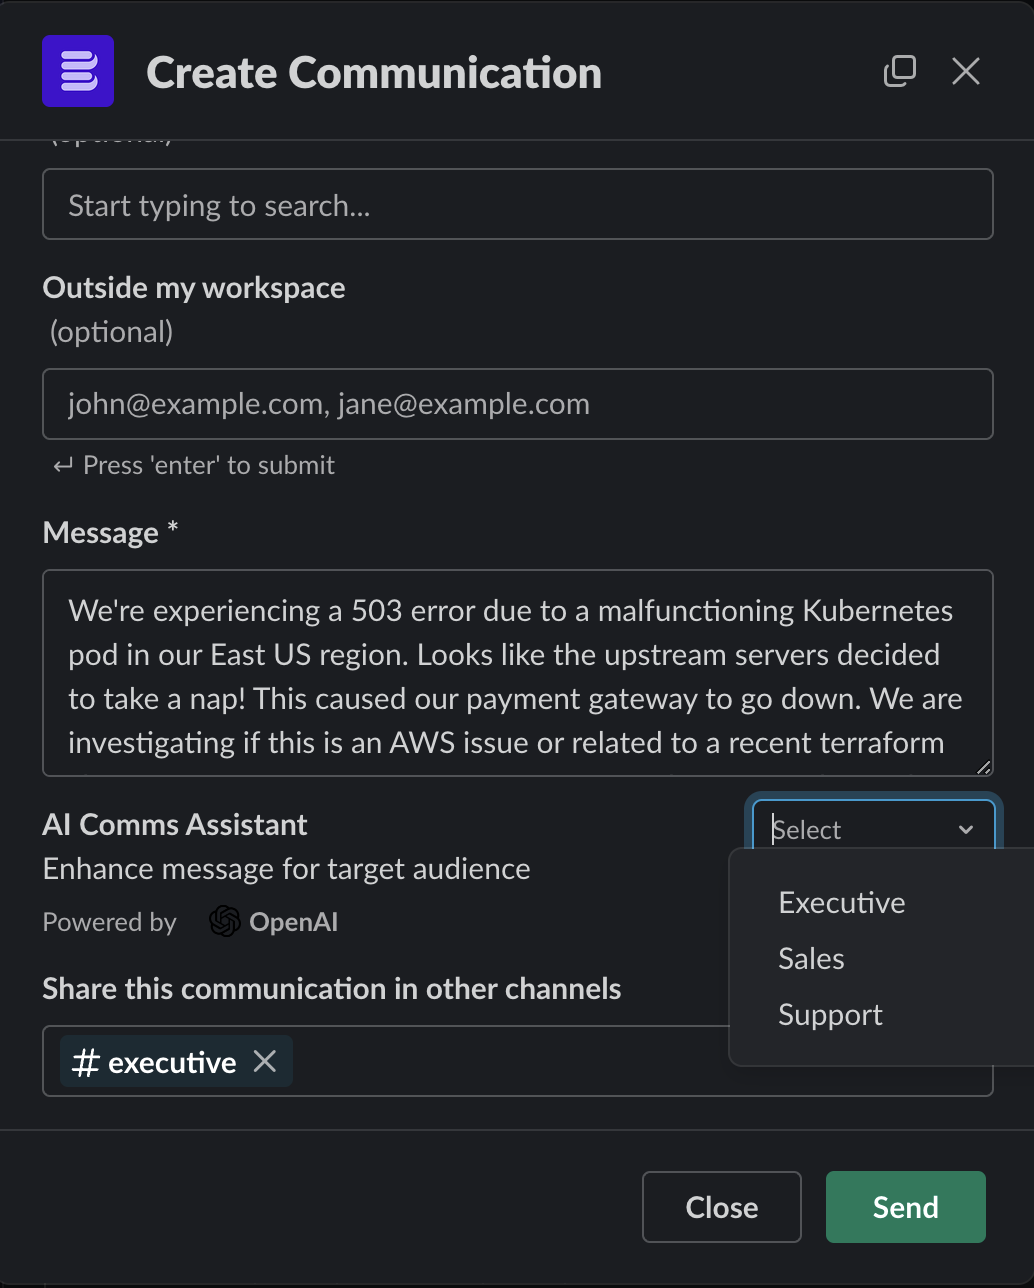
Generate Swift and Powerful Incident Updates using Comms Assistant™
Configure Blameless Settings via Terraform!
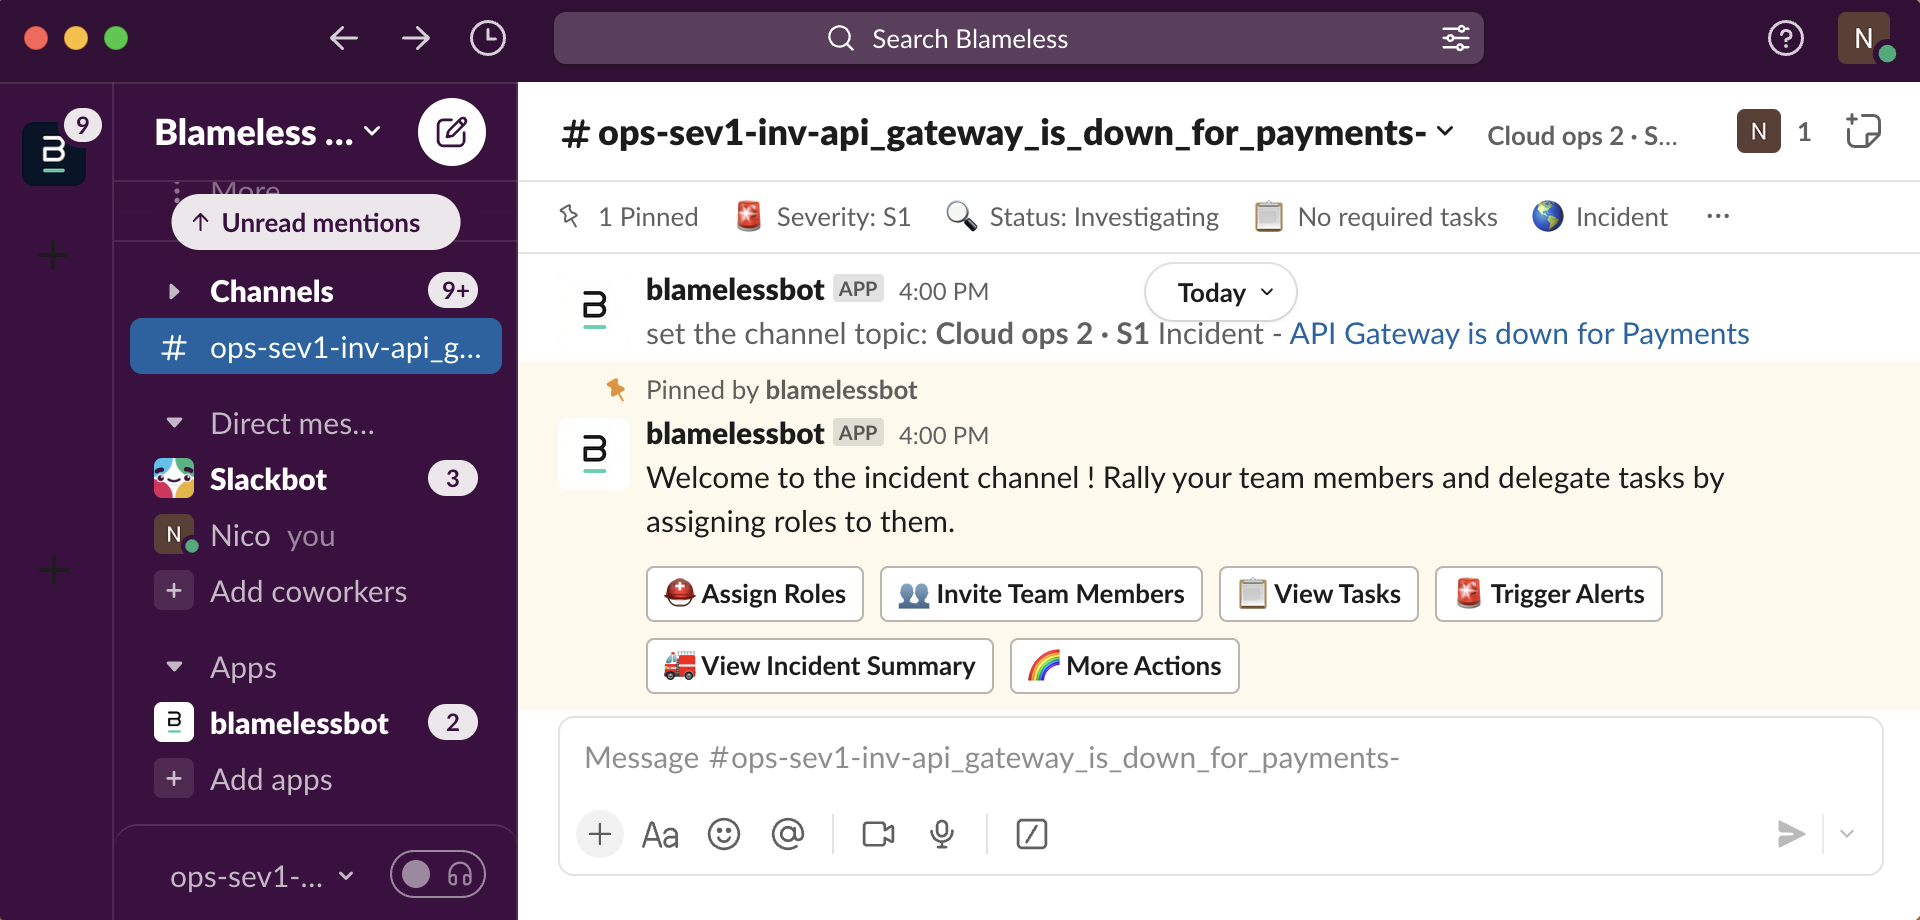
Take action as soon as you join the Incident in Slack
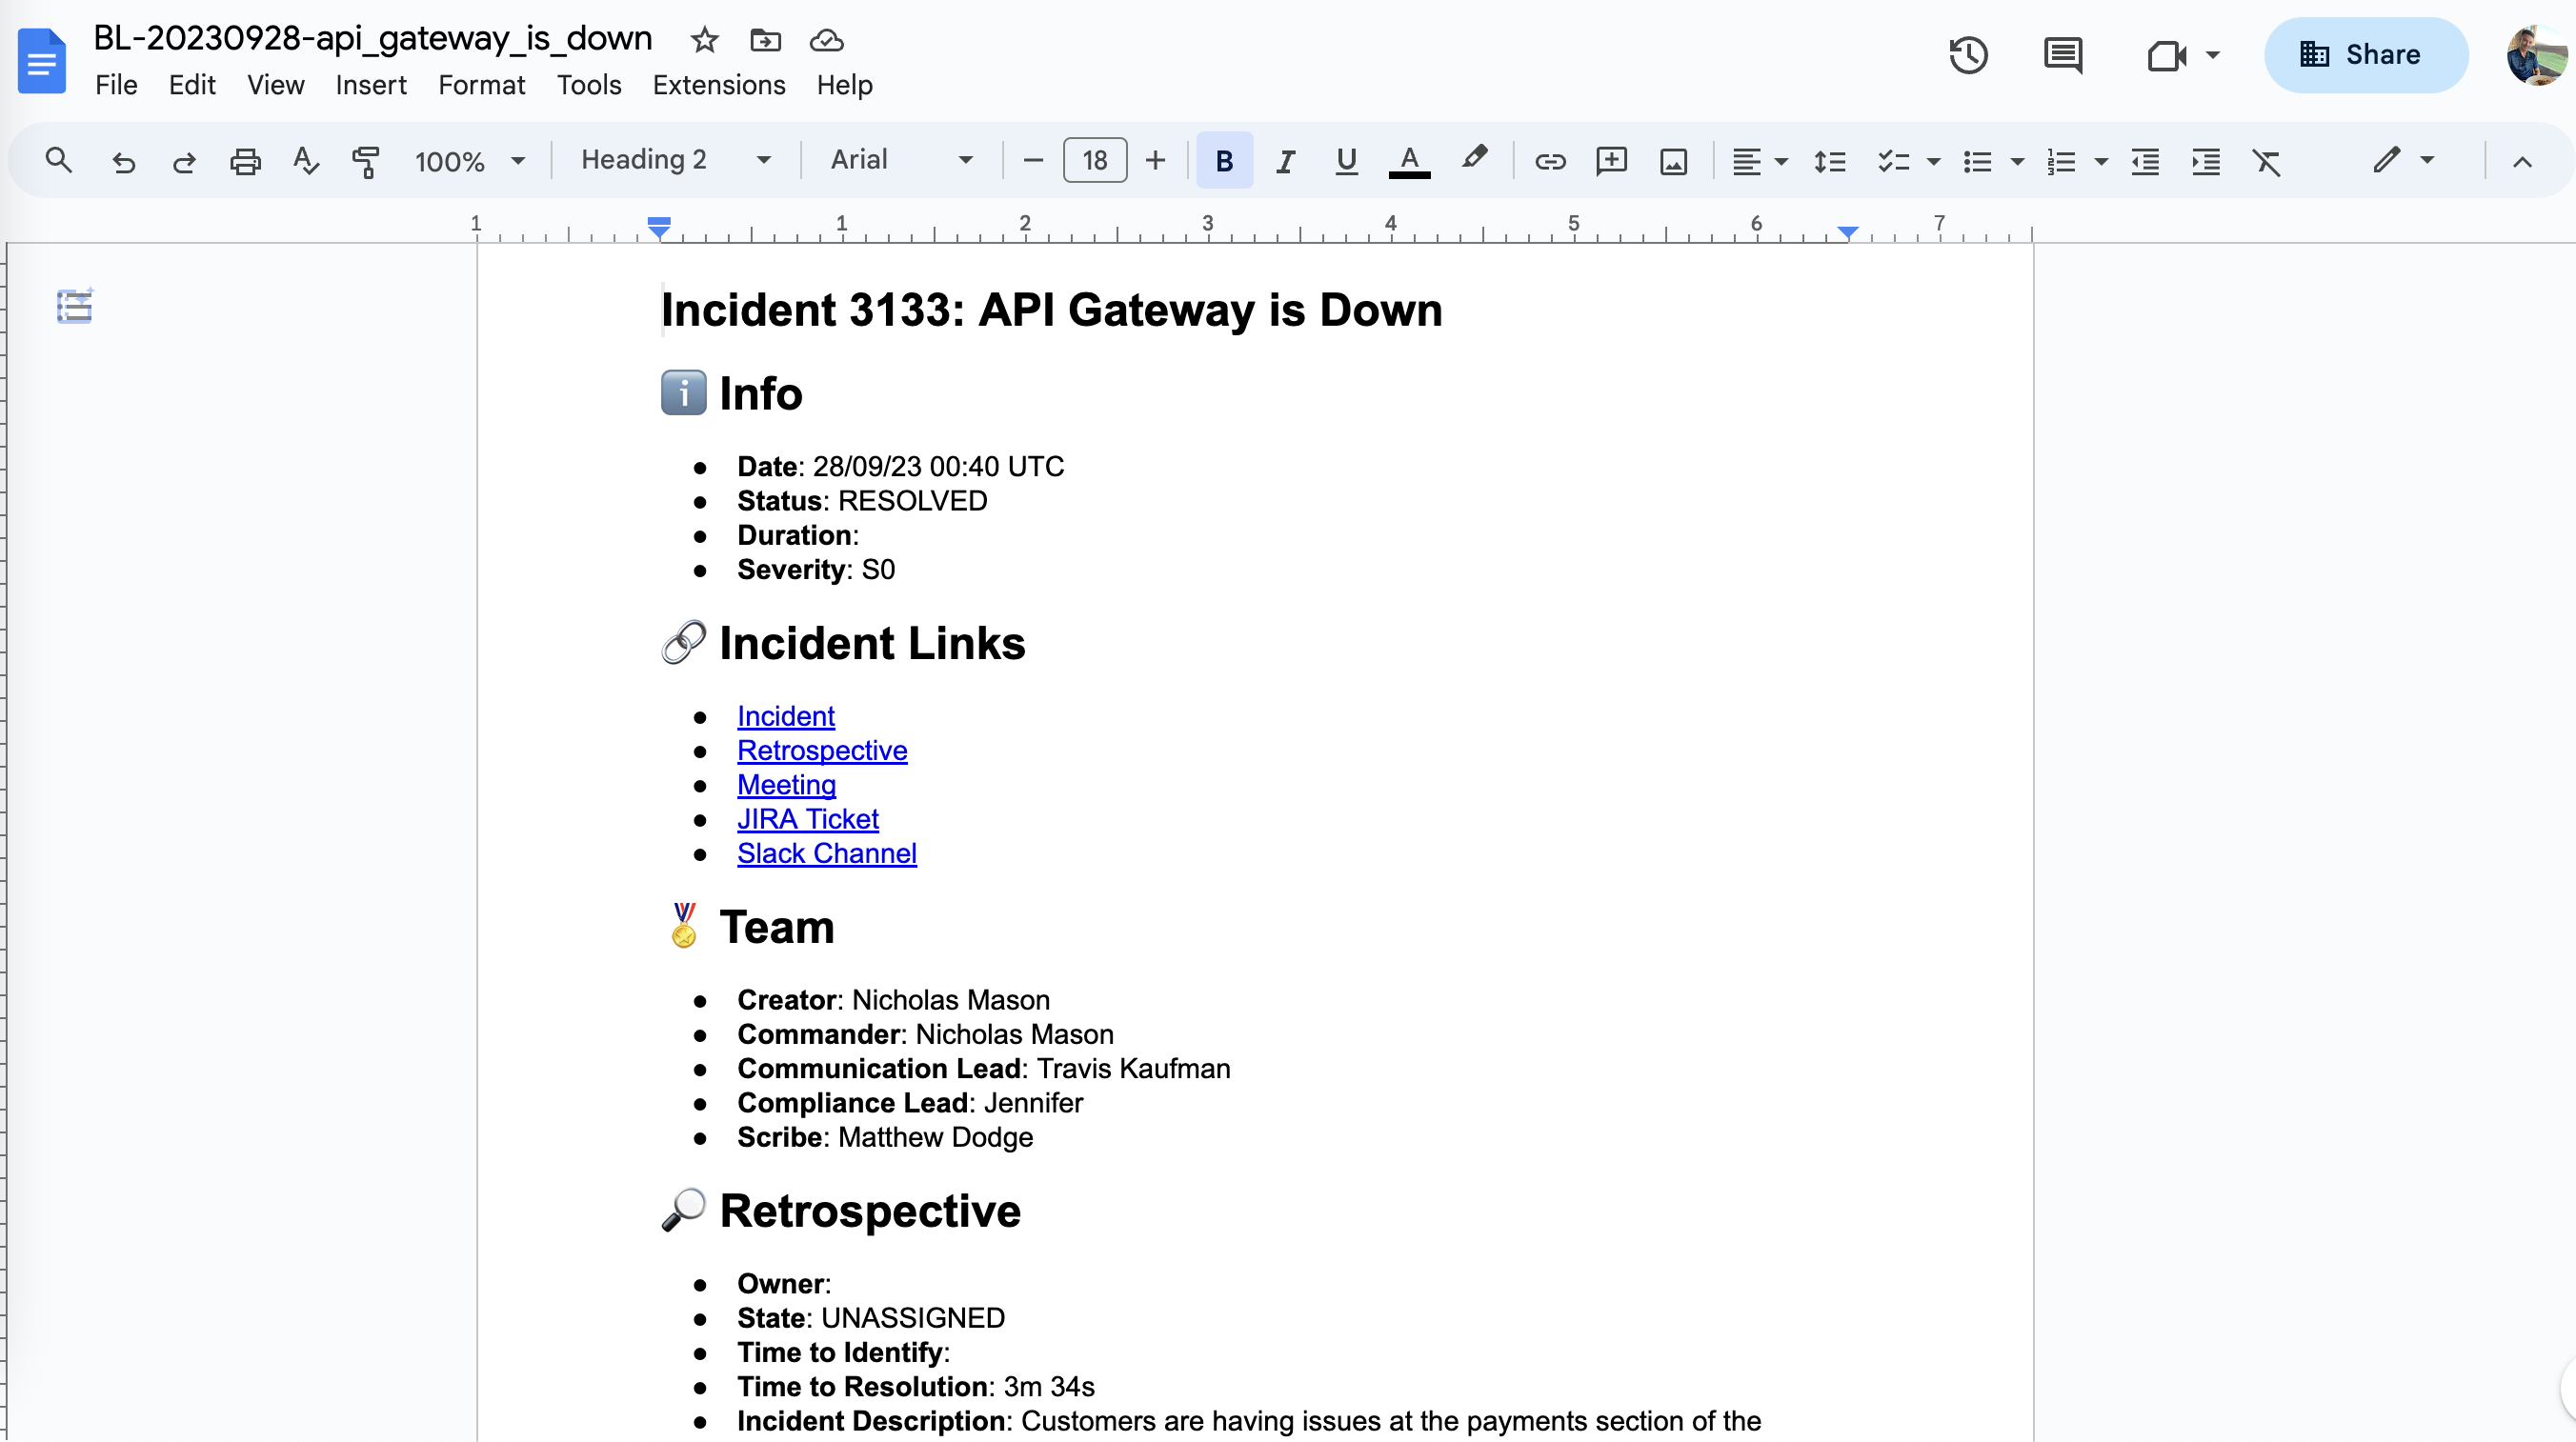
Collaborate on Retrospectives using Google Docs
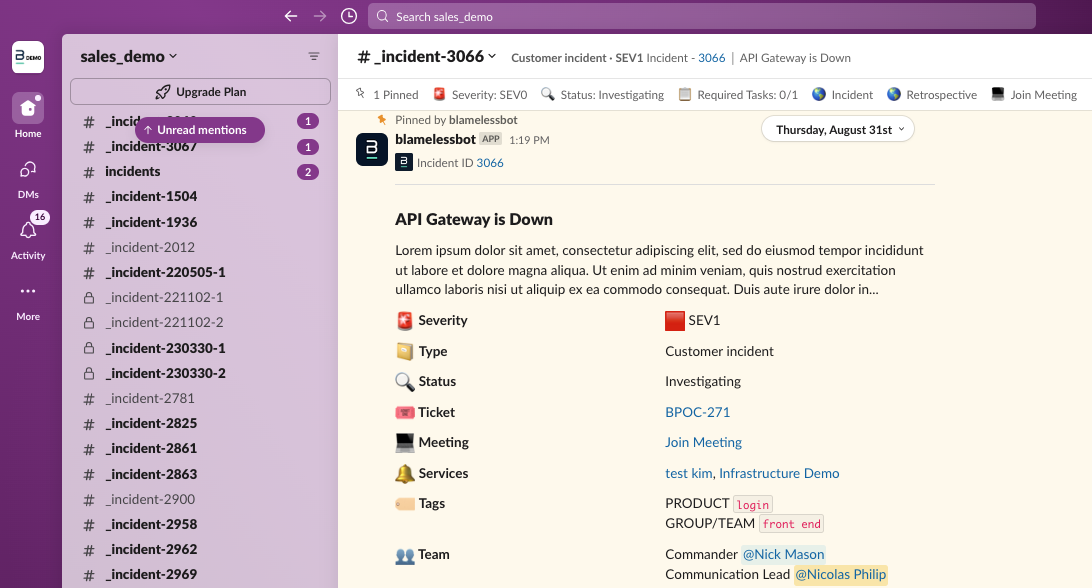
New Dynamic Bookmarks in Slack
Slack - Customizable start incident modal
Role-Based Access Control
Self-serve API Keys for authenticating services with Blameless
Role-Based Access Control